
Supplies
Scrap kit of choice - I am using the lovely "All About Love" by BabyCakes Scraps which can be purchased from her blog, Creative Scraps, Cotton Candy Kreations and Aussie Scraps (full list available on her blog)
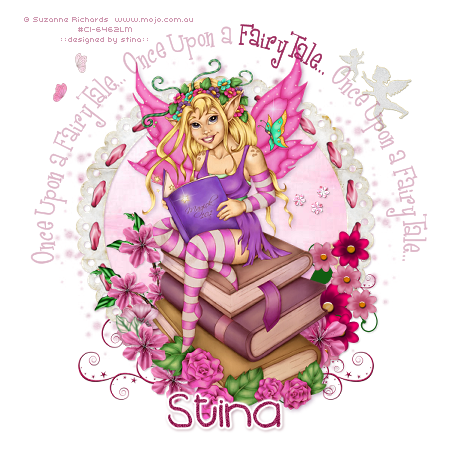
Tube of choice - I am using the delightful artwork of Suzanne Richards which can be purchased from CILM
Tube of choice - I am using the delightful artwork of Suzanne Richards which can be purchased from CILM
**PLEASE DO NOT USE HER ARTWORK WITHOUT THE APPROPRIATE LICENCE**
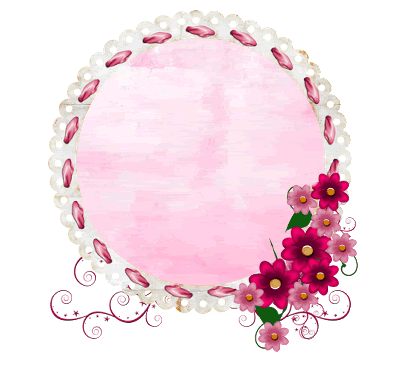
Frame by Cinnamon Scraps from her "All About Love" kit
WSL_Mask1 by Chelle
Fonts of choice - I am using Girls Are Weird and 2Peas Blueberry Pie
Plugin: Eye Candy 4000 Gradient Glow (optional)
~ Step 1 ~
Open a new blank 600 x 600 canvas flood filled white
Paste AllAboutLoveFrame as new layer
Resize by 65%
With your magic wand click inside the frame
Selections / Modify / Expand by 10
Paste Soft Pink Paper as new layer
Move below Frame
Selections / Invert
Delete
Deselect
Resize by 65%
With your magic wand click inside the frame
Selections / Modify / Expand by 10
Paste Soft Pink Paper as new layer
Move below Frame
Selections / Invert
Delete
Deselect
Duplicate and set blend mode to Multiply
Paste FancyDoodle as new layer
Resize by 50%
Move below Frame
Resize by 50%
Move below Frame
Paste ClusterFrame as new layer
Resize by 30%
With your Eraser Tool carefully erase out ALL PARTS of the frame - you may have to zoom in to see better
Position to the lower right
Resize by 30%
With your Eraser Tool carefully erase out ALL PARTS of the frame - you may have to zoom in to see better
Position to the lower right
~ Step 2 ~
Paste your tube as a new layer
Resize as necessary
Position in the centre of frame
Resize as necessary
Position in the centre of frame
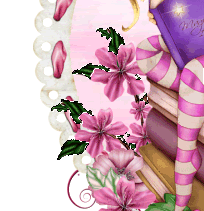
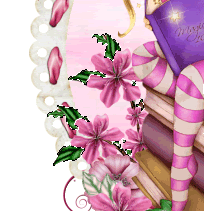
Paste BlossomWithLeaves as new layer
Resize by 25% then Image / Mirror
Position to the left
Resize by 25% then Image / Mirror
Position to the left
Paste PrettyPinkFlower as new layer
Resize by 15%
Position to the left behind flower and books
Resize by 15%
Position to the left behind flower and books
Paste BlossomBranch as new layer
Image / Rotate by 20 to the right
Resize by 40%
Position tucked behind tube and flowers
Image / Rotate by 20 to the right
Resize by 40%
Position tucked behind tube and flowers
Select your magic wand with the following settings:

Carefully select inside the dark green areas of the leaves on the branch (zoom in for a better look if you prefer)
When each of the desired areas have been selected, go to
Layers / Promote Selection to Layer
Deselect
Set your blend mode to Screen and duplicate
When each of the desired areas have been selected, go to
Layers / Promote Selection to Layer
Deselect
Set your blend mode to Screen and duplicate
Paste Cluster as new layer
Resize by 50% and position to the right in the frame
Resize by 50% and position to the right in the frame
Paste DoubleWings as new layer
Resize by 20% twice
Position to the upper left
Resize by 20% twice
Position to the upper left
Paste PinkDoubleWings as new layer and repeat resizing as above
Image / Mirror and position alongside first set of wings to the left
Image / Mirror and position alongside first set of wings to the left
Paste LargeCupid as new layer
Resize by 40% twice
Position in upper right
Resize by 40% twice
Position in upper right
Duplicate then resize by 50%
Image / Mirror and position with other cupid
Lower the opacity of both these layers to 60
Image / Mirror and position with other cupid
Lower the opacity of both these layers to 60
Apply slight drop shadows to your layers
Then crop and resize
Then crop and resize
~ Step 3 ~
Activate your background
Paste SpongeTexturePaper as new layer
Paste SpongeTexturePaper as new layer
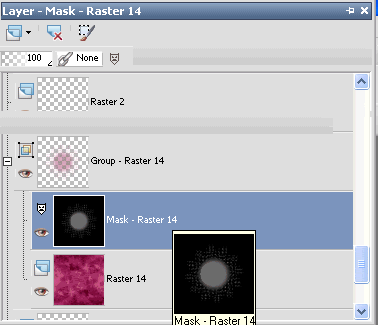
Layers / New Mask Layer / From Image
Locate WSL_Mask1
SOurce Luminance
OK
Locate WSL_Mask1
SOurce Luminance
OK
In your Layer Palette locate the Mask Layers
Click on the + to open the Group
Activate the actual Mask layer itself
Click on the + to open the Group
Activate the actual Mask layer itself
Resize by 105%
Then Layers / Merge / Merge Group
Select your Preset Shapes Tool with your foreground coloured and background null
Choose Ellipse and draw out a circle around your tag
Choose Ellipse and draw out a circle around your tag
Select your Text Tool and choose a font
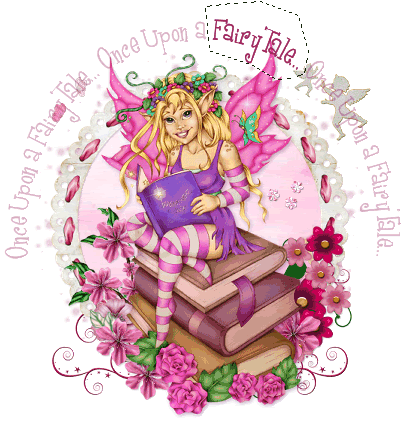
On the curve type out "Once upon a FairyTale..." or anything you choose
On the curve type out "Once upon a FairyTale..." or anything you choose
In your layer palette open the Vector Layer and close off the Ellipse
Convert to raster layer
Lower the opacity of this layer to about 35
Convert to raster layer
Lower the opacity of this layer to about 35
Grab your Freehand Tool and draw around one of the words that stand out in the text
Layers / Promote Selection to Layer
You will see this layer revert to its normal opacity and therefore stands out from the rest of the text
Layers / Promote Selection to Layer
You will see this layer revert to its normal opacity and therefore stands out from the rest of the text
Deselect
Select another font, type out your name and add any effects you wish
(I used some Noise, Gradient Glow on my usual settings and a slight drop shadow)
(I used some Noise, Gradient Glow on my usual settings and a slight drop shadow)
Add your © copyright, licence and watermark then save as a GIF or JPG and you're done!
Thanks for trying my tutorial
::st!na::
© Tutorial written by Stina on 26th Febraury 2009
All rights reserved
No comments:
Post a Comment