
Supplies
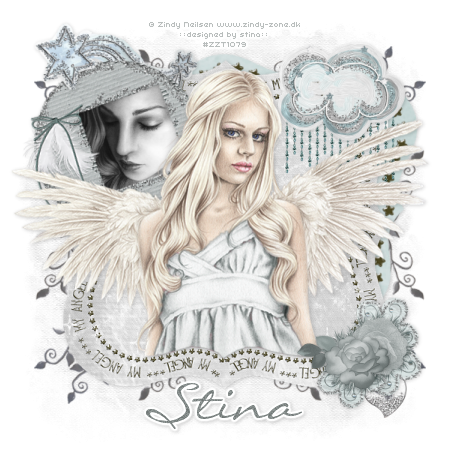
Scrap kit of choice - I am using "Angelic" by Creationz by Jo which can be purchased from Creative Scraps
Tubes (or 1 image) of choice - I am using the lovely artwork of Zindy Neilsen which can be purchased from her store
**PLEASE DO NOT USE HER ARTWORK WITHOUT THE APPROPRIATE LICENCE**
Becky_Mask022 (supplied)
Becky_Mask022 (supplied)
Font of choice - I am using LiorahBT
Plugin: Simple / Top Left Mirror (supplied)
Plugin: Eye Candy 4000 Gradient Glow (optional)
My Supplies here
~ Step 1 ~
Open a new blank canvas 600 x 600 flood filled white
Open Bracket1 and paste as new layer
Resize by 80%
Resize by 80%
Paste Bracket2 as new layer
Resize by 60%
Image / Rotate by 10 to the right
Move up and to the right, positioning behind the main bracket layer
Resize by 60%
Image / Rotate by 10 to the right
Move up and to the right, positioning behind the main bracket layer
Paste Frame2 as new layer
Image / Rotate by 20 to the left
Resize by 30% and place in top left
Image / Rotate by 20 to the left
Resize by 30% and place in top left
Open one of your tubes or image and paste it as a new layer
Resize it to fit in the frame
Move it below the frame layer and position
Image / Rotate by 20 to the left
Resize it to fit in the frame
Move it below the frame layer and position
Image / Rotate by 20 to the left
Activate Frame layer
Using your magic wand select the inside of the frame
Selections / Modify / Expand by 10
Selections / Invert
Activate tube/image layer then delete
Deselect
Using your magic wand select the inside of the frame
Selections / Modify / Expand by 10
Selections / Invert
Activate tube/image layer then delete
Deselect
~ Step 2 ~
Paste your main tube as a new layer
Resize as necessary
Resize as necessary
Now we need to trim the bottom so lower the opacity of your tube layer so we can see what we're doing
With your Freehand Tool draw carefully along the stars on the Bracket we are using as the background
Selections / Modify / Feather by 2
Hit delete TWICE
Deselect
Turn the opacity back to normal
Hit delete TWICE
Deselect
Turn the opacity back to normal
If your tube is a different colour to your tag use your magic wand with a tolerance set to about 20
(depending on the lightness/darkness in your tube)
Select the area of clothing as I have in mine
Selections / Modify / Feather by 2
(this will soften the selection)
Layers / Promote Selection to Layer
(depending on the lightness/darkness in your tube)
Select the area of clothing as I have in mine
Selections / Modify / Feather by 2
(this will soften the selection)
Layers / Promote Selection to Layer
Select your Change to Target Brush in your Tool Options bar and set your foreground to a colour matching the rest of your tag
Duplicate then set blend mode to Multiply
Deselect
Deselect
~ Step 3 ~
Paste Cloud as new layer
Resize by 35%
Place below tube layer in upper right
Resize by 35%
Place below tube layer in upper right
Paste Rose1 as new layer
Resize by 17%
Place in lower left
Resize by 17%
Place in lower left
Paste Silk Flower as new layer
Resize by 15%
Position beside Rose!
Resize by 15%
Position beside Rose!
Paste CupidsCartFlower as new layer
Resize by 23%
Place below Rose
Duplicate and repeat with other flower
Resize by 23%
Place below Rose
Duplicate and repeat with other flower
Paste Gem Flower as new layer
Resize by 20%
Position behind the Roses
Duplicate and position
Duplicate again and repeat
Resize by 20%
Position behind the Roses
Duplicate and position
Duplicate again and repeat
Paste Gem Curtain as new layer
Resize by 28%
Position over the cloud in upper right
Use your Selection Tool to draw a rectangle around the excess
Then delete and deselect
Resize by 28%
Position over the cloud in upper right
Use your Selection Tool to draw a rectangle around the excess
Then delete and deselect
Move this layer to BELOW the Cloud
Paste Dust Charm2 as new layer
Resize by 30%
Position behind flowers
Resize by 30%
Position behind flowers
Paste Star as new layer
Resize by 30%
Position over frame in upper left
Resize by 30%
Position over frame in upper left
On your Frame later use your Magic Wand to select the area outside of the frame
Selections / Modify / Expand by 2
Selections / Invert
Selections / Modify / Feather by 2
Selections / Modify / Expand by 2
Selections / Invert
Selections / Modify / Feather by 2
Using your Eraser Tool erase just the area of the star trail partially covering the frame
Leave the Star overlapping
Leave the Star overlapping
Paste Stardust2 as new layer
Duplicate and Image / Mirror
Layers / Merge / Merge Down
Set blend mode to Screen
Duplicate and Image / Mirror
Layers / Merge / Merge Down
Set blend mode to Screen
Apply a drop shadow to your element and tube layers:
H & V - 1.00
Opacity - 20
Blur - 8.00
Colour - #000000
H & V - 1.00
Opacity - 20
Blur - 8.00
Colour - #000000
~ Step 4 ~
Paste SwirlChrome as new layer
Resize by 50% then Image / Rotate by 20 to the left
Position in upper right corner
Duplicate
Image / Mirror
Image / Rotate by 90 to the right
Position with the other swirlie
Once happy with positioning
Layers / Merge / Merge Down
Resize by 50% then Image / Rotate by 20 to the left
Position in upper right corner
Duplicate
Image / Mirror
Image / Rotate by 90 to the right
Position with the other swirlie
Once happy with positioning
Layers / Merge / Merge Down
Layers / Arrange / Send to Bottom
(this should send it to the layer above your white background)
(this should send it to the layer above your white background)
Image / Mirror
Effects / Plugins / Simple / Top Left Mirror
Resize by 95% Bicubic resample
Position to your liking
Effects / Plugins / Simple / Top Left Mirror
Resize by 95% Bicubic resample
Position to your liking
Paste Paper4 as new layer
Layers / New Mask Layer / From Image
Locate Becky_Mask022
Source luminance checked
OK
Layers / New Mask Layer / From Image
Locate Becky_Mask022
Source luminance checked
OK
Layers / Merge / Merge Group
Crop and resize
Select your Text Tool and font of your choice
I am using LiorahBT
Size - 48
Colour - #b5bab9
Add a Gradient Glow (optional)
Apply a drop shadow
I am using LiorahBT
Size - 48
Colour - #b5bab9
Add a Gradient Glow (optional)
Apply a drop shadow
Add your copyright, licence (if applicable) and watermark and you're done!
Thanks for trying my tutorial
::St!na::
© Tutorial written by Stina on 22nd February 2009
All rights reserved
No comments:
Post a Comment