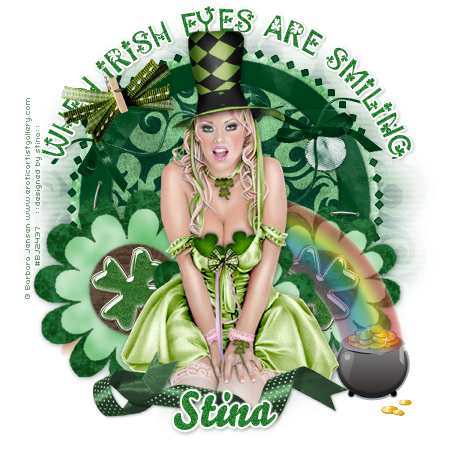
Supplies
Scrap kit of choice - I am using "Just My Luck" by Pimp'd Designs which can be purchased from Paradise 4 Scrappers
Tube of choice - I am using the lovely artwork of Barbara Jensen which can be purchased from her site
Template #20 by Pookers Creations
WSL_Mask33 by Chelle
Fonts of choice - I am using PattyDay and Bello Script (which are pay fonts)
Plugin: Eye Candy 4000 Gradient Glow
~ Step 1 ~
Open Pooker's Template and resize canvas
Image / Canvas Resize 600 x 600
Activate Background layer and flood fill excess white
Image / Canvas Resize 600 x 600
Activate Background layer and flood fill excess white
With your magic wand click inside Large circle layer
Selections / Modify / Feather by 2
Paste PP05 as new layer
Resize by 70%
Selections / Invert
Delete
Deselect
Selections / Modify / Feather by 2
Paste PP05 as new layer
Resize by 70%
Selections / Invert
Delete
Deselect
Delete Large circle template layer
Click inside Medium circle layer
Selections / Modify / Feather by 2
Paste PP01 as new layer
Resize by 70%
Selections / Invert
Delete
Deselect
Selections / Modify / Feather by 2
Paste PP01 as new layer
Resize by 70%
Selections / Invert
Delete
Deselect
Delete Medium circle template layer
Click inside Small circle layer
Selections / Modify / Feather by 2
Paste PP07 as new layer
Resize by 65%
Selections / Invert
Delete
Deselect
Selections / Modify / Feather by 2
Paste PP07 as new layer
Resize by 65%
Selections / Invert
Delete
Deselect
Delete Small circle template layer
Add a drop shadow to the last two layers:
H & V - 1
Opacity - 50
Blur - 10.00
Colour - #223324
H & V - 1
Opacity - 50
Blur - 10.00
Colour - #223324
Activate Diamond Frame layer
Selections / Float
Selections / Defloat
Selections / Modify / Feather by 2
Paste PP01 as new layer
Selections / Invert
Delete
Deselect
Layers / Merge / Merge Down
Duplicate
Selections / Float
Selections / Defloat
Selections / Modify / Feather by 2
Paste PP01 as new layer
Selections / Invert
Delete
Deselect
Layers / Merge / Merge Down
Duplicate
~ Step 2 ~
Now we'll work on the flowers
Click inside Largeflowerset1
Selections / Modify / Feather by 2
Paste PP04 as new layer
Selections / Invert
Delete twice
Deselect
Selections / Modify / Feather by 2
Paste PP04 as new layer
Selections / Invert
Delete twice
Deselect
Repeat with Largeflowerset 2 & 3
Now click inside Smallflowerset1
Selections / Modify / Feather by 2
Paste PP05 as new layer
Adjust / Blur / Gaussian Blur
Radius - 5.00
Selections / Modify / Feather by 2
Paste PP05 as new layer
Adjust / Blur / Gaussian Blur
Radius - 5.00
Selections / Invert
Delete twice
Deselect
Delete twice
Deselect
Repeat with Smallflowerset2 & 3
Now click inside Flowercircle1
Selections / Modify / Feather by 2
Paste PP10 as new layer
Selections / Invert
Delete ONCE
Deselect
Selections / Modify / Feather by 2
Paste PP10 as new layer
Selections / Invert
Delete ONCE
Deselect
Repeat with Flowercircle 2 & 3
Delete Smallflower template sets and flower circle layers
**KEEP LARGE ONES IN TACT**
**KEEP LARGE ONES IN TACT**
Add a drop shadow to each of the layers:
H & V - 1
Opacity - 50
Blur - 10.00
Colour - #223324
H & V - 1
Opacity - 50
Blur - 10.00
Colour - #223324
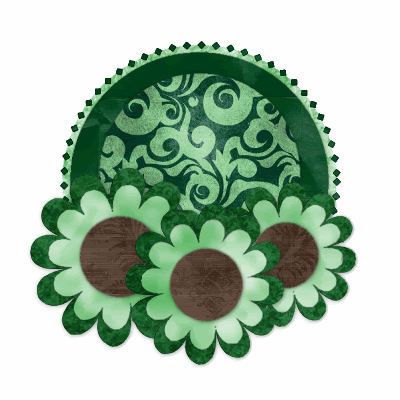
Now you should have something like this:
~ Step 3 ~
Paste Shamrock-01 as new layer
Resize by 50%
Position within the small brown circle layer
Duplicate then Image / Mirror
Position in opposite flower
Resize by 50%
Position within the small brown circle layer
Duplicate then Image / Mirror
Position in opposite flower
Paste Pot-o-gold as new layer
Position to the right
Position to the right
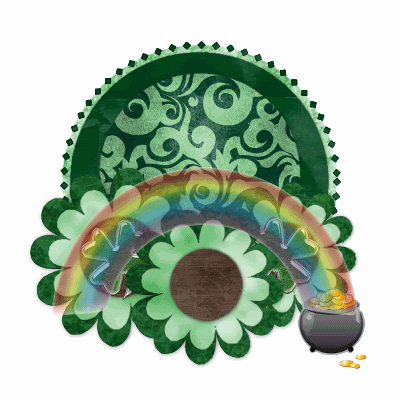
Paste Rainbow as new layer
Resize by 80%
Position with one end on Pot of Gold
Resize by 80%
Position with one end on Pot of Gold
Activate the Large Flower layer on the left
With your magic wand click the inside the flower
Activate the middle large flower layer and click inside
With your magic wand click the inside the flower
Activate the middle large flower layer and click inside
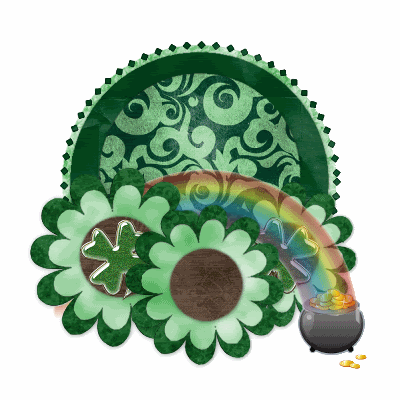
Now activating each layer hit delete to eliminate the rainbow so it looks as though it is going behind the flowers
Paste Green-Ribbon-Bows as new layer
Resize by 90% and position across tag with the bows "joining" the layers
Resize by 90% and position across tag with the bows "joining" the layers
Move this layer below the Rainbow

Paste Ribbon-clipped as new layer
Resize by 50%
Position in upper left
Duplicate then blend mode to Soft Light
Layers / Merge / Merge Down
Resize by 50%
Position in upper left
Duplicate then blend mode to Soft Light
Layers / Merge / Merge Down
Paste your tube as a new layer
Resize if necessary
Add a drop shadow:
H & V - 1
Opacity - 50
Blur - 10.00
Colour - #223324
Resize if necessary
Add a drop shadow:
H & V - 1
Opacity - 50
Blur - 10.00
Colour - #223324
Paste Ribbon-03 as new layer
Image / Rotate by 20 to the left
Resize by 55%
Position at the bottom of the tube
Image / Rotate by 20 to the left
Resize by 55%
Position at the bottom of the tube
With your magic wand click outside of the ribbon
Activate the tube layer and erase the bottom part of the tube protruding below the ribbon
Activate the tube layer and erase the bottom part of the tube protruding below the ribbon
Paste Staple-02 as new layer
Resize by 45%
Position to the right over the flower and a background layer
Duplicate then Image / Rotate 80 to the left
Position over the left flower and background
Resize by 45%
Position to the right over the flower and a background layer
Duplicate then Image / Rotate 80 to the left
Position over the left flower and background
Paste Trash-tag as new layer
Image / Rotate by 20 to the left
Resize by 25%
Position beneath the Green Ribbon and Bows layer
Add a drop shadow:
H & V - 1
Opacity - 60
Blur - 5.00
Colour - #223324
Image / Rotate by 20 to the left
Resize by 25%
Position beneath the Green Ribbon and Bows layer
Add a drop shadow:
H & V - 1
Opacity - 60
Blur - 5.00
Colour - #223324
Crop and resize
~ Step 4 ~
Activate white background layer
Paste PP07 as new layer
Paste PP07 as new layer
Layers / New Mask Layer / From Image
Locate WSL_Mask33
Source luminance
OK
Locate WSL_Mask33
Source luminance
OK
Layers / Merge / Merge Group
Paste PP01 as new layer
Layers / New Mask Layer / From Image
Locate WSL_Mask33 again
Source luminance
OK
Layers / New Mask Layer / From Image
Locate WSL_Mask33 again
Source luminance
OK
Layers / Merge / Merge Group
Lower the opacity of this layer to around 60
Select your Preset Shape Tool on Ellipse
Holding down your shift key draw out a circle
around the outer layer of your tag
Holding down your shift key draw out a circle
around the outer layer of your tag
Select your Text Tool on a font of your choice
I am using Patty Day
I am using Patty Day
Foreground - null
Background - #225a28
Background - #225a28
Position your Text Tool over the circle and type out your text
Position to your liking
In your layer palette open Vector layer
Hide Ellipse and the convert to raster layer
Position to your liking
In your layer palette open Vector layer
Hide Ellipse and the convert to raster layer
Effects / Plugins / Eye Candy 4000 / Gradient Glow with the following settings:
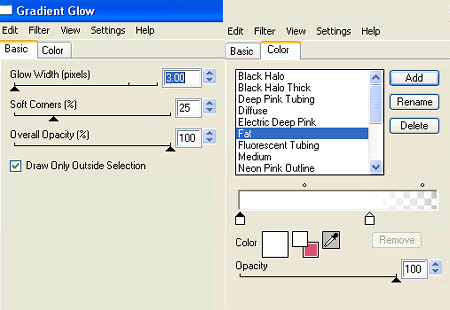
Add a drop shadow:
H & V - 1
Opacity - 30
Blur - 3.00
Colour - #225a28
Repeat similar effect in either the same or a different font for your name
Before converting to raster layer
Objects / Align / Horizontal Centre in Canvas
Then convert to raster layer and continue same steps
Before converting to raster layer
Objects / Align / Horizontal Centre in Canvas
Then convert to raster layer and continue same steps
Add your © copyright, licence and watermark and you're done
Thank you for trying my tutorial
::st!na::
© Tutorial written by Stina on 25th February 2009
All rights reserved

No comments:
Post a Comment