Please email me designed.by.stina@gmail.com with your creations. I'd love to see them.

Thursday, September 29, 2011

The Spideress (with two animated versions)

The Spideress

All tutorials require a basic knowledge of PSP

Supplies

Scrap kit of choice - I am using "Gothic Halloween" by Kittz Kreations
Tube of choice (black and white tube works best) - I am using one by Anna Ignatieva
Font of choice - I am using Addams
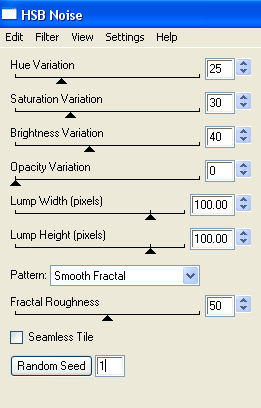
Plugin - Xero / Porcelain
Animation Shop


Open a new 700 x 300 transparent image

Select All
Then Selections / Modify / Contract by 40
Flood fill selection with black

KEEP SELECTED!!

Selections / Modify / Contract by 10
Press Delete

Selections / Modify / Expand by 5
Paste a paper of choice as a new layer
(I used GH-P6)
Move it to below the frame you just made

Selections / Invert
Delete and deselect

Now paste your tube of choice and position to your liking
Move it to the top layer above the frame
Position it so some of the tube overhangs the top of the border frame

With your Magic Wand select the inside of the border frame
Activate your tube layer again and with your Eraser Tool carefully erase the excess AT THE BOTTOM of the tube
Deselect

Effects / Plugins / Xero / Porcelain with the following settings:
Softness - 50
Strength - 128
Brightness - 128
Red Channel - 0
Green Channel - 0
Blue Channel - 100

Now beneath the tube and frame layers add a new raster layer
Use your Selection Tool set to rectangle with Feather on 0
Draw out a rectangle vertically centred and to the left
Try and keep the same amount of distance between the top, bottom and the left to the frame

DBS_sp_01

Now flood fill the selection Black
Duplicate layer
Selections / Modify / Contract by 5
Press delete
Then paste your tube again but mirror it BEFORE pasting it or only the selection mirrors
Selections / Modify / Expand by 3
Selections / Invert
Delete then deselect
Position this layer BELOW the inner frame
Apply the same effect with the Porcelain filter

DBS_sp_02

Paste GH-SkullWeb as new layer and position it BENEATH the inner frame to its centre
Resize by about 90% Bicubic

Paste GH-M2 as a new layer and position to the upper right corner of frame
Activate Background layer and use your Magic Wand to select OUTSIDE the background
On the Moon layer press Delete to remove the excess
Deselect

Now lets go back to the top layer
Paste GH-GothicGoblet as a new layer
Resize by 60% and position to the left just slightly overhanging the outer border

Paste GH-Skull as new layer
Resize by 45% and position next to the Goblet

Paste GH-BloodSpatter as new layer
Resize by 60%
Position to the right to your liking
Duplicate layer, then set blend mode to Multiply
Layers / Merge / Merge Down

Paste GH-PearlString as new layer
Free Rotate by 10 to the left
Resize by 55%
Position to the bottom right and move to the bottom layer
Duplicate and position second layer to the bottom left
Layers / Merge / Merge Down

Paste GH-GemSpider as new layer
Free Rotate by 90 to the right
Resize by 25%
Duplicate three times so that you have FOUR spider layers
Position along the bottom of the frame spaced evenly apart

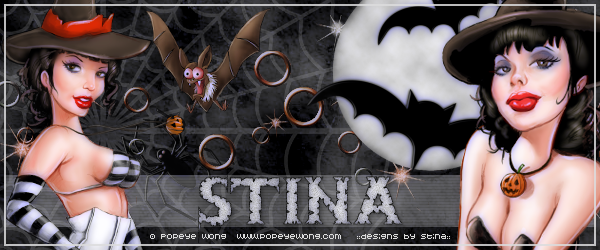
I added my copyright and name at this point, since the next steps are the animation
(You will also need to add a white background as the optimationisation in Animation Shop will create black dithering around the elements in the tag)


ANIMATION #1

Now got to the image layer in the second smaller frame
Duplicate three times
On the first layer keep the opacity at 100%
On the remaining three lower them to:
75
50
25
Turn off the visibility of these layers leaving only the first visible

Edit / Copy Merged
Open Animation Shop
Paste as new animation

In PSP
Close off first layer and open 2nd
Repeat copy

In Animation Shop
Paste AFTER current frame

Repeat steps with remaining frames, turning the last layer off so you have just a black image for the last frame

THEN
In Animation Shop
Select All Frames
Copy, then paste as new animation

Select all frames again
Animation / Reverse frames

Select all frames again
Copy and then activate LAST frame in original animation
Then paste AFTER current frame

Select all frames once again
Animation / Frame Properties
Change to 20

Save as a gif and you're done!


ANIMATION #2

The Spideress02

Now for the second animation!

Hide the bottom Pearl String layer
Unhide the tube in the frame at whatever opacity you choose

Activate your first spider layer
Copy merged

In Animation Shop
Paste as a new animation

Repeat steps for the rest of the spiders, pasting AFTER current frame

Select All frames
Animation / Frame Properties
Change to 35

Now save as a gif and you're done!


Thank you for trying my tutorial!


© Tutorial written by Stina on 29th September 2011

Tuesday, September 20, 2011

Witch Way

Photobucket

All tutorials require a basic knowledge of PSP

Supplies

Tube of choice - I am using 68 Ways to Scream by Popeye Wong
Scrap kit of choice - I am using "Halloween Night" by Foxys Designz which is FTU
Font of choice - I am using Thriller
Plugins:
Xero / Porcelain
Photo Effex / Scanlines
Eye Candy 4000 / HSB Noise

OK, let's get started..........


Open a new transparent image 600 x 250

Paste a paper of your choice onto the canvas and position to your liking
I used Paper7_FD

Paste SpiderWeb_FD as new layer
Position to the left or to your liking
In the layer palette change the Blend Mode to Screen, then Duplicate layer
Layers / Merge / Merge Down

Paste Spider_FD as new layer
Image / Free Rotate / Left by 20.00
Resize by 20%
Position in the web to your liking
Duplicate and set Blend Mode to Screen
Layers / Merge / Merge Down

Paste Glitter_FD
No need to position it as it should fall directly in the centre

Open your tube of choice
For this I am using Popeye Wong's "68 Ways to Scream"

Paste the tube and position it to your liking
Using your Freehand Selection Tool on Point to Point draw around the excess and delete

Paste the tube again and position once again
Draw around the excess once more with your Selection Tool as above and delete the excess

Next with the Selection Tool I cut around the bat in the tube
Then I copied and paste positioning him to my liking on my canvas
Then resized him by about 70%

Paste MoonBats_FD as new layer
Resize by 35% and position partially behind one of the witches in your tube

Now go to the Glitter layer
Add a new raster layer
Choose your Selection Tool and set it to Rectangle
Draw a narrow rectangle the length of the canvas near the bottom

On your material palette select your foreground to a light colour
I used the dropper tool to pick a colour from the moon - #dddddd (which you need to do BEFORE you make your selection)
Flood fill rectangle with your colour
Deselect

Go to Effects / Plugins / PhotEffex / Scanlines
Default settings
Lower opacity to around 35

Go back to your top layer
Add a new raster layer and flood fille with the same light colour
Selections / Select All

Selections / Modify / Contract by 2
Delete the deselect

With your Magic Wand Tool select OUTSIDE this border
Activate your Recangle layer and delete
Then deselect

Now you may want to delete some of the excess of the glitter layer now with your Eraser Tool

Hide the Background, Spider Web and two border layers
Then Layers / Merge / Merge Visible

You should now have four layers -
Background, Spiderweb, Merged layer and the Border

Activate your Merged layer
Effects / Plugins / Xero / Porcelain
Default settings

Repeat Porcelain effect on Border layer
Duplicate then Layers / Merge / Merge Down

At this point I added my credits

Select a font of your choice
I am using Thriller
Make sure your foreground and background are active with the colours of your choice

I am using Black for the foreground with a stroke of 1.0
Background is #dddddd

Type out your name
Add any effects of your choice and apply a drop shadow

Repeat Porcelain effect altering the Blue Channel to 100

Now let's animate!

First hide your background layer
Then merge the other layers together

Now activate your background layer
Duplicate twice
Hide the last two and activate the first layer

Effects / Plugins / Eye Candy 4000 / HSB Noise
with the following settings:
Photobucket

Now activate the second layer
Repeat the plugin effect changing the Random Seed

Activate the third layer and repeat again

Go over each layer with the Porcelain effect changing the Blue Channel back to 255

Now hide background layers 2 and 3 once again leaving the first background layer visible with the Merged layer

Edit / Copy Merged

Open Animation Shop
Paste as new animation

In PSP
Activate second background layer and Copy Merged

In Animation Shop
Paste after Current Frame

In PSP
Activate third background later and Copy Merged

In Animation Shop
Paste after Current Frame

Select all frames
ALT + Enter to open the Frame Properties box
Change to 25

Now save as a GIF and you're done!

Thank you for trying my tutorial.


Here is a still version in PNG format
Photobucket

And here is another version using the same tube differently:
Photobucket

© Tutorial written by Stina 20th September 2011