Please email me designed.by.stina@gmail.com with your creations. I'd love to see them.

Showing posts with label Cinnamon Scraps. Show all posts

Thursday, June 4, 2009

Pinkalicious Gothalicious

 
Supplies
 
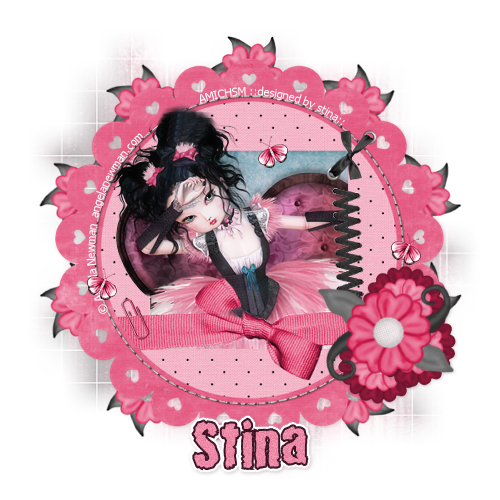
Scrap kit of choice - I am using "Pinkalicious" which is a freebie by Cinnamon Scraps
Tube of choice - I am using the artwork of Angela Newman which can be purchased with a licence from Artistic Minds Inc
**PLEASE DO NOT USE HER ARTWORK WITHOUT THE APPROPRIATE LICENCE**
WSL_Mask84 by Chelle available from her blog
Font of choice - I am using 2 Peas Bad Attitude
Plugins: Mura Meister Copies, Eye Candy 4000 Gradient Glow (for text) and Xenofex 2 Constellation
 

Ready? Let's begin....
 
 
Open a 600 x 600 blank canvas flood-filled white
 
Paste Frame02 as new layer
Resize by 80%
 
Select inside the Frame with your Magic Wand
Selections > Modify > Expand by 10
Paste Paper of choice as new layer
Selections > Invert
Delete
 
KEEP SELECTED!!
 
Paste Tube as new layer
Position beneath Frame
Duplicate, then
Layers > Arrange > Move Up
 
Activate bottom tube layer again
Delete
 
KEEP SELECTED!!
 
Activate top tube layer
Selections > Modify > Expand by 10
Erase excess around Frame, leaving some to overhang
You may need to reduce the size of your eraser in places
 
 
I also used the Clone Brush to give the girl some more hair where the tube/image cut off *g*
 
Paste a Flower as new layer
Resize by 45%
Position to right of the wrap on the Frame
Duplicate twice and position overlapping each other
 
Paste Flower 04 or 05 as new layer
Image > Rotate by 20 to the left
Resize by 55%
Position over the three flowers then position each to your liking
 
 
Paste EyeletRibbon as new layer
Image > Rotate by 45 to the left
Resize by 35%
Position to your liking
 
Paste PaperClip as new layer
Image > Rotate by 25 to the left
Resize by 35%
Position to liking
 
Paste RibbonEyelet2 as new layer
Resize by 30%
Position to the side and tucked behind Flowers
 
With your Magic Wand Select the PINK ribbon (not the eyelets)
Then go to Adjust > Hue and Saturation > Colourise with Hue and Saturation BOTH set to 0
 
KEEP SELECTED!!
 
 
Layers > Promote Selection to Layer
Set blend mode to Multiply
Layers > Merge > Merge Down
 
Again, Layers > Promote Selection to Layer
Set blend mode to Multiply
Lower opacity slightly to around 70
Layers > Merge > Merge Down
Deselect
 
Paste a Butterfly as new layer
Image > Rotate by 20 to the left
Resize by 15%
Duplicate and position to liking
 
Paste Flower 06 or 07 as new layer
Resize by 45%
 
LEAVE IN POSITION!!
 
Effects > Plugins > Mura Meister > Copies with the following settings:
 
 
Layers > Arrange > Send to Bottom
 
Activate Frame layer
Select the outside of Frame with your Magic Wand
Selections > Invert
Selections > Modify > Contract by 8
 
 
Activate Copies layer and press delete
Deselect
 
Resize tag
 
Paste Paper of choice as new layer
Layers > Arrange > Send to Bottom
 
Layers > New Mask Layer > From Image
Apply WSL_Mask84
Activate Mask layer in Layer Palette and resize by 105%
Layers > Merge > Merge Group
Lower opacity to around 30
 
Select your Text Tool and font of choice
I am using 2Peas Bad Attitude
Foreground - #411728
Background - #ec8aa7
Stroke wodth - 2.0
 
Type out your name
Objects > Align > Horizontal Centre in Canvas
Convert to raster layer
Add some Noise and a small white Gradient Glow
Apply a drop shadow of choice
 
Finally, add your © copyright, licence and watermark, then save as GIF or JPG and you're done!
 

** IF YOU WISH TO ANIMATE PLEASE FOLLOW THESE NEXT STEPS **
 
Activate your Mask Layer
Duplicate twice and rename Sparkle1, Sparkle2 and Sparkle3
 
Hide Sparkle2 and Sparkle3 leaving only Sparkle1 visible
 
Effects > Plugins > Xenofex 2 > Constellation with the following settings:
 

Hide Sparkle1 and activate Sparkle2
Apply the Constellation effect, adjusting the Random Seed
 
Hide Sparkle2 and activate Sparkle3
Apply the Constellation effect again, adjusting the Random Seed once more
 
Now for the animation part!
 
Hide Sparkle2 and Sparkle with only Sparkle1 visible
Edit > Copy Merged
 
Open Animation Shop
Edit > Paste as New Animation
 
Back to PSP
Hide Sparkle1 and activate Sparkle2
Edit > Copy Merged
 
In Animation Shop
Edit > Paste AFTER Current Frame
 
Back to PSP
Hide Sparkle2 and activate Sparkle3
Edit > Copy Merged
 
In Animation Shop
Edit > Paste AFTER Current Frame
 
Now save as a GIF and you're done!
 
Thanks for trying my tutorial!
 
::st!na::
 
 
Here is a non-animated version:


© Tutorial written by Stina on 4th June 2009
All rights reserved

Monday, June 1, 2009

Forget the Cowboy


Supplies
 
Scrap kit of choice - I am using the freebie kit "Pretty Denim" by Cinnamon Scraps available from her blog
Tube of choice - I am using the lovely artwork of Zindy S.D. Nielsen available from her store
Wood Textured Scalloped Frame (supplied)
Horseshoe tube (supplied)
WSL_Mask33 by Chelle available from her blog
Fonts of choice - I am using HorndonD and Bud Easy
Plugins: Mura Meister Copies, Xenofex Constellation and Eye 4000 Gradient Glow (optional, for text)


Ready? Let's begin....
 
 
Open a new 600 x 600 blank canvas flood-filled white
 
Paste a Frame of choice as new layer - I am using a wooden-textured Scalloped Frame (supplied)
Resize by 80%
 
Select inside the Frame with your Magic Wand
Selections > Modify > Expand by 5
Add new raster layer
Paste Paper of choice INTO selection
Deselect
Layers > Arrange > Move Down
 
Paste tube of choice as new layer
Resize as necessary and position
 
Select inside the Frame with Magic Wand again
Selections > Modify > Contract by 2
Selections > Modify > Feather by 2
Selections > Invert
 
Carefully erase any excess of your Tube leaving some overhang
 
 
Deselect
 
Turn the visibility off the Tube layer so we can see what we're doing behind it
 
Paste StitchedFlower as new layer
Resize by 10%
 
LEAVE IN POSITION!!
 
Paste Flower03 as new layer
Resize by 10%
 
LEAVE IN POSITION!!
 
Layers > Merge > Merge Down
 
Effects > Plugins > Mura Meister > Copies with the following settings:
 
 
Paste a Bow as new layer
Resize by 50% (or thereabouts)
Position to the lower right of Frame
Duplicate, then Image > Mirror
 
Paste a Button as new layer
Resize by 70%
Position over the centre of the Bow
Duplicate, then Image > Mirror
 
Paste Horseshoe as new layer
Image > Mirror
Image > Rotate by 10 to the left
Resize by 28%
Adjust > Sharpness > Sharpen
Position on the Frame to liking
 
Paste Staple as new layer
Resize by 70%
Duplicate, then Layers > Merge > Merge Down
 
Duplicate again, then set blend mode to Screen
Layers > Merge > Merge Down
 
Duplicate once more
Image > Rotate by 40 to the left
Position on the Horseshoe to liking
 
 
Paste Lace as new layer
Layers > Arrange > Send to Bottom
 
Paste StitchedFlower as new layer again
Resize by 20%
 
LEAVE IN POSITION!!
 
Paste Flower03 as new layer again
Resize by 20%
 
LEAVE IN POSITION!!
 
Layers > Merge > Merge Down
 
Effects > Plugins > Mura Meister > Copies with the following settings:
 
 
Resize by 450 x 450
 
Image > Canvas Resize 500 x 500 centred
 
 
Paste Paper of choice as new layer
Layers > Arrange > Send to Bottom
 
Layers > New Mask Layer > From Image
Apply WSL_Mask33
OK
Layers > Merge > Merge Down
 
Select Preset Shape Tool and set to Ellipse
With your Foreground a dark colour and background on NULL draw out a circle around your Frame
Objects > Align > Centre in Canvas
 
Select your Text Tool and font of choice
I am using HorndonD
Text colour to match tag - I am using #597a9b
 
Type your Text on the curve and position to liking
Open the Vector Layer in the Layer Palette and hide the Ellipse
Convert to raster layer
Lower opacity to 50
 
Select another font of choice
I am using Bud Easy
 
Type out your name
Objects > Align > Horizontal Centre in Canvas
Convert to raster layer
Apply any effects and drop shadow to your liking
 
Finally, add your © copyright, licence and watermark, then save as a GIF or JPG and you're done!
 
 
** IF YOU WISH TO ANIMATE PLEASE FOLLOW THESE NEXT STEPS **
 
Activate your Lace Layer
Duplicate twice and rename Sparkle1, Sparkle2 and Sparkle3
 
Hide Sparkle2 and Sparkle3 leaving only Sparkle1 visible
 
Effects > Plugins > Xenofex 2 > Constellation with the following settings:
 

Hide Sparkle1 and activate Sparkle2
Apply the Constellation effect, adjusting the Random Seed
 
Hide Sparkle2 and activate Sparkle3
Apply the Constellation effect again, adjusting the Random Seed once more
 
Now for the animation part!
 
Hide Sparkle2 and Sparkle with only Sparkle1 visible
Edit > Copy Merged
 
Open Animation Shop
Edit > Paste as New Animation
 
Back to PSP
Hide Sparkle1 and activate Sparkle2
Edit > Copy Merged
 
In Animation Shop
Edit > Paste AFTER Current Frame
 
Back to PSP
Hide Sparkle2 and activate Sparkle3
Edit > Copy Merged
 
In Animation Shop
Edit > Paste AFTER Current Frame
 
Now save as a GIF and you're done!
 
Thanks for trying my tutorial!
 
::st!na::
 
 
Here is the non-animated version:


© Tutorial written by Stina on 1st June 2009
All rights reserved

Wednesday, April 8, 2009

Easy Scallop Tag

 
Supplies
 
Scrap kit of choice - I am using the gorgeous "All About Love" by Cinnamon Scraps which is available from Simply Beautiful Scraps
Tube or clip art of choice - I am using those from the scrap kit "Easter Joy" by Kay Miller available at her store
WS_Mask33 by Chelle available on her blog
Font of choice - I am using GeeohHmk Bold
Plugin: Mura Meister Copies
Plugin: Eye Candy 4000 Gradient Glow (optional)
 
 
Let's begin!
 
First we shall make the scallop template which is the basis of this tag
 
Open a new 600 x 600 blank canvas flood-filled white
 
Set your Preset Shape Tool to Ellipse
Foreground - null
Background - #000000
 
Draw out a small circle (depend on what size you want your scallop to be)
 

Actual size
 
Objects > Align > Centre in Canvas
Convert to raster layer
 
Effects > Plugins > Mura Meister > Copies with the following settings:
 
 
Go back to your Preset Shape Tool (same settings)
Holding your Shift key draw out a circle to fill the scalloped circle
 
Objects > Align > Centre in Canvas
 
At this very point your image should resemble this:
 
 
Convert to raster layer
Layers > Merge > Merge Down
 
Congratulations - You have just made a Scalloped Tag Back template!
Now let's decorate it
 
Selections > Select All
Selections > Float
Selections > Defloat
 
Add a new raster layer
 
Flood fill layer with your colour of choice (one that will complement your creation)
 
Selections > Modify > Contract by 5
 
Paste your paper of choice into Selection
Deselect
 
**You can delete your scalloped template now**
 
Paste Element39 (Frame) as a new layer
Resize by 65%
Layers > Arrange > Move Down
Then Layers > Merge > Merge Down
 
 
Duplicate and resize by 75%
Move up slightly so the tops both meet
 
Paste Element54 (Bow) as a new layer
Image > Rotate by 15 to the left
Resize by 30%
Position at the top slightly to the left
 
Paste Element6 (Bow) as new layer
Resize by 50%
Position over first bow
 
Paste Element49 (Curled Ribbon with staple) as new layer
Resize by 40%
Position over the bows so that the staple is in the centre
 
Paste Element22 (flower) as new layer
Resize by 30%
Position over the centre of the bows and staple
 
 
So now we have this:
 
 
OK...time to add your tube and other embellishments you wish
I will leave those entirely up to you - after all, this is YOUR creation
 
Then Paste Paper15 as a new layer
Layers > Arrange > Send to Bottom
Layers > New Mask Layer > From Image
Locate WSL_Mask33
OK
Layers > Merge > Merge Group
 
Crop and resize
 
Now choose a colour from your tag
Select your Text Tool and font of choice
I am using GeeohHmk Bold
 
Set your Materials Palette to the following:
Foreground - null
Background - #63333f
 
Type out your name
Objects > Align > Horizontal Centre in Canvas
Convert to raster layer
Apply a Gradient Glow and drop shadow of choice
 
Finally, add your © copyright and watermark then save as a GIF or JPG and you're done!
 
Thanks for trying my tutorial
 
::st!na::
 

© Tutorial written by Stina on 8th April 2009
All rights reserved

Monday, February 16, 2009

A Single Rose...

asinglerose-stina_stina02091

Supplies

Scrap pieces of choice - I used Paper and Floral doodle from "Spring Fever" by Cinnamon Scraps
Organza Bow, Pink Lace and Floral Cluster from "All About Love" by Babycakes Scraps
Roses from "Vintage Sweetheart" by Kristi of The Scrappin Divaz Designz
Fonts of choice - I used Bickham Script Fancy and Twilight
Eye Candy 4000 Gradient Glow (optional)

~ Step 1 ~

Open a 650 x 450 transparent canvas

Using your kit of choice open a nice paper which will be your main colour (I am using Paper6) and minimise it

Select Rounded Rectangle in your Selection Tools and draw out a rectangle
You will see the marching ants

Add a new raster layer

Select your Flood Fill Tool

In your Materials Palette find the Paper you chose under Patterns
Flood fill layer

KEEP SELECTED!!

Selections / Modify / Contract by 4
Delete

STILL KEEP SELECTED!!

In your Materials Palette change the Scale of the Pattern to 70

asr-01

Add a new raster layer

Layers / Arrange / Send to Bottom

Selections / Modify / Expand by 2
Flood fill layer with paper pattern
Reduce the opacity of this layer to 50

KEEP SELECTED….*g*

Activate your background
Add new raster layer and flood fill white
Deselect

Activate your frame layer and with your magic wand click inside the frame
Selections / Invert
Now add a drop shadow:
H & V - 1
Opacity - 30
Blur - 10.00
Colour - to match your frame (mine is #ac2a57)

KEEP SELECTED

Repeat drop shadow changing the Horizontal and Vertical to -1

Layers / Merge / Merge Visible

~ Step 2 ~

Select your Text Tool
Choose a fancy Script font (I used Bickham Script Fancy)

Keep your foreground null
Background a dark colour which complements your paper

I'm using:
Foreground - null
Background - #cf215e

In your script font type out the letter A
Position it to the far left
Convert to raster layer

Choose a fancy type font (I'm using Twilight)

Type out the words
"single rose may be my garden,
single friend, my world…."

Add some spacing to the beginning of the first line as it staggers against the A

In a smaller print (either in same font or one similar) type out
"- Leo Buscaglia"

~ Step 3 ~

Choose a nice lace element and resize as necessary
Position on the bottom layer behind the frame
Erase any excess overhanging the sides

Duplicate then Image / Flip
Position opposite top to bottom

Duplicate again then Image /Rotate by 90 to the left
Position to the side, erasing the excess above and below

Duplicate again then Image / Mirror
Position on the opposite side

Once satisfied with the positioning of the lace as a frame hide all layers but the lace
Layers / Merge / Merge Visible

~ Step 4 ~

Find a soft bow in organza or even a string bow
Resize as necessary
Drop the Bow layer below the Text but above the Frame
Erase any excess to give the impression of the Bow being wrapped around the bottom

Feel free to add any elements to make this creation "your own"

Add your name and watermark

Export as a GIF with the following settings:

asr-02
And you're done!

Thank you for trying my tutorial

::st!na::

©Tutorial written by Stina on 14th February 2009
All rights reserved

Sunday, February 15, 2009

French Kiss

frenchkiss-stina_stina-0209

Supplies

Scrap kit of choice - I am using the lovely "French Kiss" kit by Laura of Cinnamon Scraps
which can be purchased from Designer Scraps Livin' Large
Tube of choice - I am using the artwork of Barbara Jensen which can be purchased from her site
WSL_Mask214 by Chelle which can be found on her blog
Script Fonts of choice - I am using Bickham Script Pro Regular and Bickham Script Fancy (which are pay fonts)
Eye Candy Gradient Glow (optional)

~ Step 1 ~

Open Mask and fonts and minimise them for later

Open a new blank canvas 600 x 600 flood-filled white

Paste FrenchKiss_Lace as new layer
Resize by 15%
With your magic wand click the area inside the frame
Selections / Modify / Expand by 2
Add new raster layer and move below the frame

Open Paper12 and copy
Then paste into selection
Deselect

~ Step 2 ~

Paste Flower3 as new layer
Resize by 10% and position to the left
Duplicate
Image / Mirror
Duplicate again and move up slightly on the frame
Duplicate again and Image / Mirror

Paste Bow2 as new layer
Resize by 12% and position at the top of the frame
Paste Bow1 as new layer
Resize by 10% and position over black bow
Paste Bow3 as new layer
Resize by 10% and position over both bows
cs_fk-01
Paste Frame1 (heart) as new layer
Resize by 10%
Leave in centre

Paste your tube as new layer
Resize as necessary (if using the same as me it does not need resizing)
Position to your liking

Paste Lips as new layer
Resize by 4% then again by 85% bicubic resample
Position to the bottom right of frame
Duplicate
Image / Mirror
Position opposite to your liking, moving layer beneath tube

Crop and resize tube

~ Step 3 ~

Open Paper1 and resize 600 x 600
Paste as a new layer above your white background

Layers / New Mask Layer / From Image
Locate WSL_Mask214 in drop down
Source luminance checked
Invert Mask Data UNchecked
OK

Layers / Merge / Merge Group
Lower opacity to 40

Activate the layer above your frame
Select your Text Tool
Choose a nice script font

In your Materials Palette find the Silver Pattern and set the size of your font

I used Bickham Script Fancy, size 48
I also used my silver pattern as both foreground and background, setting my stroke width at 0.2

Type out the words "French Kiss"
Image / Rotate by 35 to the left
Convert to raster layer
Duplicate
On the original layer apply a drop shadow:
H & V - 1
Opacity - 80
Blur - 2.00
Colour - #000000

On the duplicate layer set the blend mode to Soft Light
cs_fk-02
In your Materials Palette set your background to a colour matching your tube

Choose a nice script font and type out your name

Add some noise (if you wish) and the optional choice of Gradient Glow

Glow width 3.00
Soft corners 25
Opacity 100
Colour - Solid White

Add your © copyright, licence and watermark and you're done!

Thanks for trying my tutorial

::st!na::

©Tutorial written by Stina on 10th February 2009
All rights reserved