Please email me designed.by.stina@gmail.com with your creations. I'd love to see them.

Showing posts with label Tutorials (No Scraps). Show all posts

Monday, August 18, 2014

Basic Text Border

WHAT YOU'LL NEED

A basic knowledge of Paint Shop Pro
I am using PSP X but any version is fine

A bold font
I am using TangledUp

Pattern or Paper of choice


Open a blank canvas. I usually start with a large one because it gives you more workspace to play in. You can always crop and resize it later.

In your Materials Palette choose a colour, gradient or pattern for your background (fill). I used a paper from one of my scrap kits "Phantasmagoria". Papers are always effective for use in text and I use them often. I set the Angle to 0 and the Scale to 50%.

Now depending on the colour of your paper, choose either black or white for your foreground (stroke) colour. I set the stroke width to 2.0

Type out your name, or preferred text. Then in the Menu bar go to
Adjust > Align > Centre in Canvas
Go to Layers > Convert to Raster Layer
Or alternatively, right click your layer in the Layer Palette to Convert with the same result.

Now this step is always effective if you don't have access to the plugins or filters that will give you a Gradient Glow, like Eye Candy.

On your Text layer:
Selections > Select All
Then:
Selections > Float
Then:
Selections > Defloat
Then:
Selections > Modify > Expand
Expand by 5
(Or if you want a thicker border, Expand by 10)

Go to Layers > New Raster Layer
In your Layer Palette, drag THIS empty layer BELOW your TEXT layer
KEEP SELECTED!!
Now flood fill with your Stroke colour (either black or white)
I changed mine to white for contrast against the original black stroke colour.

Layers > Merge > Merge Visible

Next, go to Effects > 3D Effects > Drop Shadow
Add one of your choice

I used:
2
2
30
5.00
Black

You can decorate your tag anyway you wish - use a mask as a background or use the name on an existing tag!

If you are using this a stand-alone tag, don't forget to Crop to Selection around the tag so you don't have any untidy excess.

And that's it - a very easy and basic tutorial. This is how I create a nice border around my name or text if I don't like the Gradient Glow effect on it.

Don't forget to add your usual credit for creating the tag and any others you may credit for use of materials.

I hope you've enjoyed this tutorial!

Please note: I was prompted to write this tutorial when a CT member of mine has been unable to load any of her filters so is limited in how to make the name on her tags stand out. I thought a tutorial such as this may help others like her who are limited in this way, or don't have the necessary plugins

© Tutorial written by Stina on 18th August 2014

Wednesday, July 25, 2012

Go Purple for Animals


I've had some positive feedback and a few comments on my Facebook timeline cover which I then converted into a sig-tag, so I decided to write a tutorial. *s*


Supplies

Tube of choice - I am using two tubed images of my own dogs, Ciara and Dexter
Fonts of choice - I am using Copperplate TMed and BickhamFancy Script
Pawprint made by me, available here
Plugins: Penta.com / Jeans
Xero / Soft Mood (optional)
Eye Candy 5 Impact / Gradient Glow (optional, for text)


Open a transparent canvas 850 x 315
(this is the size of a timeline cover)

In your materials palette choose a colour (I'm using #4e2b69) for the foreground and a darker colour like black for your background

Click on the Foreground to open the Material Properties
Select the Gradient tab

Choose the Foreground-Background which should be preset in your gradients
Angle - 45
Repeats - 4
Style - Linear

Flood fill canvas
Then Adjust / Blur / Gaussian Blur with a Radius of 30.00

With your Selection Tool set to Rectangle and Feather to 0, draw out a long narrow rectangle toward the bottom of your canvas from end to end (left to right)
Don't worry about the position - we can reposition it later

Add a new raster layer
Flood fill white
Selections / Modify / Contract by 1
Then flood fill with black
Deselect

Now select the entire canvas
Selections / Select All
Add a new raster layer
Flood fill black
Selections / Modify / Contract by 9
Fllood fill white
Selections / Modify / Contract by 1
Delete the deselect

You should now have something like this:


Now activate the background layer again
Paste a pawprint as a new layer
Image / rotate by 15.00 to the right
Resize by 45%
Position to the left just above the rectangle

Duplicate then Image / Mirror
Position just to the right of the first pawprint
Layers / Merge / Merge Down

Duplicate four times and position each set evenly spaced along the canvas
Turn visibility off all layers but these five sets of pawprints
Layers / Merge / Merge Visible
Turn visibility back on again

Open your Pawprint and paste as new layer
Image / Rotate by 15.00 to the left
Resize by 45% and position to the left above the first set

Adjust / Brightness and Contrast / Brightness/Contrast with the following settings:
Brightness - 50
Contrast - 11

Duplicate then Image / Mirror and position almost between first two sets of pawprints
Layers / Merge / Merge Down
Duplicate four times and position along the top

The last set does not fit so only the left pawprint will be positioned


Turn off all layers but ALL the pawprints
Layers / Merge / Merge Visible
Lower opacity to 50%
Turn visibility back on again
Still on the pawprint layer,
Layers / Merge / Merge Down

Now apply your Jeans filter
Effects / Plugins / Penta.com / Jeans with the following settings:
Amount - 15
Border Width - 4

Open your tube(s) and paste as a new layer
Resize as needed to your liking and position to the far right
I also applied an optional filter to my tubes as follows:

Duplicate tube and apply Xero / Soft Mood with default settings
Lower opacity to around 55 to 65% - depending on your tube and to your liking
Layers / Merge Down
Repeat for second tube, if using one

Now activate the Rectangle layer

Open your Pawprints and resize by around 35%
Position to the right on the narrow rectangle we drew out
Duplicate, then Image / Mirror
Layers / Merge Down

Now with your block print font (I used Copperplate TMed), type out a few words of your choice
Make sure you type the word as a Vector layer
Position the text to the right then grab the middle left node of the Vector layer and drag in a little to narrow the text slightly
Layers / Convert to Raster Layer

Place your credit in the lower right in a small pixel font
I used a black gradient glow to make it stand out

If you are using this as a Timeline cover, you may save it and you're done!

For a signature tag you may want to resize it down before adding your credits

Choose a nice font for your name
I also added a black gradient glow to mine for effect

Now save as a PNG (better quality), and you're done!

Thank you for trying my tutorial!


© Tutorial written by Stina on 25th July 2012

Wednesday, May 4, 2011

Friendship


Supplies

Image of choice
Fonts of choice - I used Bickham Script Regular and Kinkie
Plugins:
Alien Skin Eye Candy Impact / Gradient Glow
Eye Candy 4000 / HSB Noise
Penta.com / Color and Dot
Paint Shop Pro
Animation Shop


Open an image of choice - I am using a private photo
Resize to your liking
Mine is 650 x 320

Duplicate and turn visibility off duplicate layer
On original layer With original layer active go to:

Adjust / Blur / Gaussian Blur
Radius - 20.00

Now activate the top layer
Select your Magic Wand with the following settings:
Selection Type: Point to Point
Mode: Add (Shift)
Feather: 5
Smoothing: 0

Now carefully draw around the subject in your image you wish to use and invert selection


Press Delete
You may need to tidy areas to your liking

On the bottom layer duplicate layer again
Go to:
Effects / Plugins / Penta.com / Dot and Cross
Default settings
The lower the opacity to 30

Activate your top layer and duplicate
Layers / Arrange / Move Down

Adjust / Blur / Gaussian Blur
Radius - 10.00

Activate top layer again
With your Selection Tool set to Rectangle, Feather 0
Draw out a thin rectangle towards bottom of image


Add a new raster layer
Flood fill rectangle white
Deselect
Lower opacity to 25

Add a new raster layer
Flood fill black
Select All
Selections / Modify / Contract by 2
Delete then deselect

Choose an italic font of choice in white
Type a few words of choice
Lower opacity to 40

Choose a nice bold font and type your name
Objects / Align / Horizontal Centre
Convert to raster layer

Effects / Plugins / Alien Skin Eye Candy Impact / Gradient Glow


** FOR ANIMATION **

Activate the bottom (background) layer
Duplicate twice
Rename Noise 1, Noise 2 and Noise 3

On Noise 1 go to:
Effects / Plugins / Eye Candy 4000 / HSB Noise with the following settings:


Activate Noise 2 and repeat, changing the Random Seed

Activate Noise 3 and repeat again, changing the Random Seed once more

Hide Noise 2 and Noise 3
Edit / Copy Merged

Open Animation Shop and Paste as New Animation

Back in PSP, activate Noise 2, then Copy Merged
In Animation Shop, paste after Current Frame

Repeat for last frame

Press CTRL A to Select All Frames, then ALT + Enter to open Frame Properties
Change the number to 35

Save as a GIF and you're done.


© Tutorial written by Stina on 4th May 2011

Sunday, July 26, 2009

Girlz Zone Only


Supplies

Tube of choice - I am using the artwork of Popeye Wong which is free to use with credit
Fonts of choice - I am using Impact and Cookie
Plugins: Eye Candy 4000 Gradient Glow and Alien Skin Eye Candy 5: Impact Gradient Glow
No Scraps

**This is an old tag I made some time ago and have redone it as a tut, adding a few extra effects.
It predominantly uses the effects in PSP**


Let's begin...


Open a new 700 x 600 blank canvas flood-filled white

Select your Preset Shape tool and set to Triangle
Foreground - #000000
Background - #fed33e
Set Width to 10.00
Create as Vector

Hold Shift key and draw out a Triangle
Objects > Align > Centre in Canvas
Convert to raster layer
Duplicate three times and hide top two layers

Activate bottom Triangle

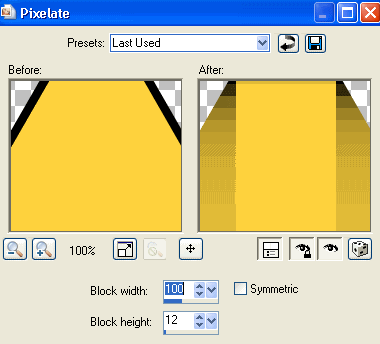
Effects > Distortion Effects > Pixelate with the following settings:


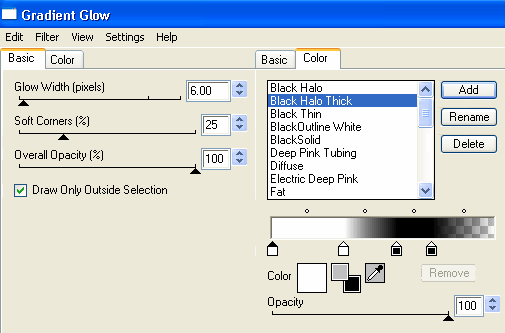
Effects > Plugins > Eye Candy 4000 > Gradient Glow with the following settings:


Duplicate and resize by 75%
Position slightly down and to the right
Duplicate again and resize by 75%
Position to the upper left
Layers > Merge > Merge Down
Repeat
Rename Pixelate
Duplicate twice and rename first one Fine Leather and second one Glass

Activate Fine Leather

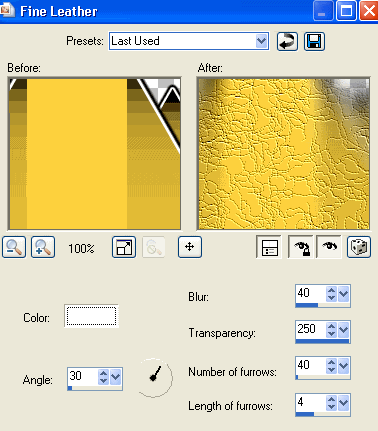
Adjust > Texture Effects > Fine Leather with the following settings:


On Glass,
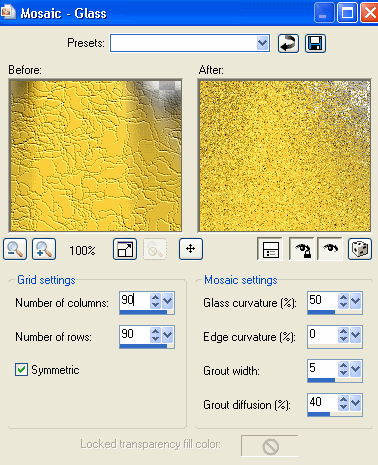
Adjust > Texture Effects > Mosaic - Glass with the following settings:


Lower the opacity of Fine Leather to 80 and Glass to 70

Activate top Triangle layer
Resize by 90%
Apply same Gradient Glow as above
Position between two Triangles to the left

Apply a drop shadow:
V - 7
H - 5
Opacity - 30
Blur - 2.00
Colour - #000000

Activate second Triangle layer
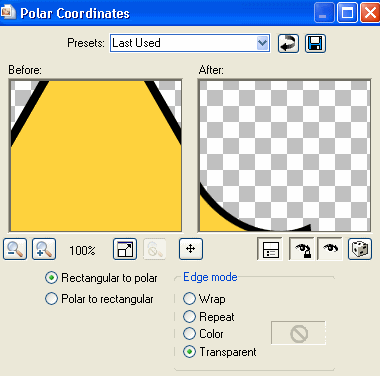
Effects > Distortion Effects > Polar Coordinates with the following settings:


Resize by 50%
Position to the lower left of Triangle
Apply same drop shadow as above but lower opacity to 15

Paste Tube of choice as new layer
Resize and position to liking
Apply a drop shadow of choice

Crop and resize

Select your Text Tool and font of choice
I am using Impact
Colour is Black

Type out your text of choice
Position within the main triangle
Duplicate

On bottom text layer,
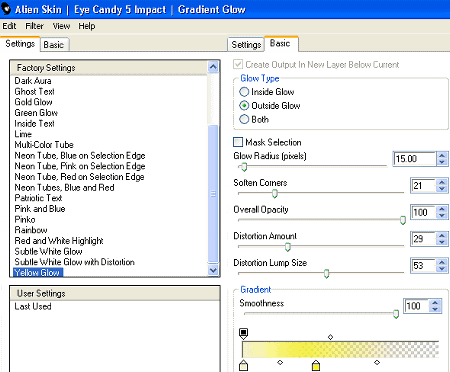
Effects > Alien Skin Eye Candy 5: Impact > Gradient Glow with the following settings:


Rename Caution Text and Caution Text Glow

Select another font of choice
I am using Cookie
Foreground - #000000
Background - #fed33e
Stroke width - 2.00

Type our your name
Objects > Align > Horizontal Centre in Canvas
Convert to raster layer
Apply a drop shadow of choice

Finally, add your © copyright, licence and watermark, then save as a GIF or JPG and you're done!


** IF YOU WISH TO ANIMATE PLEASE FOLLOW THESE NEXT STEPS **

Activate your Caution Text layer and hide Caution Text Glow
Edit > Copy Merged

Open Animation Shop
Edit > Paste as New Animation

Back to PSP
Activate Caution Text Glow
Edit > Copy Merged

In Animation Shop
Edit > Paste after Current Frame

Select All and change the Frame Properties to 80
Now save as a GIF and you're done!

Thanks for trying my tutorial!

::st!na::


Here is a non-animated version:


© Tutorial written by Stina on 26th July 2009
All rights reserved