
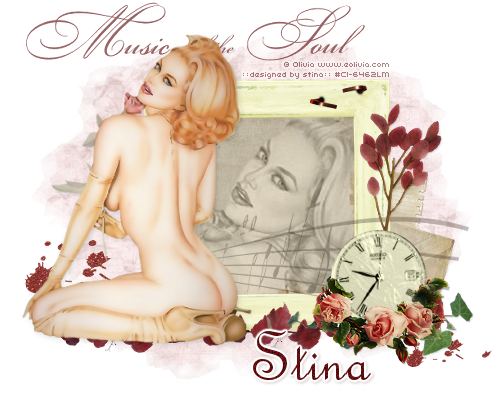
Supplies
"In Your Eyes" scrap kit by Nanede Jardin which is a freebie available on her blog
PLEASE NOTE: This kit IS Full Size
Tube of choice - I am using the lovely artwork of Olivia which can be purchased from CILM
**PLEASE DO NOT USE HER ARTWORK WITHOUT THE APPROPRIATE LICENCE**
**PLEASE DO NOT USE HER ARTWORK WITHOUT THE APPROPRIATE LICENCE**
WSL_Mask218 by Chelle (supplied)
Floral Rose Spray (supplied)
Fonts of choice - I am using Bickham Script Pro Regular and French Script MT
Plugin: Xero / Improver, Xero / Radiance and Xero / Porcelain
Plugin: Eye Candy 4000 Gradient Glow (optional)
Plugins here
My Supplies here
~ Step 1 ~
Open a new 600 x 400 blank canvas flood-filled white
Paste Element13 as new layer
Resize by 30%
Resize by 30%
Open Papier19
Resize by 15%
Resize by 15%
Now select the area inside the Frame with your Magic Wand
Selections / Modify / Expand by 10
Add a new raster layer
Paste Papier19 into Selection
Layers / Arrange / Move Down
Selections / Modify / Expand by 10
Add a new raster layer
Paste Papier19 into Selection
Layers / Arrange / Move Down
KEEP SELECTED!!
Now paste your tube as a new layer
No need to resize (unless it is really huge)
Position within in the Frame to show just a portion
No need to resize (unless it is really huge)
Position within in the Frame to show just a portion
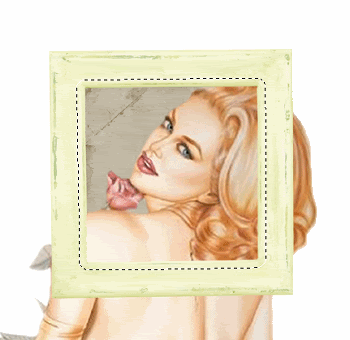
Selections / Invert
Press delete and then deselect
Press delete and then deselect
Set the blend mode to Luminance (Legacy)
Lower opacity to around 60 - 70
Lower opacity to around 60 - 70
~ Step 2 ~
The following drop shadow applies to the selected layers:
H & V - 1
Opacity - 20
Blur - 3.00
Colour - #000000
H & V - 1
Opacity - 20
Blur - 3.00
Colour - #000000
Paste Element47 as new layer
Resize by 12%
Position to the lower right
Add drop shadow
Resize by 12%
Position to the lower right
Add drop shadow
Paste Element29 as new layer
Resize by 12%
Position behind the Clock
Duplicate layer
Effects / Plugins / Xero / Improver with default settings
Effects / Plugins / Xero / Radiance with default settings
Lower opacity to 60
Resize by 12%
Position behind the Clock
Duplicate layer
Effects / Plugins / Xero / Improver with default settings
Effects / Plugins / Xero / Radiance with default settings
Lower opacity to 60
Activate previous layer and apply drop shadow
Paste Element25 as new layer
Resize by 12%
Position with some greenery protruding below the Clock
Resize by 12%
Position with some greenery protruding below the Clock
Using your Selection Tool draw a small rectangle around one end of the branch
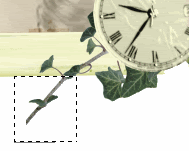
Press delete and deselect
Add drop shadow
Add drop shadow
Paste Element31 as new layer
Resize by 10%
Position over the Ivy partially tucked behind the clock
Duplicate then Image / Mirror
Position on the opposite side
Resize by 10%
Position over the Ivy partially tucked behind the clock
Duplicate then Image / Mirror
Position on the opposite side
Paste FloralRoseSpray as new layer
Image / Flip
Resize by 35%
Layers / Arrange / Move Up
Position at the bottom of the Clock
Image / Flip
Resize by 35%
Layers / Arrange / Move Up
Position at the bottom of the Clock
Effects / Plugins / Xero / Improver with default settings
Duplicate layer
Effects / Plugins / Xero / Radiance with default settings
Lower opacity to 80
Activate previous layer and apply drop shadow
You should now have something like this:
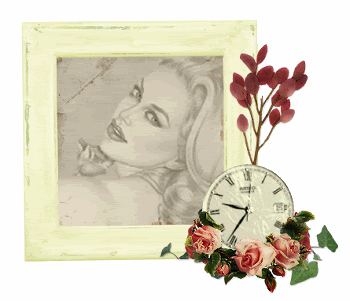
ACTIVATE FRAME LAYER
Paste Element54 as new layer
Reszie by 20%
Position near the bottom of the Frame, the left end sitting against the inside of the Frame
Lower opacity to around 30
Reszie by 20%
Position near the bottom of the Frame, the left end sitting against the inside of the Frame
Lower opacity to around 30
Paste Element8 as new layer
Resize by 12%
Position in the top of Frame
Resize by 12%
Position in the top of Frame
Paste Element14 as new layer
Image / Rotate by 15 to the right
Resize by 11%
Position protruding from behind the Frame
Layers / Arrange / Send to Bottom
Apply a drop shadow
Image / Rotate by 15 to the right
Resize by 11%
Position protruding from behind the Frame
Layers / Arrange / Send to Bottom
Apply a drop shadow
ACTIVATE FRAME LAYER
(so we can see what we're doing)
(so we can see what we're doing)
Paste Element15 as new layer
Image / Mirror
Image / Rotate by 10 to the right
Resize by 5%
Position alongside the Envelope, protruding just above it
Layers / Arrange / Send to Bottom
Image / Mirror
Image / Rotate by 10 to the right
Resize by 5%
Position alongside the Envelope, protruding just above it
Layers / Arrange / Send to Bottom
Apply the following drop shadow, but change the Blur to 1.00
Paste Element36 as new layer
Resize by 10%
Place beneath the flowers and greenery
Resize by 10%
Place beneath the flowers and greenery
~ Step 3 ~
Paste your Tube as new layer
Resize as necessary
Position to the left of the Frame
Duplicate layer
Effects / Plugins / Xero / Improver with default settings
Resize as necessary
Position to the left of the Frame
Duplicate layer
Effects / Plugins / Xero / Improver with default settings
Effects / Plugins / Xero / Porcelain with the following settings:
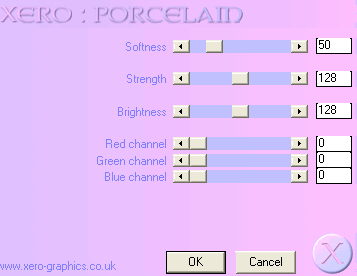
Apply the following drop shadow:
H & V - 2
Opacity - 20
Blur - 20
Colour - #000000
H & V - 2
Opacity - 20
Blur - 20
Colour - #000000
Paste Element36 as new layeragain
Resize by 15%
Position behind your tube layer but somewhere still partially visible
Resize by 15%
Position behind your tube layer but somewhere still partially visible
Paste Element28 as new layer
Image / Mirror
Image / Rotate by 40 to the left
Move to the Frame layer and position behind Roses and greenery
Duplicate and move across slightly so it looks like your tube is on a bed of roses
Image / Mirror
Image / Rotate by 40 to the left
Move to the Frame layer and position behind Roses and greenery
Duplicate and move across slightly so it looks like your tube is on a bed of roses
~ Step 4 ~
Image / Canvas Resize with the following Settings:
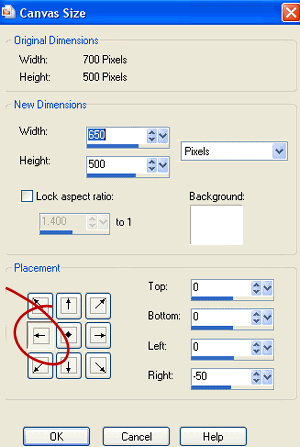
Paste Papier1 as new layer
Resize by 30%
Layers / Arrange / Send to Bottom
Resize by 30%
Layers / Arrange / Send to Bottom
Layers / New Mask Layer / From Image
Locate WSL_Mask218
OK
Layers / Merge / Merge Group
Resize by 96%
Lower opacity to 25 - 30
Locate WSL_Mask218
OK
Layers / Merge / Merge Group
Resize by 96%
Lower opacity to 25 - 30
Select your Text Tool and font of choice
I am using Bickham Script Pro Regular with Bickham Script Fancy for the CAPS
I am using Bickham Script Pro Regular with Bickham Script Fancy for the CAPS
In your Materials Palette check your Foreground is null and your Background is your colour of choice
I am using #5f0f11
I am using #5f0f11
Type out the text of your choice
Convert to raster layer
Convert to raster layer
Choose another font of choice for your name
I used French Script MT
Type out your name, add some noise and a Gradient Glow
I used French Script MT
Type out your name, add some noise and a Gradient Glow
Apply a drop shadow:
H & V - 1
Opacity - 20
Blur - 3.00
Colour - #5f0f11
H & V - 1
Opacity - 20
Blur - 3.00
Colour - #5f0f11
Finally, add your © copyright, licence and watermark
Save as a GIF or JPG and you're done!
Thanks for trying my tutorial!
::st!na::
© Tutorial written by Stina on 27th March 2009
All rights reserved
