Please email me designed.by.stina@gmail.com with your creations. I'd love to see them.

Showing posts with label Simply Irresistable Designs. Show all posts

Sunday, June 21, 2009

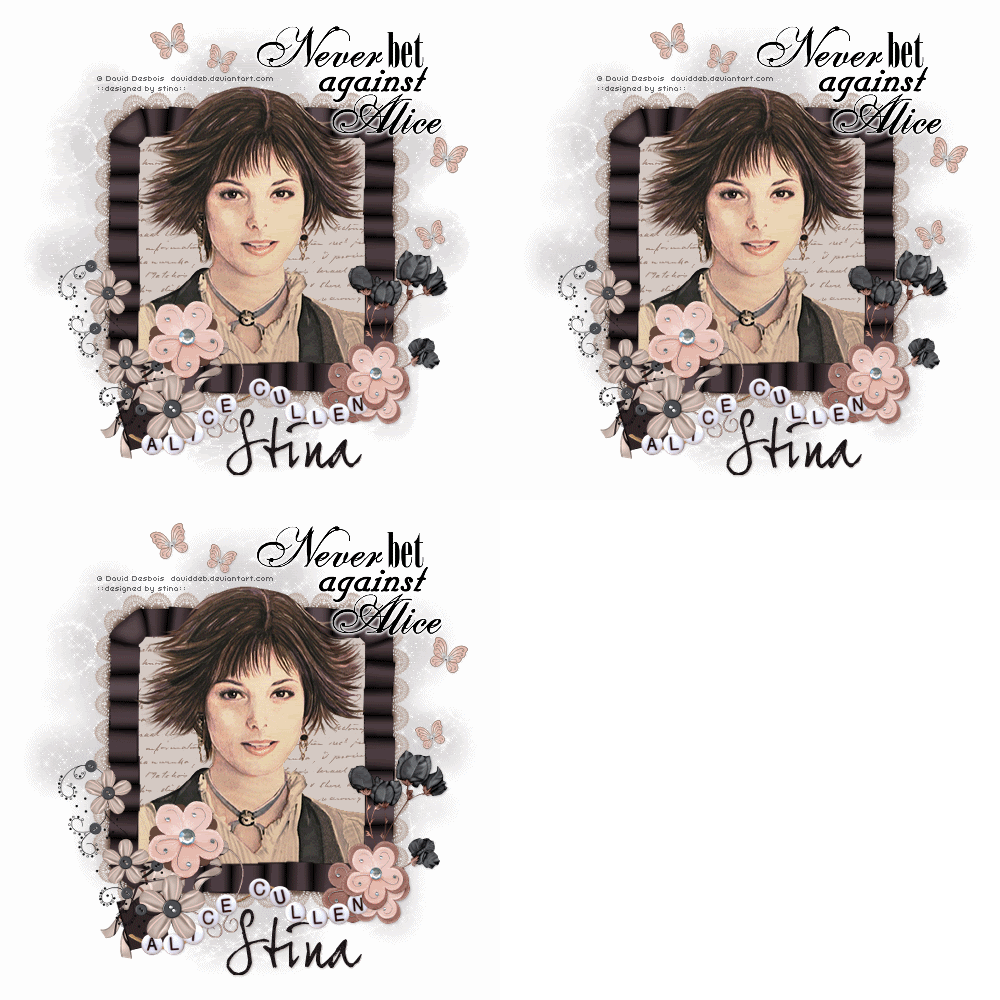
Never Against Alice


Supplies

Scrap kit of choice - I am using "Alice Cullen" by Nicole of Simply Irresistable Designs available for purchase from Creative Scraps Store and Twilight Scraps
Tube of choice - I am using the lovely artwork of David Desbois from whom you must obtain permission to use
WSL_Mask230 by Chelle available from her blog
Font of choice - I am using JoeHand2 (Alice's handwriting)
Plugin: Xenofex 2 Constellation


Let's begin....


Open a new 600 x 600 canvas flood-filled white

Paste Frame2 as new layer
Resize by 50%
Select inside the Frame with your Magic Wand
Selections > Modify > Expand by 10
Add new raster layer
Paste paper of choice INTO selection
Layers > Arrange > Move Down

KEEP SELECTED!!

Paste Tube of choice as new layer
Resize as necessary and position
Duplicate and bring to top

Hide top layer and return to original below Frame
Selections > Invert
Delete then deselect
Activate top layer and unhide

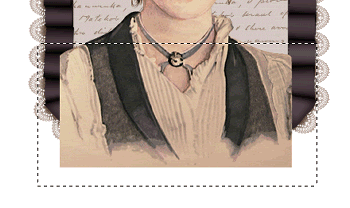
Use your Selection or Freehand Tool (depending on how much you want to overhang) to make a selection around the bottom of your Tube


Delete then deselect

Paste DoodleFlower as new layer
Resize by 25%
Position in lower left

Paste a Flower as new layer
Resize by 20%
Place over the larger of the Doodle Flowers
Layers > Merge > Merge Down
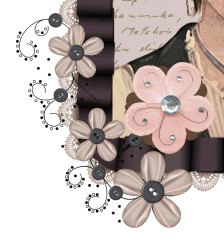

Paste RibbonHeart as new layer
Resize by 40%
Layers > Arrange > Move Down
Position Heart behind and below large flower
Use Erase to remove any excess ribbon you wish to eliminate

Paste Flower1 as new layer
Image > Rotate by 20 to the right
Resize by 30%
Position to the lower right

Paste Flower4 as new layer
Resize by 18%
Position at base of Flower1's stem
Duplicate, then Resize by 90%
Layers > Arrange > Move Down
Position slightly off side

Activate the flower layer above again

Paste Flower3 as new layer
Resize by 15%
Position over the centre of Flower4
Layers > Merge > Merge Down

Paste Beads as new layer
Resize by 50%
Position along the bottom of Frame to your liking

Paste Paper of choice as new layer
Layers > Arrange > Send to Bottom

Layers > New Mask Layer > From Image
Apply WSL_Mask230
OK
Layers > Merge > Merge Group
Lower opacity to 30

Crop and resize

Paste WordArt of choice as new layer
Resize by 55% or as necessary
Position to liking
Apply a slight Gradient Glow

Paste Wings as new layer
Image > Rotate by 20 to the left
Resize by 5%
Duplicate, then Image > Mirror
Position to your liking

Select your Text Tool and a font of choice
I am using JoeHand2 (Alice's handwriting)
Text colour to match tag - I am using #1e171a

Type out your name
Position to your liking
Convert to raster layer
Apply a drop shadow of choice

Finally, add your © copyright, licence and watermark, then save as GIF or JPG and you're done!


** IF YOU WISH TO ANIMATE PLEASE FOLLOW THESE NEXT STEPS **

Activate your Mask layer
Duplicate twice and rename Sparkle1, Sparkle2 and Sparkle3
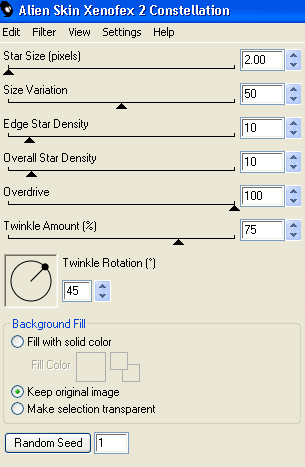
Hide Sparkle2 and Sparkle3 and activate Sparkle1
Effects > Plugins > Xenofex > Constellation with the following settings:


Hide Sparkle1 and activate Sparkle2
Apply the Constellation again, adjusting the Random Seed

Hide Sparkle2 and activate Sparkle3
Apply the Constellation effect again, adjusting the Random Seed

Now for the animation!

Activate Sparkle1 and hide Sparkle2 and Sparkle3
Edit > Copy Merged

Open Animation Shop
Edit > Paste as New Animation

Back to PSP
Hide Sparkle1 and activate Sparkle2
Edit > Copy Merged

In Animation Shop
Edit > Paste AFTER Current Frame

Back to PSP
Hide Sparkle2 and activate Sparkle3
Edit > Copy Merged

In Animation Shop
Edit > Paste AFTER Current Frame

Save as a GIF and you're done!
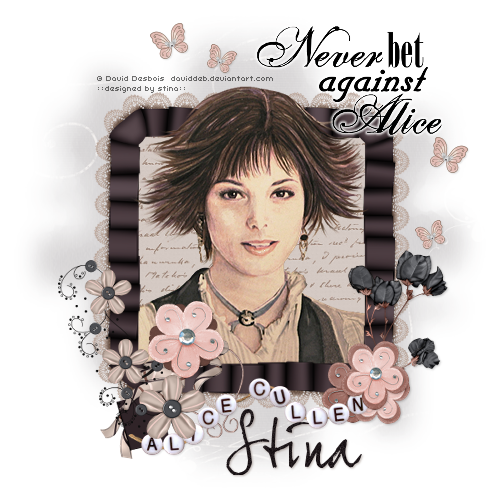
Thanks for trying my tutorial!

::st!na::


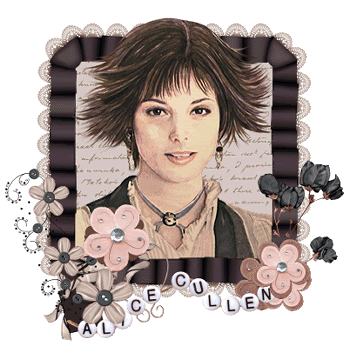
Here is a non-animated version:


© Tutorial written by Stina on 21st June 2009
All rights reserved

Friday, March 6, 2009

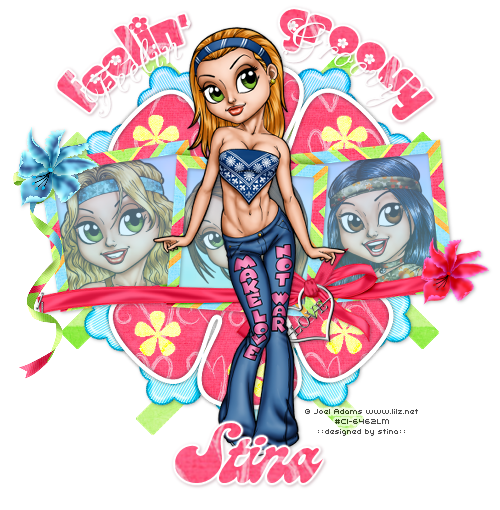
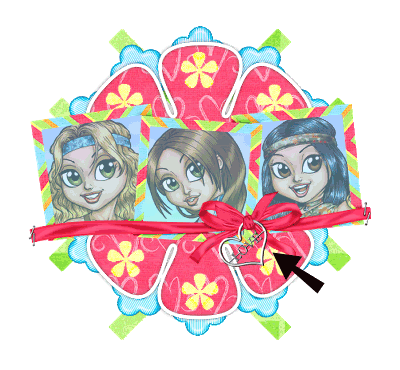
Feelin' Groovy

 
Supplies
 
Scrap kit of choice - I am using the delightful "Retro Love" by Nicole of Simply Irresistable Designs which can be purchased from Creative Scraps, Scrappin Bratz and Aussie Scraps
Tubes of choice - I am using the gorgeous artwork of Joel Adams which canbe purchased from CILM
**PLEASE DO NOT USE HIS ARTWORK WITHOUT THE APPROPRIATE LICENCE**
Template #10 by Cheri of Wyld Creationz
Fonts of choice - I am using Chick, CAC Champagne and Candy
Plugin: Mura Meister Copies
Plugin: Photo Tools Gradient Sky (David Blend Filters)
 
My Supplies here
 
 
~ Step 1 ~
 
Open the Template and resize canvas to 650 wide x 600 high
Flood fill excess area white on Background layer
Delete copyright info
 
Open Paper2
Edit / Copy
 
Activate Bars1
With your Magic Wand click inside the bars
Selections / Modify / Feather by 1
Edit / Paste into Selection
Deselect
 
Open Paper1
Edit / Copy
 
Activate Dark Grey Flower
Click inside the Flower
Selections / Modify / Feather by 1
Edit / Paste in to Selection
Deselect
 
REMAIN ON THIS LAYER
 
Click inside each of the little flowers
Selections / Modify / Expand by 5
Add a new raster layer and called it Flowers
Layers / Arrange / Move Down
 
Open Paper4
Edit / Copy
Edit / Paste into Selection
Deselect
 

~ Step 2 ~
 
Activate top layer
 
Paste FlowerBrad2 as new layer
Resize by 60%
Use your Mover Tool to ensure Flower is central
 
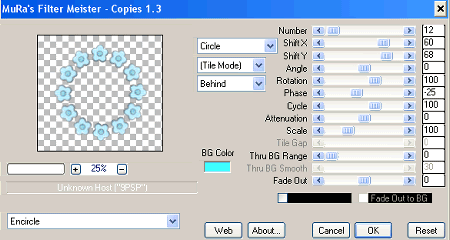
Effects / Plugins / Mura Meister / Copies with the following settings:


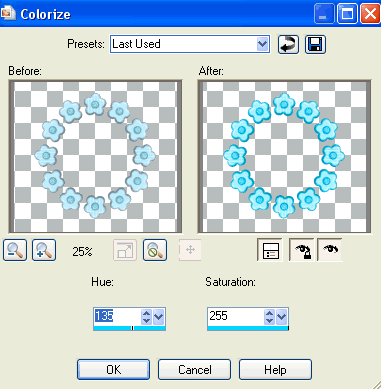
Then Adjust / Hue & Saturation / Colourise with the following settings:


Layers / Arrange / Move Down
Repeat this step twice
 
Duplicate then hide duplicate layer
On original go to
Effects / Plugins / Photo Tools / Gradient Sky
Add a drop shadow:
H & V – 1
Opacity – 30
Blur – 5.00
Colour - #000000
 
Unhide duplicate layer and turn the opacity down to 65
 
Paste Frame1 as new layer
Resize by 70%
Click inside each frame with your Magic Wand (make sure your mode is on Add (Shift) )
Selections / Modify / Expand by 10
Open Paper3 and Edit / Copy
Layers / Arrange / Move Down
Edit / Paste as New Layer
Resize by 70%
Adjust / Blur / Gaussian Blur with a Radius of 10.00
Selections / Invert
Delete
 
KEEP SELECTED
 
Selections / Invert
Effects / Plugins / Photo Tools / Gradient Sky
Deselect
 
Resize your Canvas to about 500 wide ALL LAYERS CHECKED
 

~ Step 3 ~
 
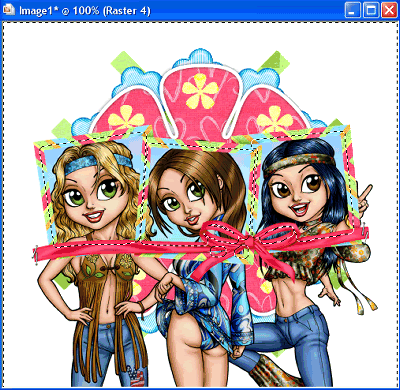
Open three tubes you wish to use in the frames
 
Click inside each of the frames
Selections / Modify / Expand by 5
 
Paste each tube as a new layer below the Frame positioning it to your liking
Selections / Invert


Ensuring that each tube is in position, press delete on each layer
Deselect
 
Activate the top tube layer then
Layers / Merge / Merge Down twice
Lower the opacity to 55
 
Activate Frame layer and apply a drop shadow:
H & V – 1
Opacity – 30
Blur – 5.00
Colour - #000000
 
Paste LoveRibbon1 as new layer
Resize by 35%
Position over the bow on Frame
 
Add a drop shadow:
H & V – 1
Opacity – 30
Blur – 5.00
Colour - #000000
 

Paste Ribbon2 as new layer
Resize by 35%
Position in upper left corner of Frame
 
Paste Flower1 as new layer
Resize by 30% and position over the Ribbon in upper left
Paste Flower2 as new layer
Resize by 25% and position in lower right
 
Add a drop shadow:
H & V – 1
Opacity – 30
Blur – 5.00
Colour - #000000
 
Paste your main tube as a new layer
Resize as necessary (I resized by 80%)
Position to your liking or leave as is
 
Apply the same drop shadow:
H & V – 1
Opacity – 30
Blur – 5.00
Colour - #000000
 

~ Step 4 ~
 
Activate the Bars1 layer
Select your Preset Shape Tool to Ellipse
Foreground - #000000
Background – null
Draw out your circle around your tag
 
Select your Text Tool and set your font to Chick
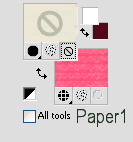
Open Paper1 (if you haven't already kept it open) and minimize it
 
In your Materials Palette use the following settings:
 
 
Set your Kerning to 25
 
Type out the word "Feelin' Groovy" with several spaces between the two words to enable them to sit on either side of your tube
Position to your liking, then
Convert to raster layer
Layers / Merge / Merge Down
 
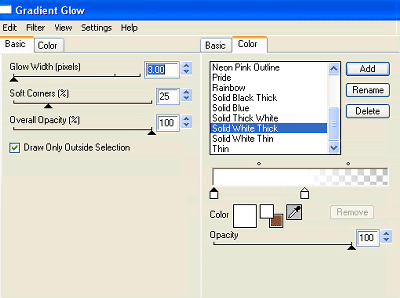
Effects / Plugins / Eye Candy 4000 / Gradient Glow with the following settings:


Then apply a drop shadow:
H & V – 1
Opacity – 30
Blur – 5.00
Colour - #520b1f
Select your Preset Shape Tool to Ellipse again
Foreground - #000000
Background – null
Draw out your circle slightly smaller than the previous
 
Now choose a nice script font and change your Background to #FFFFFF
Type out the same words again as above
(you  may have to play with the spacing between the words till you get something you are happy with)
Adding a drop shadow of:
H & V – 1
Opacity – 20
Blur – 2.00
Colour - #520b1f
 
Activate top layer again
Toggle your Material Palette colours again to return to the Paper1 Pattern
Select another "groovy" font
 (I'm using Candy – some other great ones are BellBottomLaser, Husky Stash, LMS Hippy Chick, Peace, PuppyLike or Shagadelic to name a few)
Return the Kerning to 0
 
Type out your name
Objects / Align / Horizontal Centre in Canvas
Convert to raster layer
 
Effects / Plugins / Eye Candy 4000 / Gradient Glow with the same settings as above
Apply a drop shadow:
H & V – 1
Opacity – 30
Blur – 4.00
Colour - #520b1f
 
Finally add your © copyright, licence, your watermark then save as a GIF or JPG and you're done!
 
Thanks for trying my tutorial
 
::st!na::
 

© Tutorial written by Stina on 6th March 2009
All rights reserved
 

Sunday, February 15, 2009

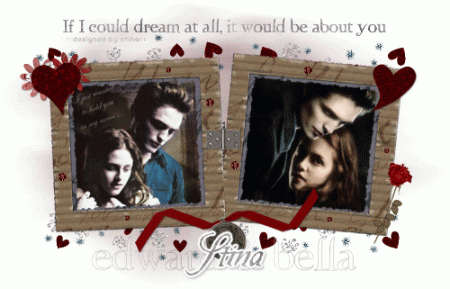
If I Could Dream...

ificoulddream-stina1

Supplies

Scrap kit of choice - I am using "Bella's Lullaby" by Nicole of Simply Irresistible Designs
which can be purchased at Creative Scrap Store
Thank you Nicole for this fantastic kit! I loved using it!
Images of choice or those I used (supplied)
Becky_Mask023 and Becky_Mask026 (supplied)
ww-sandbase pattern (supplied)
Twilight font (supplied)
Be Safe font (Edward's handwriting) (supplied)
Eye Candy 4000 Gradient Glow (optional)

My Supplies here

~ Step 1 ~

Open Masks and font and minimise till later
Place ww-sandbase in your Pattern folders (or if you prefer simply open it and minimise till later)

Open Frame 4 and duplicate then close off original
Resize to 600 in width
Image / Canvas Resize to 700 x 450 for more working space
Add new raster layer and flood fill white
Send to bottom

Using your magic wand click inside the two frames
Selections / Modify / Expand by 10
Open Paper5 and paste as new layer below the frame
Resize by 65%
Selections / Invert
Hit delete
Deselect

Still on this layer
Adjust / Hue and Saturation / Colourise
Hue - 160
Saturation - 10

~ Step 2 ~

Open the two images in the supplies (or use your own)
If using your own images resize them to 285 x 285 square and then apply Becky_Mask026

Take the first image and paste as new layer
Rotate to the left by 3
Position it in the left frame
Paste the second image as a new layer
Rotate to the right by 6
Position in the right frame

Add a drop shadow to your frame
H & V - 1
Opacity - 50
Blur - 1.00
Colour - #000000

~ Step 3 ~

Open RibbonCharm1 and paste as new layer
Resize by 50% and position at the bottom of the frame
Add a drop shadow
H & V - 1
Opacity - 50
Blur - 2.00
Colour - #000000

Open Shimmer1 and paste as new layer
Resize by 45% and position below the frame layer
Paste again as new layer (the copy should still be in your clipboard memory)
Image / Flip
Resize by 47% and position at the top of the frame below the frame layer

Open Flower3 and paste as new layer
Resize by 20% Smart size and then again at 60% Bicubic resample
Position in the top left corner of frame

Open Flower1 and repeat steps above
Position with Flower3 at top left corner of frame

Open GlitterHearts3 and draw a selection around the heart in the top centre
Copy and paste as new layer
Image / Mirror then resize by 60%
Position over the flowers

Make another selection around the glitter heart in the bottom left
Copy and paste as new layer
Resize by 50% and position in top right corner

Add a drop shadow to your elements
H & V - 1
Opacity - 50
Blur - 2.00
Colour - #000000

Open Rose1 and paste as new layer
Resize by 15%
Position to the right of the frame and rotate by 20 to the right

~ Step 4 ~

Open Sequin1 and paste as new layer
Rename this layer SEQUIN
Resize by 30%
Duplicate several times and place around the frame
Paste again (which should still be in your clipboard) and resize by 20%
Duplicate and place around the frame
Merge down each layer one by one till you reach the layer named SEQUIN
Duplicate layer then change blend mode to Multiply and duplicate again
Name these SEQUIN 1, SEQUIN 2 and SEQUIN 3

Now activate the SEQUIN 1 (which was your original sequin layer) and go to
Adjust / Hue and Saturation / Colourise
Hue - 255
Saturation - 40

Activate the SEQUIN 2 layer and repeat the Hue/Saturation Colourising

THE SEQUINS SHOULD NOW TURN A DEEP RED

~ Step 5 ~

Activate white background
Paste Paper8 as new layer
Duplicate and blend mode to Multiply
Layers / Merge / Merge Down
Layers / New Mask Layer / From Image
Locate Becky_Mask023 and apply
Layers / Merge / Merge Group
Lower opacity to 40

Resize your tag ALL LAYERS CHECKED and Bicubic resample

~ Step 6 ~

Select your text tool and locate the Twilight font
Size 20

In your materials palette ensure you have the following:
Foreground: null
Background: ww-sandbase pattern

Type out "If I could dream at all, it would be about you" or any phrase of your choosing and place in position

Object / Align / Horizontal centre in canvas
Convert to raster layer
Apply drop shadow:
H & V - 1
Opacity - 40
Blur - 1.00
Colour - #FFFFFF

Toggle the foreground and background so that the pattern is now your foreground colour and your background is null
Change your font size to 48

Type out "edward & bella" (in lower case)
Position below the RibbonCharm layer
Object / Align / Horizontal centre in canvas
Convert to raster layer
Apply drop shadow:
H & V - 1
Opacity - 40
Blur - 1.00
Colour - #FFFFFF
Lower opacity to 40

Choose a nice script font to type your name
Apply Eye Candy 4000 Gradient Glow in white with a glow width of 3.00 (optional)
Apply a drop shadow

Add your ©copyright and watermark and you're done!

Thank you for trying my tutorial!

::st!na::

©Tutorial written by Stina 30th January 2009
All rights reserved

Love's Last Lullaby

loveslastlullaby-stina

Supplies

Scrap kit of choice - I am using the gorgeous "Bella's Lullaby" kit by Nicole at Simply Irresistible Scraps which you can purchase at Creative Scraps Store
Thank you Nicole for this fantastic kit! I loved using it!
Tube of choice - I am using the delightful work of Zindy Neilsen which can be purchased from her site
PLEASE DO NOT USE HER WORK WITHOUT THE PROPER LICENCE
Mura Meisters Copies
Eye Candy 4000 Gradient Glow
Becky_Mask009 (supplied)
Fonts of choice - I am using Bickley Script (a pay font) and BloodFeast (free and supplied)

My Supplies here

~ Step 1 ~

Open Mask and minimise for later

Open Frame 2
Duplicate (shift D) and close off original
Resize all layers checked to 400 x 400
Image / Canvas Resize to 550 x 550 for more working space
Add new raster layer and flood fill with white
Move to bottom

Open Paper 7 and paste as new layer
Resize by 35%
Activate Frame layer
With your magic wand click inside the frame
Selections / Modify / Expand by 10
Selections / Invert
Activate Paper layer
Hit delete
Deselect

~ Step 2 ~

Open your tube and paste as new layer
Resize as necessary
On the frame layer click inside the frame
Selections / Modify / Feather by 2
Selections / Invert
With your eraser tool carefully erase the bottom of the tube
Deselect
Move tube to the edge of the inside of the framesid_bl01

With your magic wand on the following settings:

sid_bl02

Click the inside of the heart the girl is holding (if using the same or similar tube) until the heart is selected

Selections / Promote selection to Layer
Blend Mode to Multiply
Duplicate then Layers / Merge / Merge Down
Duplicate again then Layers / Merge / Merge Down
Deselect

Now the heart will stand out as blood red

~ Step 3 ~

Open Ribbon 2 and paste as new layer
Resize by 40% and position at the bottom of the frame
Add drop shadow:
Horizontal and Vertical: 1
Opacity: 40
Blur: 3.00
Colour: #000000

Open Rose 1 and resize by 25%
Image / Rotate to the right by 40
Position on the lower right of the frame
Add same drop shadow as above

Open HeartCharm and paste as new layer
Resize by 30% and position beneath the rose along the ribbon
Duplicate and blend mode to Multiply

Open Notebook and paste as new layer
Resize by 25%
Rotate by 20 to the left
Adjust / Sharpness / Unsharpen Mask
1.00, 100, 4.00
Position tucked behind rose above charm

Open WordArt2 and paste as new layer
Resize by 35% and position to your liking

~ Step 4 ~

Open Shimmer 2 and resize by 50%
Move to layer to bottom
Keep positioned in the centre
Effects / Plugins / Mura Meister / Copies using the following settings:

sid_bl03

Layers / New Mask Layer / From Image
Locate Becky_Mask009 in the drop down menu
Source Luminance checked
Invert Mask Data UNchecked
OK

Still on this layer select your Pick Tool (if using PSP X - in other versions it will be your Deformation Tool)

sid_bl04

You will now see a box around your mask layer
Use the nodes to drag the mask layer into a square around your frame
Once happy with it go back to your Mover Tool

Open Glitter Hearts 3 and with your selection Tool make a selection around the heart with the three little hearts
Copy and paste as a new layer
Resize by 50% and position over the edge of the notebook and beneath the rose layer

~ Step 5 ~

Selet your text tool and bold font of your choice
Foreground null
Background #610e0a
Type out Love's Last Lullaby (or a phrase of your choice)
Position where you want it
Object / Align / Horiztonal Centre in Canvas
Convert to raster layer
Reduce opacity to 35

Add the same text in a script font of your choice
Position to your liking above the bold font
Objects / Align / Horizontal Centre in Canvas
Add a drop shadow
Horizontal and Vertical: 1
Opacity: 40
Blur: 3.00
Colour: #610e0a

Type out your name
Add a Gradient Glow in white with a glow width of 3.00 (optional)
Add a drop shadow
Horizontal and Vertical: 1
Opacity: 40
Blur: 3.00
Colour: #40000

Add your ©copyright, licence and watermark and you're done!

Thank you for trying my tutorial!

::st!na::

©Tutorial written by Stina 29th January 2009
All rights reserved