
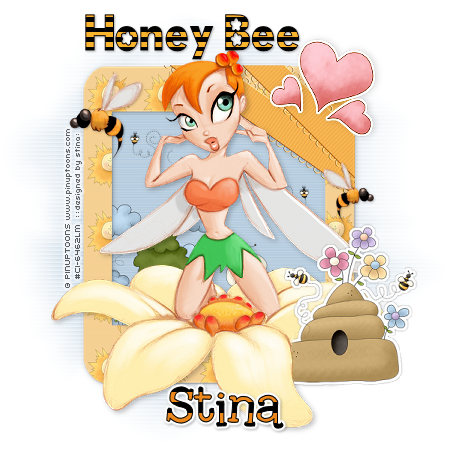
Supplies
Scrap kit of choice - I am using the delightful mini kit "Beautiful Day" by Connie's Creative Chaos which can be purchased from Creative Scraps
Tube of choice - I am using the lovely artwork of Rion Vernon and PinUpToons which can b e purchased from CILM
**PLEASE DO NOT USE HIS ARTWORK WITHOUT THE APPROPRIATE LICENCE**
Becky_Mask023 (supplied)
tp_tiger Gradient (supplied)
Plugin: Eye Candy 4000 Gradient Glow
My Supplies here
Place the tp_tiger gradient into your Gradients folder
and your Mask into your Masks folder
~ Step 1 ~
Open a new blank canvas 600 x 600 flood filled white
Paste BDFraming2 as new layer (leave in position)
With your magic wand click inside the frame
Selections / Modify / Expand by 10
With your magic wand click inside the frame
Selections / Modify / Expand by 10
Paste BDPaper04 as new layer
Resize by 50% and move into desired position
Resize by 50% and move into desired position
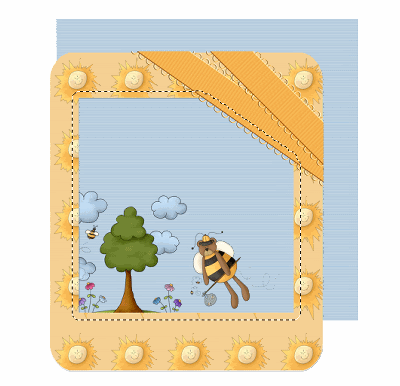
Selections / Invert
Delete
Deselect
Delete
Deselect
Add a drop shadow to your frame:
H & V - 1
Opacity - 25
Blur - 10.00
Colour - #000000
H & V - 1
Opacity - 25
Blur - 10.00
Colour - #000000
~ Step 2 ~
Paste your tube as new layer
Resize if necessary
Position to the centre of the frame
The clouds and tree should be somewhat visible behind your tube
Resize if necessary
Position to the centre of the frame
The clouds and tree should be somewhat visible behind your tube
Add a drop shadow:
H & V - 3
Opacity - 25
Blur - 10.00
Colour - #000000
H & V - 3
Opacity - 25
Blur - 10.00
Colour - #000000
Paste Beehive1 as new layer
Resize by 65%
Position in lower corner of frame alongside your tube
Resize by 65%
Position in lower corner of frame alongside your tube
With your Freehand Tool draw along one of the petals of your tube
Selections / Modify / Feather by 2
Hit delete once or twice
Deselect
Selections / Modify / Feather by 2
Hit delete once or twice
Deselect
Paste Hearts1 as new layer
Resize by 50%
Position in the upper right corner of the frame
Duplicate
Resize by 50%
Position in the upper right corner of the frame
Duplicate
Adjust / Hue & Saturation / Colourise with the following settings:
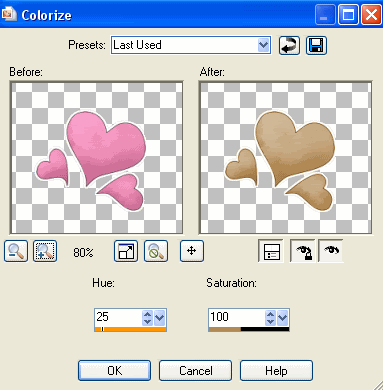
Set the blend mode to Overlay or Hard Light whichever you prefer
Activate original heart layer and apply a drop shadow:
Veritcal - 0
Horizontal - 2
Opacity - 15
Blur - 10.00
Colour - #000000
Horizontal - 2
Opacity - 15
Blur - 10.00
Colour - #000000
Paste some bees as new layers
Resize as necessary
Duplicate
Image / Mirror then resize slightly once again
Apply a slight drop shadow
Crop and resize
~ Step 3 ~
With your Dropper Tool select a colour from your tag by left clicking anywhere on that colour

The colour should now be your foreground in your Materials Palette
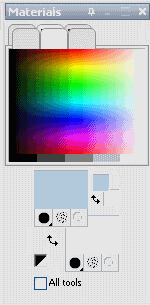
Activate your white background layer
Add a new raster layer
Flood will with your foreground colour by left clicking
Add a new raster layer
Flood will with your foreground colour by left clicking
Layers / New Mask Layer / From Image
Locate Becky_Mask023
Source luminance
OK
Locate Becky_Mask023
Source luminance
OK
Layers / Merge / Merge Group
Effects / Texture Effects / Blinds with the following settings:
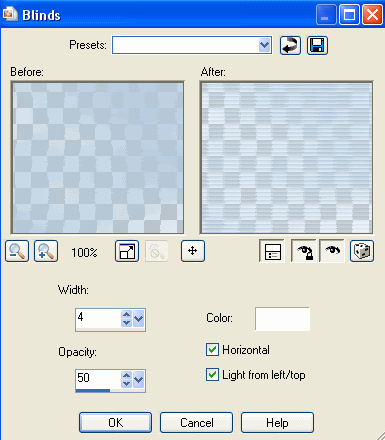
~ Step 4 ~
Select your Text Tool and font of choice - a flowery font would look nice
I am using 2Peas Groovy Bloom
I am using 2Peas Groovy Bloom
Foreground - #000000 (Black)
Background - Tiger Gradient
Background - Tiger Gradient
With the following settings:
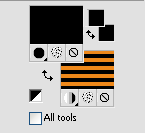
Stroke width - 1.00
Type out the words Honey Bee
Apply a slight drop shadow
Duplicate
Set blend mode to Screen then lower opacity to 70
Apply a slight drop shadow
Duplicate
Set blend mode to Screen then lower opacity to 70
Change the number of repeats in the Material Properties to 3
Choose another font and type out your name
Objects / Align / Horizontal Centre in Canvas
Convert to raster layer
Convert to raster layer
Effects / Plugins / Eye Candy 4000 / Gradient Glow with the following settings:
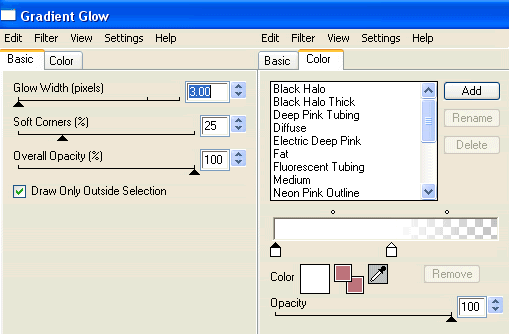
Add a drop shadow:
H & V - 1
Opacity - 30
Blur - 3.00
Colour - #000000
Add your © copyright, licence and watermark and you're done!
Thank you for trying my tutorial
::st!na::
© Tutorial written by Stina on 25th February 2009
All rights reserved
