Please email me designed.by.stina@gmail.com with your creations. I'd love to see them.

Showing posts with label Popeye Wong. Show all posts

Tuesday, September 20, 2011

Witch Way

Photobucket

All tutorials require a basic knowledge of PSP

Supplies

Tube of choice - I am using 68 Ways to Scream by Popeye Wong
Scrap kit of choice - I am using "Halloween Night" by Foxys Designz which is FTU
Font of choice - I am using Thriller
Plugins:
Xero / Porcelain
Photo Effex / Scanlines
Eye Candy 4000 / HSB Noise

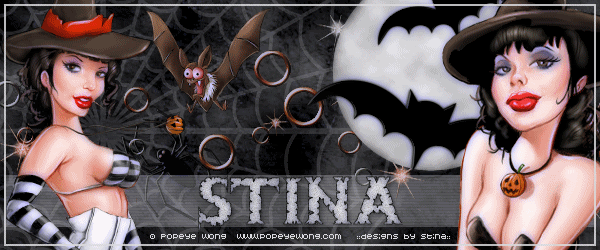
OK, let's get started..........


Open a new transparent image 600 x 250

Paste a paper of your choice onto the canvas and position to your liking
I used Paper7_FD

Paste SpiderWeb_FD as new layer
Position to the left or to your liking
In the layer palette change the Blend Mode to Screen, then Duplicate layer
Layers / Merge / Merge Down

Paste Spider_FD as new layer
Image / Free Rotate / Left by 20.00
Resize by 20%
Position in the web to your liking
Duplicate and set Blend Mode to Screen
Layers / Merge / Merge Down

Paste Glitter_FD
No need to position it as it should fall directly in the centre

Open your tube of choice
For this I am using Popeye Wong's "68 Ways to Scream"

Paste the tube and position it to your liking
Using your Freehand Selection Tool on Point to Point draw around the excess and delete

Paste the tube again and position once again
Draw around the excess once more with your Selection Tool as above and delete the excess

Next with the Selection Tool I cut around the bat in the tube
Then I copied and paste positioning him to my liking on my canvas
Then resized him by about 70%

Paste MoonBats_FD as new layer
Resize by 35% and position partially behind one of the witches in your tube

Now go to the Glitter layer
Add a new raster layer
Choose your Selection Tool and set it to Rectangle
Draw a narrow rectangle the length of the canvas near the bottom

On your material palette select your foreground to a light colour
I used the dropper tool to pick a colour from the moon - #dddddd (which you need to do BEFORE you make your selection)
Flood fill rectangle with your colour
Deselect

Go to Effects / Plugins / PhotEffex / Scanlines
Default settings
Lower opacity to around 35

Go back to your top layer
Add a new raster layer and flood fille with the same light colour
Selections / Select All

Selections / Modify / Contract by 2
Delete the deselect

With your Magic Wand Tool select OUTSIDE this border
Activate your Recangle layer and delete
Then deselect

Now you may want to delete some of the excess of the glitter layer now with your Eraser Tool

Hide the Background, Spider Web and two border layers
Then Layers / Merge / Merge Visible

You should now have four layers -
Background, Spiderweb, Merged layer and the Border

Activate your Merged layer
Effects / Plugins / Xero / Porcelain
Default settings

Repeat Porcelain effect on Border layer
Duplicate then Layers / Merge / Merge Down

At this point I added my credits

Select a font of your choice
I am using Thriller
Make sure your foreground and background are active with the colours of your choice

I am using Black for the foreground with a stroke of 1.0
Background is #dddddd

Type out your name
Add any effects of your choice and apply a drop shadow

Repeat Porcelain effect altering the Blue Channel to 100

Now let's animate!

First hide your background layer
Then merge the other layers together

Now activate your background layer
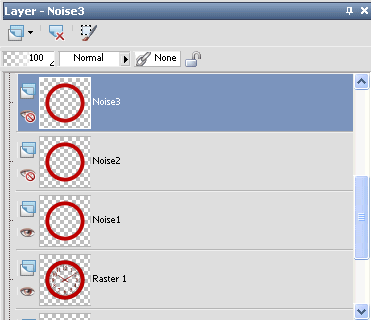
Duplicate twice
Hide the last two and activate the first layer

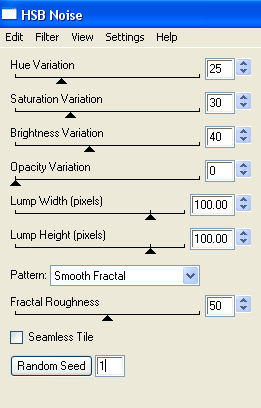
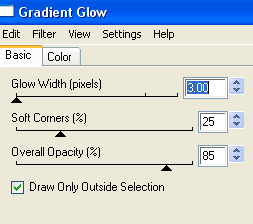
Effects / Plugins / Eye Candy 4000 / HSB Noise
with the following settings:
Photobucket

Now activate the second layer
Repeat the plugin effect changing the Random Seed

Activate the third layer and repeat again

Go over each layer with the Porcelain effect changing the Blue Channel back to 255

Now hide background layers 2 and 3 once again leaving the first background layer visible with the Merged layer

Edit / Copy Merged

Open Animation Shop
Paste as new animation

In PSP
Activate second background layer and Copy Merged

In Animation Shop
Paste after Current Frame

In PSP
Activate third background later and Copy Merged

In Animation Shop
Paste after Current Frame

Select all frames
ALT + Enter to open the Frame Properties box
Change to 25

Now save as a GIF and you're done!

Thank you for trying my tutorial.


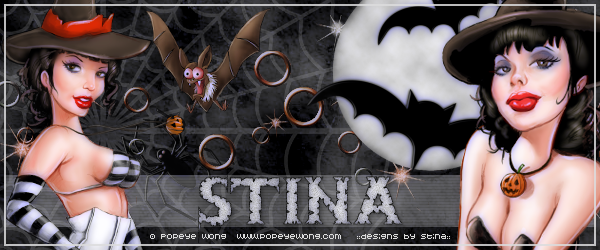
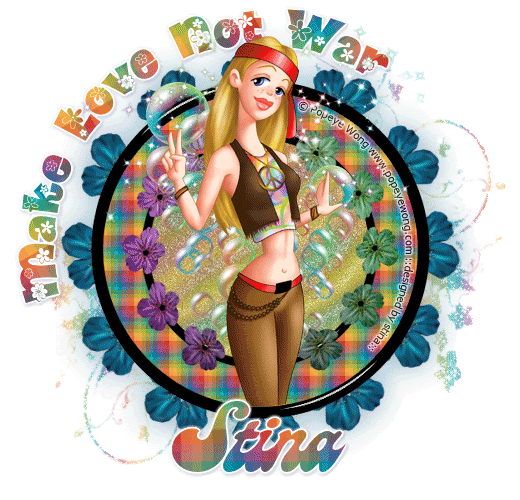
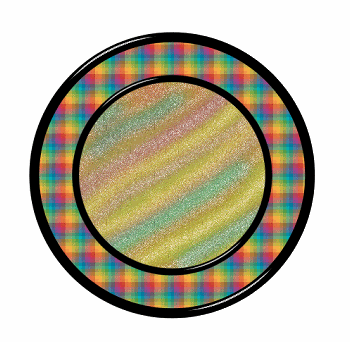
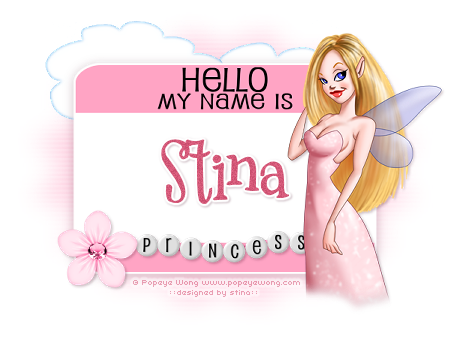
Here is a still version in PNG format
Photobucket

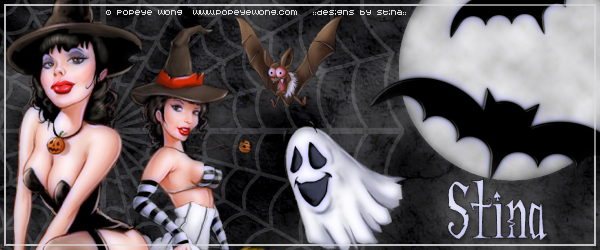
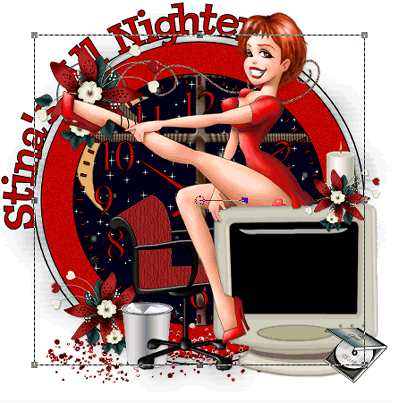
And here is another version using the same tube differently:
Photobucket

© Tutorial written by Stina 20th September 2011

Wednesday, August 5, 2009

Good vs Evil


Supplies

Scrap kit of choice - I am using "Good vs Evil" by Alyssa's Scraps & Such available from Paradise 4 Scrappers, Twilight Scraps and Dazzling Scraps
Tube of choice - I am using the lovely FTU artwork of Popeye Wong available from his site
WSL_Mask26 by Chelle available from her blog
Template #8 by Chuliiss Designz available from her blog
Fonts of choice - I am using Cynthia Script ES and Warlock
Plugin: Eye Candy 4000 > Gradient Glow
Tramages > Moving Screen


Let's begin....

Open CD Template #8 and duplicate
Close off original
Delete copyright layer

Add a new raster layer and flood-fill white
Layers > Arrange > Send to Bottom

Activate and select HORNS with your Magic Wand
Selections > Modify > Feather by 2
Delete twice
Paste Paper of choice INTO selection
Deselect

Activate and select LARGE HEART
Selections > Modify > Feather by 2
Delete twice
Paste another Paper of choice INTO selection
Deselect
Activate and select MEDIUM HEART
Selections > Modify > Feather by 2
Delete twice
Paste another Paper of choice INTO selection
Deselect

Activate and select HEART BORDER
Selections > Modify > Expand by 1
Selections > Modify > Feather by 2
Add a new raster layer
Paste another Paper of choice INTO selection
Deselect
Layers > Merge > Merge Down

Select outside the HEART BORDER with your Magic Wand
Selections > Invert
Selections > Modify > Contract by 2
Selections > Modify > Feather by 2


Effects > Plugins > Eye Candy 4000 > Gradient Glow with a thin white setting
Deselect

Activate DOTS HEART layer
Selections > Float
Selections > Defloat
Repeat Gradient Glow to your your liking

Select WHITE BACK LEFT
Selections > Modify > Feather by 2
Paste a Tube of choice as new layer and position
Resize as necessary
Selections > Invert
Delete then deselect

Select WHITE BACK RIGHT
Selections > Modify > Feather by 2
Paste another Tube of choice as new layer and position
Resize as necessary
Selections > Invert
Delete then deselect

Delete the WHITE BACK layers so the backgrounds are black

Select PINK HEART and flood-fill with colour of choice
I am using #800000
Duplicate twice and rename RED HEART1, RED HEART2 and RED HEART3
Hide RED HEART2 and RED HEART3
Activate RED HEART1

KEEP SELECTED!!

Effects > Plugins > Filters Unlimited > Tramages > Moving Screen with the following settings: (or any of your choice)


Deselect

Paste your main Tube as new layer
Resize as necessary and position in centre
Add a drop shadow of choice

Paste a paper of choice as new layer
Layers > Arrange > Send to Bottom

Layers > New Mask Layer > From Image
Apply WSL_Mask181
OK
Layers > Merge > Merge Group
Lower opacity to 40

Crop and resize

Activate top layer

Select your Text Tool and font of choice
I am using I am using Cynthia Script ES
Background - #800000

Type out text of choice
Objects > Align > Horiztonal Centre in Canvas
Convert to raster layer
Apply some slight noise
Place below HORNS layer

Select another font of choice
I am using Warlock
Foreground - #000000
Background - #800000

Type out your name
Objects > Align > Horizontal Centre in Canvas
Convert to raster layer
Apply some noise and drop shadow of choice

Finally, add your © copyright, licence and watermark, then save as a GIF or JPG and you're done!


** IF YOU WISH TO ANIMATE PLEASE FOLLOW THESE NEXT STEPS **

Activate your RED HEART2 layer

Effects > Plugins > Effects > Plugins > Tramages > Moving Screen with any settings of your choice
(NOTE - Keep the Lightener and Transparency set to 0)

Hide RED HEART2 and activate RED HEART3
Repeat the Moving Screen effect and randomise - keeping Lightener and Transparency set to 0

Now to animate!

Activate RED HEART1 and hide RED HEART2 and RED HEART3
Edit > Copy Merged

Open Animation Shop
Edit > Paste as New Animation

Back to PSP
Hide RED HEART1 and activate RED HEART2
Edit > Copy Merged

In Animation Shop
Edit > Paste After Current Frame

Back to PSP
Hide RED HEART2 and activate RED HEART3
Edit > Copy Merged

In Animation Shop
Edit > Paste After Current Frame

Select All and change Frame Properties to 20
Now save as a GIF and you're done!

Thanks for trying my tutorial!

::st!na::


Here is a non-animated version:


© Tutorial written by Stina on 5th August 2009
All rights reserved

Sunday, July 26, 2009

Girlz Zone Only


Supplies

Tube of choice - I am using the artwork of Popeye Wong which is free to use with credit
Fonts of choice - I am using Impact and Cookie
Plugins: Eye Candy 4000 Gradient Glow and Alien Skin Eye Candy 5: Impact Gradient Glow
No Scraps

**This is an old tag I made some time ago and have redone it as a tut, adding a few extra effects.
It predominantly uses the effects in PSP**


Let's begin...


Open a new 700 x 600 blank canvas flood-filled white

Select your Preset Shape tool and set to Triangle
Foreground - #000000
Background - #fed33e
Set Width to 10.00
Create as Vector

Hold Shift key and draw out a Triangle
Objects > Align > Centre in Canvas
Convert to raster layer
Duplicate three times and hide top two layers

Activate bottom Triangle

Effects > Distortion Effects > Pixelate with the following settings:


Effects > Plugins > Eye Candy 4000 > Gradient Glow with the following settings:


Duplicate and resize by 75%
Position slightly down and to the right
Duplicate again and resize by 75%
Position to the upper left
Layers > Merge > Merge Down
Repeat
Rename Pixelate
Duplicate twice and rename first one Fine Leather and second one Glass

Activate Fine Leather

Adjust > Texture Effects > Fine Leather with the following settings:


On Glass,
Adjust > Texture Effects > Mosaic - Glass with the following settings:


Lower the opacity of Fine Leather to 80 and Glass to 70

Activate top Triangle layer
Resize by 90%
Apply same Gradient Glow as above
Position between two Triangles to the left

Apply a drop shadow:
V - 7
H - 5
Opacity - 30
Blur - 2.00
Colour - #000000

Activate second Triangle layer
Effects > Distortion Effects > Polar Coordinates with the following settings:


Resize by 50%
Position to the lower left of Triangle
Apply same drop shadow as above but lower opacity to 15

Paste Tube of choice as new layer
Resize and position to liking
Apply a drop shadow of choice

Crop and resize

Select your Text Tool and font of choice
I am using Impact
Colour is Black

Type out your text of choice
Position within the main triangle
Duplicate

On bottom text layer,
Effects > Alien Skin Eye Candy 5: Impact > Gradient Glow with the following settings:


Rename Caution Text and Caution Text Glow

Select another font of choice
I am using Cookie
Foreground - #000000
Background - #fed33e
Stroke width - 2.00

Type our your name
Objects > Align > Horizontal Centre in Canvas
Convert to raster layer
Apply a drop shadow of choice

Finally, add your © copyright, licence and watermark, then save as a GIF or JPG and you're done!


** IF YOU WISH TO ANIMATE PLEASE FOLLOW THESE NEXT STEPS **

Activate your Caution Text layer and hide Caution Text Glow
Edit > Copy Merged

Open Animation Shop
Edit > Paste as New Animation

Back to PSP
Activate Caution Text Glow
Edit > Copy Merged

In Animation Shop
Edit > Paste after Current Frame

Select All and change the Frame Properties to 80
Now save as a GIF and you're done!

Thanks for trying my tutorial!

::st!na::


Here is a non-animated version:


© Tutorial written by Stina on 26th July 2009
All rights reserved

Sunday, July 5, 2009

Make Love Not War


Supplies

Scrap kit of choice - I am using the part of the "Starving Artist Collab" by Bits n' Bobs available for the low price of $2 for the month of July from Exquisite Scraps
Tube of choice - I am using the artwork of Popeye Wong which is FTU with proper credit and link
tde_maske20 here
Fonts of choice - I am using Daffodil and Candy
Plugins: Alien Skin Eye Candy 5: Impact Glass
Mura Meister Copies
Colour Rave Atmospheriser
Eye Candy 4000 Gradient Glow


Let's begin...


Open a new 700 x 600 blank canvas flood-filled white

Select your Preset Shape Tool and set to Ellipse
Foreground - #000000
Background - Null
Stroke width - 15.00

Hold your shift key and draw out a circle in the centre of your canvas
Objects > Align > Centre in Canvas
Convert to raster layer

Effects > Plugins > Eye Candy 5: Impact > Glass with the following settings:


Select the inside of Frame with Magic Wand
Selections > Modify > Expand by 10
Add a new raster layer
Paste Paper of choice INTO selection
Deselect
Layers > Arrange > Move Down

Duplicate Frame and reszie by 70%
Select inside with your Magic Wand
Selections > Modify > Expand by 5
Add a new raster layer
Paste another paper of choice INTO selection
Deselect
Layers > Arrange > Move Down


Activate top layer

Paste a Flower as new layer
Resize by 25%

LEAVE IN POSITION!!

Effects > Plugins > Mura Meister > Copies with the following settings:


Then Effects > Plugins > Colour Rave > Atmospherizer with the following settings:


Paste another Flower as new layer
Resize by 45%

LEAVE IN POSITION!!

Effects > Plugins > Mura Meister > Copies with the following settings:


Layers > Arrange > Send to Bottom
Duplicate
On bottom layer;
Adjust > Blur > Gaussian Blur with a radius of 15.00
Lower opacity to around 50

Activate top layer again

Paste some Bubbles as new layer
Resize by 45%
Position to the left

Paste some sparkles as new layer
Position to the top

Paste a paper of choice as new layer
Layers > Arrange > Send to Bottom

Layers > New Mask Layer > From Image
Apply tde_maske20
Invert mask data/transparency checked
OK
Layers > Merge > Merge Group
Layers > Arrange > Send to Bottom
Resize by 90% and position
Lower opacity to 50

Activate top layer again and paste your Tube of choice as new layer
Resize as necessary
Position to your liking

If your Tube is like mine (ie. long), then select the inside of the larger Frame
Selections > Modify > Contract by 2
Selections > Modify > Feather by 2
Selections > Invert
Use your Eraser to remove the excess from the bottom


Apply any drop shadows of choice to your tube and elements

Select your Preset Shape Tool and set to Ellipse again
Foreground - #000000
Background - Null
Stroke width - 2.00

Hold your shift key and draw out a circle around your canvas
Objects > Align > Centre in Canvas

Select your Text Tool and font of choice
I am using Daffodil
Text colour of choice - I am using one of the papers

On your curve type out your text of choice
Position to your liking


Open the Layer Palette and Vector Layer
Hide the Ellipse and convert to raster layer
Apply a Gradient Glow and drop shadow of choice

Select another font of choice
I am using Candy
Same Paper for text colour

Type out your name
Objects > Align > Horizontal Centre in Canvas
Convert to raster layer
Apply a Gradient Glow and drop shadow of choice

Finally, add your © copyright, licence and watermark, then save as a GIF or JPG and you're done!


** IF YOU WISH TO ANIMATE PLEASE FOLLOW THESE NEXT STEPS **

Activate your Mask layer
Duplicate twice and rename them Sparkles1, Sparkles2 and Sparkles3

Hiding the Sparkles2 and Sparkles3 go to:
Effects > Plugins > Xenofex 2 > Constellation with the following settings:


Repeat with the remaining two Sparkles layers adjusting the Random Seed

Now let's animate!!!
Activate Sparkles1 and hide Sparkles2
Edit > Copy Merged

Open Animation Shop
Edit > Paste as New Animation

Back to PSP
Hide Sparkles1 and activate Sparklesr2
Edit > Copy Merged

In Animation Shop
Edit > Paste AFTER Current Frame

Back to PSP
Hide Sparkles2 and activate Sparkles3
Edit > Copy Merged

In Animation Shop
Edit > Paste AFTER Current Frame

Save as a GIF and you're done!

Thanks for trying my tutorial!

::st!na::


Here is a non-animated version:


© Tutorial written by Stina on 5th July 2009
All rights reserved

Sunday, May 31, 2009

Sugar Shack

 
Supplies
 
Scrap kit of choice - I am using "Sugar Shack" by KristiW Designs available from The Scrappin' Divaz Designz and Sunshine Studio Scraps
Tube of choice - I am using the artwork of Popeye Wong which is free to use and available for download from his site
WSL_Mask88 by Chelle available from her blog
Font of choice - I am using DymaxionScript which is a free font available from DaFont.com
Plugin: Eye Candy 4000 Gradient Glow
 
 
Ready? Let's go...
 
 
Open a new 700 x 600 blank canvas flood-filled white
 
Paste Frame2 as new layer
Resize by 20%
 
Select the inside of Frame with your Magic Wand
Selections > Modify > Expand by 10
Add new raster layer
Paste Paper of choice INTO selection
Layers > Arrange > Move Down
Deselect
 
Paste Sign1 as new layer
Resize by 18% and position
 
Paste Stool1 and Stool2 as new layers
Resize each by 8% and position across bottom of Frame
 
Paste Jukebox as new layer
Resize by 7% and position, then
Paste MusicNotes as new layer
Resize by 16% and position coming from the speaker
 
Paste Sprinkles as new layer
Resize by 15% and position behind MusicNotes
 
Paste a Flower as new layer
Resize by 15%
Position in upper left
Duplicate, then Image > Mirror
 
Paste Menu as new layer
Image > Rotate by 20 to the left
Resize by 10%
Place to the left tucked below the Jukebox and Sign
 
Paste Tube as new layer
Resize as necessary
Position to the right
 
Resize tag down, then
Image > Canvas Resize 550 x 500 centred
 
Paste paper of choice as new layer
Layers > Arrange > Send to Bottom
 
Layers > New Mask Layer > From Image
Apply WSL_Mask88
OK
Layers > Merge > Merge Group
 
Effects > Texture Effects > Mosaic Antique with the following settings:
 
 
Apply a Gradient Glow in WHITE to each of your elements and your Tube
 
 
Select your Text Tool and font of choice
I am using DymaxionScript
Text colour to match your tag - I am using #f2a8bd
 
Type out your text
Objects > Align > Horizontal Centre in Canvas
Convert to raster layer
Apply same Gradient Glow
 
Type out your name
Objects > Align > Horizontal Centre in Canvas
Convert to raster layer
Apply any effects and drop shadow of your choice
 
Finally, add your © copyright, licence and watermark, then save as a GIF or JPG and you're done!

Thanks for trying my tutorial!
 
::st!na::


© Tutorial written by Stina on 31st May 2009
All rights reserved

Wednesday, March 4, 2009

My All Nighter

 
Supplies
 
Scrap kit of choice - I am using the wonderful "Suz's All Nighter" by Created by Jill which can be purchased from Exquisite Scraps, Paradise 4 Scrappers and Creative Scraps
Tube of choice - I am using the delightful artwork of Popeye Wong which is free to use though you must provide credit back to him © Popeye Wong www.popeyewong.com
WSL_Mask33 by Chelle which can be found on her blog
Font of choice - I am using Chowderhead
Paint Shop Pro (I am using X)
Animation Shop
 
My Supplies here
 
 
~ Step 1 ~
 
Open a blank 600 x 600 canvas flood-filled white
 
With your dropper tool pick a colour from your tube and set that as your background
Your Foreground should be black (#000000)
Line width - 2.00
 
Select your Preset Shape Tool and find the Clock
Hold your Shift key and draw out the clock
Objects / Align / Centre in Canvas
Convert to raster layer
 
Using your Magic Wand select the inside rim of the clock
 
 
Layers / Promote Selection to Layer
Duplicate twice
Rename them Noise1, Noise2 and Noise3
 

Close off the visibility of Noise 2 and 3, leaving Noise1 visible
 
Adjust / Add/Remove Noise / Add Noise
Gaussian
Noise - 15
Monochrome
OK
 
Close off Noise1 and activate Noise2
Repeat steps, changing Noise to 20
 
Close off Noise2 and activate Noise3
Repeat steps above, changing Noise to 25
 
You can close off these layers until later when we will return to them
 

~ Step 2 ~
 
Paste SAN_Window as new layer
Layers / Arrange / Move Down
Resize by 105%
 
Use your Magic Wand to click outside the clock
Selections / Modify / Expand by 15
 
Activate Window layer again and press delete
 
Paste SAN_Computer as new layer
Resize by 75%
Move to the right
 
With your Selection Tool draw out a rectangle around the monitor screen
Add a new raster layer
Layers / Arrange / Move Down
Flood fill this layer #000000
Deselect
 
Paste SAN_Chair as new layer
Resize by 70%
Layers / Arrange / Move Down
Position slightly tucked behind computer
Duplicate then set blend mode to Soft Light
Layers / Merge / Merge Down
 
Paste SAN_TrashCan as new layer
Resize by 30%
Layers / Arrange / Move Down
Position behind the chair
 
Paste CompactDisk as new layer
Resize by 25%
Position beside computer monitor
 
Paste Candle1 as new layer
Resize by 25%
Place on top of computer
 
Paste FlowerDeco as new layer
Resize by 50%
Position in upper left
Duplicate and set blend mode to Hard Light
Layers / Merge / Merge Down
 
Duplicate and resize by 80%
Image / Mirror
Position in the lower left partially behind Trash Can
 
Duplicate and resize by 80%
Image / Mirror
Position over candle and computer
 
Paste Doodle2 as new layer
Resize by 20%
Place behind Flower in upper left
 
Paste Doodle3 as new layer
Resize by 60%
Place along top of clock tucked under Flower
 
You should now have something that looks like this:
 
You may add any other embellishments you like - this is your creation! *s*
 

~ Step 3 ~
 
Paste your tube as a new layer
Resize if necessary
I used a Popeye Wong tube which is free to use
(though you MUST credit him by including his copyright © Popeye Wong www.popeyewong.com)
 
The tube I used also required some work to get it to how I wanted it
(she was originally on a stool with a dog on the end of a leash that was wrapped round her leg)
After cutting out the stool I then had to clone her leg as if none of it was ever missing (took some work too! *g*)
You can either use the tube I did or one of your own
 
Activate your Background layer
Paste PaperK as new layer
Resize by 75%
 
Layers / New Mask Layer / From Image
Locate WSL_Mask33
Source Luminance
OK
 
In your Layer Palette locate the Mask layer and activate it
 
 
Resize by 105%
 
Layers / Merge / Merge Group
 
Crop and resize tag
 
Select your Preset Shape Tool to Ellipse
Holding your shift key draw out a circle around the clock
Objects / Align / Centre in Canvas
 
Select your Text Tool in a font of your choice (I'm using Chowderhead)
 
Set your Properties to the following:
Stroke width - 1.00
Foreground - #000000
Background - #c00000
 
Over the curve of the ellipse type out "YOUR NAME All Nighter"
Or as an alternative you can simply type "My All Nighter"
 

In the Layer Palette open the Vector Layer and turn off the visibility of the ellipse
Convert to raster layer
Add a slight drop shadow
 
Add © Popeye Wong www.popeyewong.com (if using the same tube)
or the copyright of the tube you are using, licence and watermark
 

~ Step 4 ~
 
** This step is purely optional if you wish to animate **
 
In your Layer Palette find the Noise1, Noise2 and Noise3 layers we created at the beginning
 
Turn the visibility off Noise 2 and 3, leaving Noise1 visible
 
Edit / Copy Merged
 
Open Animation Shop and paste as new animation
 
Back to PSP
Turn off Noise1 and open Noise2
Edit / Copy Merged
 
Go to Animation Shop
Edit / Paste / Paste After Current Frame
 
Back to PSP
Turn off Noise2 and open Noise3
Edit / Copy Merged
 
Go to Animation Shop
Edit / Paste / Paste After Current Frame
 
Now just save as a GIF and you're done!!
 
Thank you for trying my tutorial
 
::st!na::
 
 
Here is a non-animated version:


© Tutorial written by Stina on 4th March 2009
All rights reserved

Saturday, February 21, 2009

Just a Princess

 
This is a fairly easy tutorial
 
Supplies
 
Scrap kit of choice - I am using "My Prince has Come" by DMK Designs which can be purchased from Creative Scraps, Simply Beautiful Scraps and TKO Scraps
Tube of choice - I am using the delightful artwork of Popeye Wong which is free to use
If you use this tube, please credit him © Popeye Wong www.popeyewong.com
WSL_Mask33 by Chelle
Eye Candy 4000 Gradient Glow
Font of choice - I am using 2Peas Mister Giggles
 
My Supplies here
 
 
~ Step 1 ~
 
Open a new blank canvas 600w x 450h flood filled white
 
Paste NameSticker02 as new layer
Resize by 40%
 
Effects / Plugins / Eye Candy 4000 / Gradient Glow with the following settings:
 
 
Add a drop shadow:
Vertical - 3
Horizontal - 0
Opacity - 25
Blur - 20.00
Colour - #3e001a
 

~ Step 2 ~
 
Paste Clouds as new layer
Resize by 40%
Place toward the top below the NameSticker
 
Paste PrincessTiara as new layer
Resize by 15%
Keep centred and lower opacity to 25
 
Paste WordBeads01 as new layer
Resize by 35%
Position along bottom of NameSticker
 
Paste Flower01 as new layer
Resize by 25%
Place over string part of Word Beads
 
Next Paste your tube as a new layer
Resize if necessary
If using the same tube there is no need to resize
JUst place in position and then select your Eraser Tool with the following settings:
 

And carefully erase around the bottom of the tube giving it a softness to give the impression she is on a cloud
 
Erase any excess of rope from the Word Beads behind your tube
 
Add a drop shadow to your elements and tube:
H & V - 2
Opacity - 25
Blur - 5.00
Colour - #3e001a
 
Crop and resize
 

~ Step 3 ~
 
Activate your Background layer
 
Paste Paper 04 as new layer
Adjust / Blur / Gaussian Blur
Radius - 10.00
 
Layers / New Mask Layer / From Image
Locate WSL_Mask33
Source luminance
OK
 
Layers / Merge / Merge Group
 
Select your Text Tool and font of choice
I am using 2Peas Mister Giggles
 
Set your background to #d45878
Type out your name
Add a Gradient Glow if you wish
then a drop shadow (same as above)
 
Add your copyright, licence (if applicable) and watermark and you're done!
 
Thanks for trying my tutorial
 
::St!na::
 

© Tutorial written by Stina on 21st February 2009
All rights reserved