Supplies
Scrap kit of choice - I am using "Good vs Evil" by Alyssa's Scraps & Such available from Paradise 4 Scrappers, Twilight Scraps and Dazzling Scraps
Tube of choice - I am using the lovely FTU artwork of Popeye Wong available from his site
WSL_Mask26 by Chelle available from her blog
Template #8 by Chuliiss Designz available from her blog
Fonts of choice - I am using Cynthia Script ES and Warlock
Plugin: Eye Candy 4000 > Gradient Glow
Tramages > Moving Screen
Let's begin....
Open CD Template #8 and duplicate
Close off original
Delete copyright layer
Close off original
Delete copyright layer
Add a new raster layer and flood-fill white
Layers > Arrange > Send to Bottom
Activate and select HORNS with your Magic Wand
Selections > Modify > Feather by 2
Delete twice
Paste Paper of choice INTO selection
Deselect
Selections > Modify > Feather by 2
Delete twice
Paste Paper of choice INTO selection
Deselect
Activate and select LARGE HEART
Selections > Modify > Feather by 2
Delete twice
Paste another Paper of choice INTO selection
Deselect
Selections > Modify > Feather by 2
Delete twice
Paste another Paper of choice INTO selection
Deselect
Activate and select MEDIUM HEART
Selections > Modify > Feather by 2
Delete twice
Paste another Paper of choice INTO selection
Deselect
Selections > Modify > Feather by 2
Delete twice
Paste another Paper of choice INTO selection
Deselect
Activate and select HEART BORDER
Selections > Modify > Expand by 1
Selections > Modify > Feather by 2
Add a new raster layer
Paste another Paper of choice INTO selection
Deselect
Layers > Merge > Merge Down
Selections > Modify > Expand by 1
Selections > Modify > Feather by 2
Add a new raster layer
Paste another Paper of choice INTO selection
Deselect
Layers > Merge > Merge Down
Select outside the HEART BORDER with your Magic Wand
Selections > Invert
Selections > Modify > Contract by 2
Selections > Modify > Feather by 2
Selections > Invert
Selections > Modify > Contract by 2
Selections > Modify > Feather by 2

Effects > Plugins > Eye Candy 4000 > Gradient Glow with a thin white setting
Deselect
Deselect
Activate DOTS HEART layer
Selections > Float
Selections > Defloat
Selections > Float
Selections > Defloat
Repeat Gradient Glow to your your liking
Select WHITE BACK LEFT
Selections > Modify > Feather by 2
Paste a Tube of choice as new layer and position
Resize as necessary
Selections > Invert
Delete then deselect
Selections > Modify > Feather by 2
Paste a Tube of choice as new layer and position
Resize as necessary
Selections > Invert
Delete then deselect
Select WHITE BACK RIGHT
Selections > Modify > Feather by 2
Paste another Tube of choice as new layer and position
Resize as necessary
Selections > Invert
Delete then deselect
Selections > Modify > Feather by 2
Paste another Tube of choice as new layer and position
Resize as necessary
Selections > Invert
Delete then deselect
Delete the WHITE BACK layers so the backgrounds are black
Select PINK HEART and flood-fill with colour of choice
I am using #800000
Duplicate twice and rename RED HEART1, RED HEART2 and RED HEART3
Hide RED HEART2 and RED HEART3
Activate RED HEART1
I am using #800000
Duplicate twice and rename RED HEART1, RED HEART2 and RED HEART3
Hide RED HEART2 and RED HEART3
Activate RED HEART1
KEEP SELECTED!!
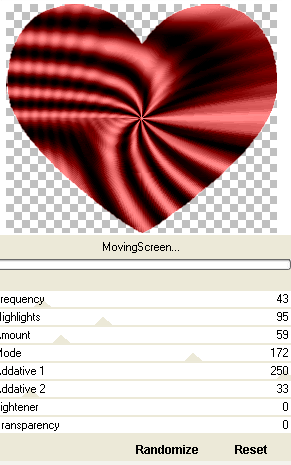
Effects > Plugins > Filters Unlimited > Tramages > Moving Screen with the following settings: (or any of your choice)

Deselect
Paste your main Tube as new layer
Resize as necessary and position in centre
Add a drop shadow of choice
Resize as necessary and position in centre
Add a drop shadow of choice
Paste a paper of choice as new layer
Layers > Arrange > Send to Bottom
Layers > New Mask Layer > From Image
Apply WSL_Mask181
OK
Layers > Merge > Merge Group
Lower opacity to 40
Crop and resize
Activate top layer
Select your Text Tool and font of choice
I am using I am using Cynthia Script ES
Background - #800000
I am using I am using Cynthia Script ES
Background - #800000
Type out text of choice
Objects > Align > Horiztonal Centre in Canvas
Convert to raster layer
Apply some slight noise
Objects > Align > Horiztonal Centre in Canvas
Convert to raster layer
Apply some slight noise
Place below HORNS layer
Select another font of choice
I am using Warlock
Foreground - #000000
Background - #800000
I am using Warlock
Foreground - #000000
Background - #800000
Type out your name
Objects > Align > Horizontal Centre in Canvas
Convert to raster layer
Apply some noise and drop shadow of choice
Objects > Align > Horizontal Centre in Canvas
Convert to raster layer
Apply some noise and drop shadow of choice
Finally, add your © copyright, licence and watermark, then save as a GIF or JPG and you're done!
** IF YOU WISH TO ANIMATE PLEASE FOLLOW THESE NEXT STEPS **
Activate your RED HEART2 layer
Effects > Plugins > Effects > Plugins > Tramages > Moving Screen with any settings of your choice
(NOTE - Keep the Lightener and Transparency set to 0)
Hide RED HEART2 and activate RED HEART3
Repeat the Moving Screen effect and randomise - keeping Lightener and Transparency set to 0
Repeat the Moving Screen effect and randomise - keeping Lightener and Transparency set to 0
Now to animate!
Activate RED HEART1 and hide RED HEART2 and RED HEART3
Edit > Copy Merged
Edit > Copy Merged
Open Animation Shop
Edit > Paste as New Animation
Back to PSP
Hide RED HEART1 and activate RED HEART2
Edit > Copy Merged
Hide RED HEART1 and activate RED HEART2
Edit > Copy Merged
In Animation Shop
Edit > Paste After Current Frame
Edit > Paste After Current Frame
Back to PSP
Hide RED HEART2 and activate RED HEART3
Edit > Copy Merged
Hide RED HEART2 and activate RED HEART3
Edit > Copy Merged
In Animation Shop
Edit > Paste After Current Frame
Edit > Paste After Current Frame
Select All and change Frame Properties to 20
Now save as a GIF and you're done!
Now save as a GIF and you're done!
Thanks for trying my tutorial!
::st!na::
Here is a non-animated version:

© Tutorial written by Stina on 5th August 2009
All rights reserved

No comments:
Post a Comment