
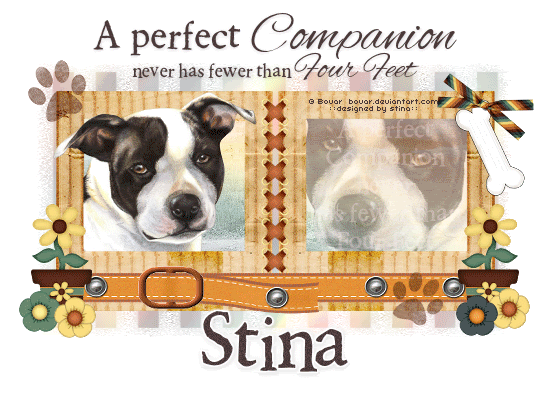
Supplies
Scrap kit of choice - I am using two kits from the freebie blog train "Mommy Can We Keep Him?" by Miggins and Royanna
Tube of choice - I am using the lovely artwork of Bovar
WSL_Mask185 by Chelle available from her blog
Fonts of choice - I am using 2Peas Renaissance and Alex Brush
Plugin: Eye Candy 4000 > HSB Noise
Let's begin....
Open a new 750 x 600 blank canvas flood-filled white
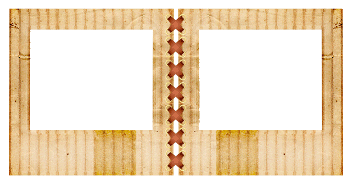
Paste Royanna_SlideMount as new layer
Resize by 40%
Position to the right
Duplicate, then Image > Mirror
So they are now side by side
Resize by 40%
Position to the right
Duplicate, then Image > Mirror
So they are now side by side
Layers > Merge > Merge Down
Paste Miggs_elem25 as new layer
Resize by 38%
Position between the two slide frames
Resize by 38%
Position between the two slide frames
Layers > Merge > Merge Down
Select inside the Frames with Magic Wand
Selections > Modify > Expand by 10
Add new raster layer
Layers > Arrange > Move Down
Paste paper of choice INTO selection
Selections > Modify > Expand by 10
Add new raster layer
Layers > Arrange > Move Down
Paste paper of choice INTO selection
KEEP SELECTED!!
Paste Tube of choice as new layer
Image > Mirror
Position in one of the Frames
Selections > Invert
Delete then deselect
Lower opacity to around 45
Image > Mirror
Position in one of the Frames
Selections > Invert
Delete then deselect
Lower opacity to around 45
Paste Tube as new layer again
Bring to Top
Resize as necessary and position in opposite slide frame
Bring to Top
Resize as necessary and position in opposite slide frame
Select inside the Frame your tube is positioned in
Selections > Invert
Selections > Modify > Contract by 2
Selections > Modify > Feather by 2
Selections > Invert
Selections > Modify > Contract by 2
Selections > Modify > Feather by 2
Activate tube layer and erase the overhanging excess
Deselect
Deselect
Paste Miggs_elem23 as new layer
No need to resize
Position toward the lower portion of Frames
No need to resize
Position toward the lower portion of Frames
Paste Miggs_elem6 as new layer
Image > Rotate by 65 to the right
Resize by 30%
Position to the upper right
Image > Rotate by 65 to the right
Resize by 30%
Position to the upper right
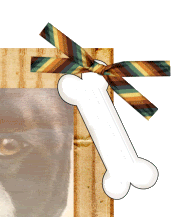
Paste Miggs_elem38 as new layer
Image > Rotate by 20 to the right
Resize by 35%
Position in upper right to fasten Bone to Frame
Image > Rotate by 20 to the right
Resize by 35%
Position in upper right to fasten Bone to Frame
Paste Miggs_elem14 as new layer
Resize by 35%
Position in lower right
Duplicate, then Image > Mirror
Resize by 35%
Position in lower right
Duplicate, then Image > Mirror
Paste a Flower element as new layer
Resize by 35%
Repeat with three more Flowers and position to liking
Resize by 35%
Repeat with three more Flowers and position to liking
Paste Royanna_Stamp01 as new layer
Image > Rotate by 20 to the left
Resize by 7%
Duplicate and position around Frame
Image > Rotate by 20 to the left
Resize by 7%
Duplicate and position around Frame
Paste Paper of choice as new layer
Layers > Arrange > Send to Bottom
Layers > Arrange > Send to Bottom
Adjust > Blur > Gaussian Blur with a radius of 10.00
Layers > New Mask Layer > From Image
Apply WSL_Mask185
OK
Layers > Merge > Merge Group
Apply WSL_Mask185
OK
Layers > Merge > Merge Group
Crop and resize to liking
Select your Text Tool and font of choice
I am using 2Peas Rennaissance and Alex Brush
Text Colour to match tag - I am using #4d3a3f
I am using 2Peas Rennaissance and Alex Brush
Text Colour to match tag - I am using #4d3a3f
Type out Text of choice and position in centre above Frame
Apply a drop shadow of choice
Apply a drop shadow of choice
Using the same text, position in Frame with the lowered opacity
Set blend mode to Screen
Set blend mode to Screen
Select another font of choice
I am using 2Peas Renaissance
Same text colour
I am using 2Peas Renaissance
Same text colour
Type out your name
Objects > Align > Horizontal Centre in Canvas
COnvert to raster layer
Apply any effects and drop shadow of choice
Objects > Align > Horizontal Centre in Canvas
COnvert to raster layer
Apply any effects and drop shadow of choice
Finally, add your © copyright, licence and watermark, then save as a GIF or JPG and you're done!
** IF YOU WISH TO ANIMATE PLEASE FOLLOW THESE NEXT STEPS **
Activate your Frame Mask layer
Duplicate twice and rename Noise1, Noise2 and Noise3
Duplicate twice and rename Noise1, Noise2 and Noise3
Activate Noise1 and hide Noise2 and Noise3
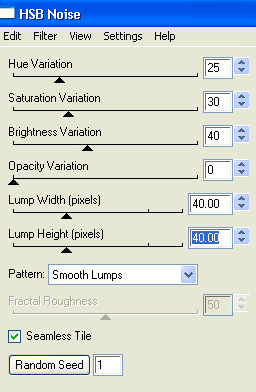
Effects > Plugins > Eye Candy 4000 > HSB Noise with the following settings:
Hide Noise1 and activate Noise2
Repeat HSB Noise again adjusting the Random Seed
Repeat HSB Noise again adjusting the Random Seed
Hide Noise2 and activate Noise3
Repeat HSB Noise once again, adjusting the Random Seed
Repeat HSB Noise once again, adjusting the Random Seed
Activate Noise1 and hide Noise2 and Noise3
Edit > Copy Merged
Edit > Copy Merged
Open Animation Shop
Edit > Paste as New Animation
Edit > Paste as New Animation
Back to PSP
Hide Noise1 and activate Noise2
Edit > Copy Merged
Hide Noise1 and activate Noise2
Edit > Copy Merged
In Animation Shop
Edit > Paste after Current Frame
Edit > Paste after Current Frame
Back to PSP
Hide Noise2 and activate Noise3
Edit > Copy Merged
Hide Noise2 and activate Noise3
Edit > Copy Merged
In Animation Shop
Edit > Paste after Current Frame
Edit > Paste after Current Frame
Now save as a GIF and you're done!
Thanks for trying my tutorial!
::st!na::
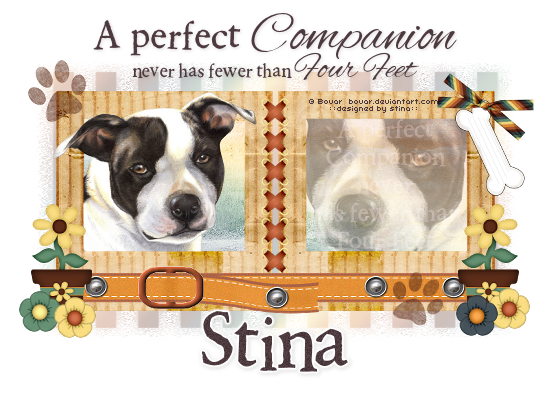
Here is a non-animated version:
© Tutorial written by Stina on 22nd August 2009
All rights reserved
No comments:
Post a Comment