
Supplies
Scrap kit of choice - I am using "The Frog Prince" by Tootypup Scraps available from Twilight Scraps, Stargazer Scraps, Scraps with Attitude, Paradise 4 Scrappers, Katelynn Designs and Dazzling Scraps
Tube of choice - I am using the artwork of Katherine Barber which is available for purchase with a licence from Up Your Art
**PLEASE DO NOT USE HER ARTWORK WITHOUT THE APPROPRIATE LICENCE**
Font of choice - I am using Cookie
Plugin: Eye Candy 4000 Gradient Glow
**This is an easy tutorial**
Let's begin...
Open a new 600 x 600 blank canvas flood-filled white
Paste Frame02 as new layer
Resize by 60%
Resize by 60%
Select inside the Frame with your Magic Wand
Selections > Modify > Expand by 10
Add new raster layer
Paste Paper of choice INTO selection
Layers > Arrange > Move Down
Selections > Modify > Expand by 10
Add new raster layer
Paste Paper of choice INTO selection
Layers > Arrange > Move Down
KEEP SELECTED!!
Paste your Tube as new later
Resize as necessary and position inside Frame
Selections > Invert
Delete excess
Deselect
Resize as necessary and position inside Frame
Selections > Invert
Delete excess
Deselect
Paste LilyPad1a as new layer
Resize by 50%
Position in lower left
Resize by 50%
Position in lower left
Paste some Frogs of choice as new layers
Resize as necessary and position on Lilypad and bottom of Frame
Resize as necessary and position on Lilypad and bottom of Frame
Paste Clouds as new layer
Resize by 90%
Positon to your liking
Resize by 90%
Positon to your liking
Paste Sparkle of choice as new layer
Resize by 20%
Position BEHIND frogs and Lilypad
Duplicate, and position to the lower right behind frog
Resize by 20%
Position BEHIND frogs and Lilypad
Duplicate, and position to the lower right behind frog
Paste Daisy Frame as new layer
Layers > Arrange > Send to Bottom
Resize by 95%
Lower opacity to 35
Layers > Arrange > Send to Bottom
Resize by 95%
Lower opacity to 35
Apply any drop shadows of choice to your layers
Select your Text Tool and font of choice
I am using Cookie
Foreground - #d9d9b7
Background - #6c643a
Stroke width - 2.00
I am using Cookie
Foreground - #d9d9b7
Background - #6c643a
Stroke width - 2.00
Type out your name
Objects > Align > Horizontal Centre in Canvas
Convert to raster layer
Add some noise
Objects > Align > Horizontal Centre in Canvas
Convert to raster layer
Add some noise
Effects > Plugins > Eye Candy 4000 > Gradient Glow with the following settings:
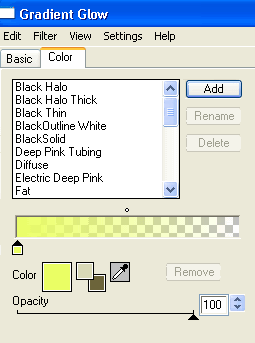
Finally, add your © copyright, licence and watermark, then save as a GIF or JPG and you're done!
** IF YOU WISH TO ANIMATE PLEASE FOLLOW THESE NEXT STEPS **
Activate your Frog layer
Duplicate twice and rename as Frog1, Frog2 and Frog3
Leave Frog1 in postion
Activate Frog2 and move up slightly not quite above Frog1
Activate Frog3 and position similarly so that they look like this:
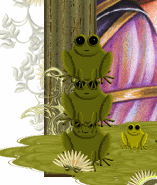
You can do the same with another of the frogs if you wish
Now to animate!
Hide Frog2 and Frog3, leaving only Frog1 visible
Edit > Copy Merged
Open Animation Shop
Edit > Paste as new animation
Back to PSP
Hide Frog1 and activate Frog2
Edit > Copy Merged
In Animation Shop
Edit > Past After Current Frame
Back to PSP
Hide Frog2 and activate Frog3
Edit > Copy Merged
In Animation Shop
Edit > Paste After Current Frame
I chose to animate a second frog, so from here I shall name them - Frog4, Frog5 and Frog6
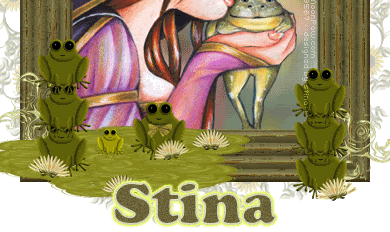
So back to PSP
Hide Frog3 and activate Frog2
Hide Frog4 and Frog6 also, activating Frog5
Edit > Copy Merged
In Animation Shop
Edit > Paste After Current Frame
Back to PSP
Hide Frog2 and Frog5
Activate Frog1 and Frog6
Edit > Copy Merged
In Animation Shop
Edit > Paste After Current Frame
Back to PSP
Leave Frog1 visible and hide Frog6 and activate Frog5
Edit > Copy Merged
In Animation Shop
Edit > Paste After Current Frame
Back to PSP
Hide Frog5 and activate Frog4
Edit > Copy Merged
In Animation Shop
Edit > Paste After Current Frame
You should now have a total of 7 Frames
Select All and change your Frame Properties to 25
Now save as a GIF and you're done!
Thanks for trying my turorial!
::st!na::
Here is a non-animated version:

© Tutorial written by Stina on 6th August, 2009
All rights reserved

No comments:
Post a Comment