Supplies
Scrap pieces of choice - I used Paper and Floral doodle from "Spring Fever" by Cinnamon Scraps
Organza Bow, Pink Lace and Floral Cluster from "All About Love" by Babycakes Scraps
Roses from "Vintage Sweetheart" by Kristi of The Scrappin Divaz Designz
Fonts of choice - I used Bickham Script Fancy and Twilight
Eye Candy 4000 Gradient Glow (optional)
~ Step 1 ~
Open a 650 x 450 transparent canvas
Using your kit of choice open a nice paper which will be your main colour (I am using Paper6) and minimise it
Select Rounded Rectangle in your Selection Tools and draw out a rectangle
You will see the marching ants
Add a new raster layer
Select your Flood Fill Tool
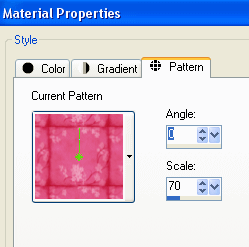
In your Materials Palette find the Paper you chose under Patterns
Flood fill layer
KEEP SELECTED!!
Selections / Modify / Contract by 4
Delete
STILL KEEP SELECTED!!
In your Materials Palette change the Scale of the Pattern to 70

Add a new raster layer
Layers / Arrange / Send to Bottom
Selections / Modify / Expand by 2
Flood fill layer with paper pattern
Reduce the opacity of this layer to 50
KEEP SELECTED….*g*
Activate your background
Add new raster layer and flood fill white
Deselect
Activate your frame layer and with your magic wand click inside the frame
Selections / Invert
Now add a drop shadow:
H & V - 1
Opacity - 30
Blur - 10.00
Colour - to match your frame (mine is #ac2a57)
KEEP SELECTED
Repeat drop shadow changing the Horizontal and Vertical to -1
Layers / Merge / Merge Visible
~ Step 2 ~
Select your Text Tool
Choose a fancy Script font (I used Bickham Script Fancy)
Keep your foreground null
Background a dark colour which complements your paper
I'm using:
Foreground - null
Background - #cf215e
In your script font type out the letter A
Position it to the far left
Convert to raster layer
Choose a fancy type font (I'm using Twilight)
Type out the words
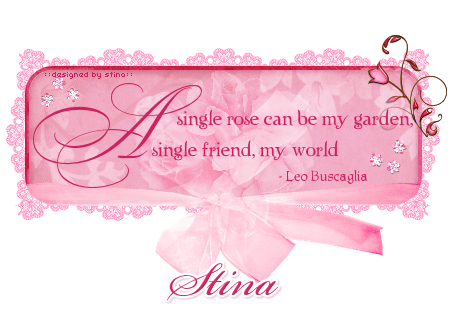
"single rose may be my garden,
single friend, my world…."
Add some spacing to the beginning of the first line as it staggers against the A
In a smaller print (either in same font or one similar) type out
"- Leo Buscaglia"
~ Step 3 ~
Choose a nice lace element and resize as necessary
Position on the bottom layer behind the frame
Erase any excess overhanging the sides
Duplicate then Image / Flip
Position opposite top to bottom
Duplicate again then Image /Rotate by 90 to the left
Position to the side, erasing the excess above and below
Duplicate again then Image / Mirror
Position on the opposite side
Once satisfied with the positioning of the lace as a frame hide all layers but the lace
Layers / Merge / Merge Visible
~ Step 4 ~
Find a soft bow in organza or even a string bow
Resize as necessary
Drop the Bow layer below the Text but above the Frame
Erase any excess to give the impression of the Bow being wrapped around the bottom
Feel free to add any elements to make this creation "your own"
Add your name and watermark
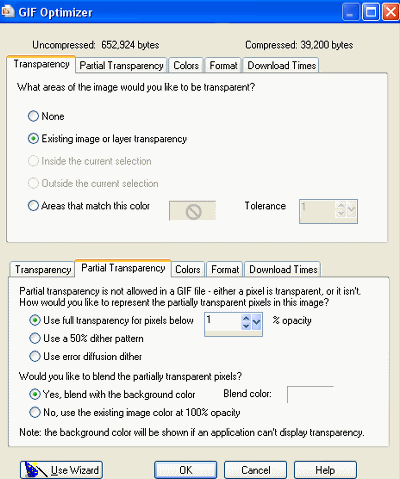
Export as a GIF with the following settings:

And you're done!
Thank you for trying my tutorial
::st!na::
©Tutorial written by Stina on 14th February 2009
All rights reserved


No comments:
Post a Comment