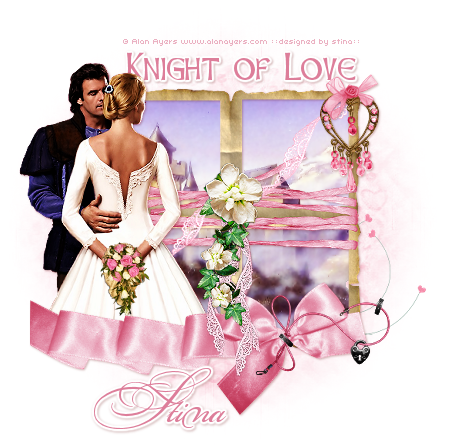
Supplies
Scrap kit of choice - I am using the lovely "Vintage Valentine" by Babycakes Scraps
which canbe purchased from her blog, Creative Scraps Store, Cotton Candy Kreations
or Aussie Scraps (full list available on her blog)
Thank you Lynne for this gorgeous kit! Such wonderful elements to work with
Tube and image of choice - or you can use mine (supplied)
Tube is by Alan Ayers http://www.alanayers.com/
WSL_Mask214 by Chelle found on her blog (supplied)
Fonts of choice - I used Celtic Hand (supplied) and Bickham Script Fancy
(pay font, not supplied)
Plugins:
Xero Improver (Xero set 3)
Xero Radianace (Xero set 4)
Adjust Variations
Eye Candy 4000 Gradient Glow
My Supplies here
~ Step 1 ~
Place the plugin files (.8bf files) into your PSP plugin folder
Open your mask and fonts and minimise them for later
Open new blank canvas 600 x 600 flood-filled white
Paste Square Frame as new layer and resize by 65%
Open your and paste as new layer
Move below frame and resize as necessary
On the frame layer use your magic wand to click outside the frame
Selections / Modify / Expand by 5
Activate your image layer and hit delete
Deselect
On your image layer go to
Effects / Plugins / Xero / Improver
Default settings
Effects / Plugins / Xero / Radiance with the following settings:
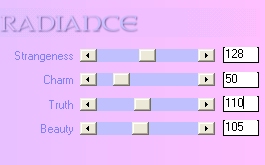
Duplicate this layer
On the duplicate go to
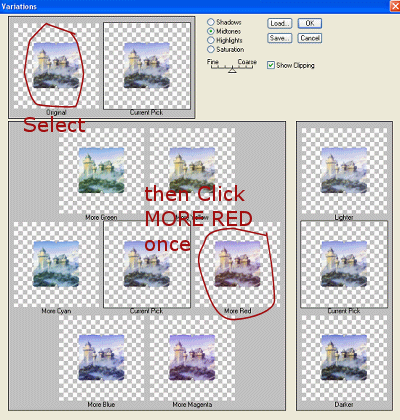
Effects / Plugins / Adjust / Variations
Select the window marked "Original"
Then click the one marked "More Red" ONCE ONLY
Midtones - checked
OK
Duplicate again and then set the blend mode to Soft Light
~ Step 2 ~
Paste tube as new layer
If using a different tube you may need to resize
Duplicate then
Adjust / Hue & Saturation / Colourise
Hue - 250
Saturation - 55
Effects / Plugins / Xero / Improver
Default settings
In your layer palette set the blend mode to Soft Light
Paste Bouquet as new layer
Resize by 15% and position over the woman's hands
Paste Pink Ribbon as new layer
Resize by 30% then position along the bottom of frame
Duplicate and move it slightly along to cover the bottom of the tube
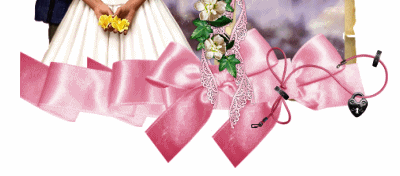
Use your eraser to erase the excess from the top ribbon layer
till you reach a part where the ribbons blend
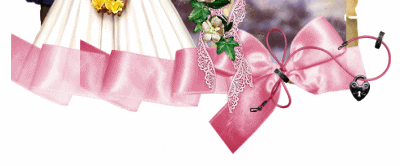
Change layers and erase the excess from the bottom so that the two ribbons now look like one
Layers / Merge / Merge Down
Paste Charm Tie as new layer
Image / Mirror then resize by 20%
Position with on the ribbon's bow in lower left
Duplicate this layer then blend mode to Multiply
Paste Ribbon Flowers as new layer
Resize by 35% and position over the flowers in the centre of the frame
so the lace now overhangs the ribbon at the bottom
Adjust / Sharpness / Sharpen
Duplicate layer then blend mode to Screen
Reduce opacity of this layer to 55
Paste Heart Charm as new layer
Resize by 20% and position in the top right corner
Paste Rose Bow as new layer
Resize by 12% and position over the link of the jewelled Heart Charm
Apply a drop shadow to all your element layers:
H & V - 1
Opacity - 30
Blur - 2.00
Colour - #6b0e0e
Paste the Pink Lace as a new layer
Image / Mirror then resize by 20%
Position below the Heart Charm across the window
Adjust / Sharpen / Unsharpen Mask
Radius - 1.00
Strength - 100
Clipping - 4
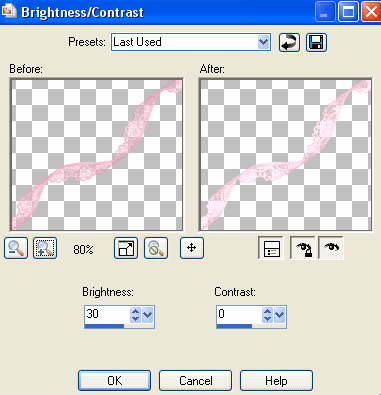
Adjust / Brightness & Contrast / Brightness/Contrast with the following settings:
~ Step 3 ~
Paste Paper Ten as new layer
Resize by 80%
Layers / New Mask Layer / From Image
Locate WSL_Mask214 in drop down list
Source luminance checked
Invert Mask Data UNchecked
OK
Layers / Merge / Merge Group
Reduce the opacity of this layer to around 65
Feel free to add any other elements you wish to make this creation "your own"
Then crop and resize
~ Step 4 ~
Select your Text Tool
Foreground - null
Background - #dd7e9a (or a colour to match your kit)
Type out "Knight of Love" or your choice of phrase
Convert to raster layer
Effects / Plugins / Eye Candy 4000 / Gradient Glow
Glow width - 3.00
Soft Corners - 25
Opacity - 100
Colour - Solid White
Apply a drop shadow:
H & V - 1
Opacity - 30
Blur - 2.00
Colour - #6b0e0e
In a nice script font add your name and any other effects you wish
Then add your © copyright, licence and watermark and you're done!
**Please note: if you are using the same tube as I am please ensure you include credit to
© Alan Ayers www.alanayers.com
Thanks for trying my tutorial
::st!na::
©Tutorial written by Stina on 9th February 2009
All rights reserved

No comments:
Post a Comment