Supplies
Scrap kit of choice - I'm using "Me Lucky Charms" by Cindy of Southern Scrapz
which can be purchased from Paradise4Scrappers
Thank you Cindy for this cute kit! I enjoyed using it!
Tube of choice - I am using the lovely artwork of Suzanne Richards
which can be purchased from CILM with a proper licence
**PLEASE DO NOT USE HER ARTWORK WITHOUT THE APPROPRIATE LICENCE**
WSL_Mask239 by Chelle which can be downloaded from her blog
Fonts of choice - I am using PattyDay (which is a pay font)
~ Step 1 ~
Open Mask and fonts and minimise till later
Open new blank image 600 x 600 with white background
Paste the yellow floral green frame (#39) as new layer
Resize by 70%
With your magic wand select inside the frame and the spaces in between the flowers
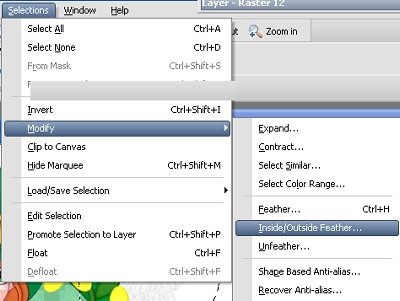
Selections / Modify / Expand by 10
Add new raster layer
Copy Paper12 and paste into selection
Deselect
Drag layer below frame
~ Step 2 ~
Paste your tube of choice as new layer
Resize as necessary then position to your liking
Using your freehand tool on point to point (you may need to zoom in for this step)
carefully draw along the inside edge of the frame
and continue OVER the flowers along frame edge
Then bring it back around the bottom to the other side
Using your eraser tool erase the legs but careful not to erase the ribbon
Paste Pot of Gold (#4) as new layer
Resize by 30% and position it to the left tucked slightly behind the girl and behind the frame layer
Paste Clover Bag (#4 ![]() as new layer and resize by 15%
as new layer and resize by 15%
Position in front of the pot of gold
Paste Yellow Flower (#45) as new layer
Resize by 15% and tuck slightly behind the bag
Paste Green Flower (#46) as new layer
Resize by 15% and tuck slightly behind yellow flower
Use your Pick Tool (or Deformation Tool in earlier versions) and turn it slightly to right or Image / Rotate by 10 to the right
Paste Horseshoe (#50) as new layer
Resize by 25% and postion to the left on frame
Paste Green Bow with Gem (#51) as new layer
Resize by 25%
Position an the bottom of the horseshoe
~ Step 3 ~
Paste Rainbow (#5) as new layer
Place one end behind the pot of gold
Use your Pick Tool (or Deformation Tool) to rotate the rainbow and stretch it into position to your liking
Select your Freehand Tool and draw around the cloud at the top end of the rainbow

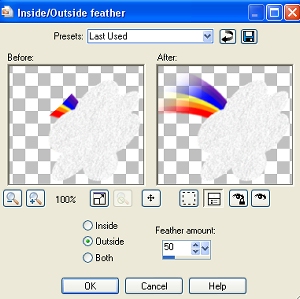
Selections / Modify / Inside/Outside Feather with the following settings:

Hit delete
Deselect
Use your Pick Tool again to stretch rainbow so you can see the end slightly
Erase any excess cloud from the end behind the pot of gold
Lower opacity to about 50
~ Step 4 ~
Paste the Dark Green Doodle (#15) as new layer
Image / Mirror then Image / Flip
Resize by 60%
Position in lower left corner beneath frame
Paste Paper12 as new layer
Resize by 75%
Layers / New Mask Layer / From Image
Locate WSL_Mask239 from drop down list
Source Luminance checked
Invert Mask Data UNchecked
OK
Layers / Merge / Merge Group
Resize by 95% and position centrally behind frame
Lower opacity to about 30
Crop and resize tag
~ Step 5 ~
Using your preset shape tool with your foreground set to a colour like #000000 draw out an ellipse just slightly larger than the frame
Objects / Align / Center in Canvas
You may need to position the shape slightly where you intend placing your text
Select your text tool and choose an Irish font if you wish (I used PattyDay)
Change the background colour in your Materials Palette to a green that matches your tube (I used #008441)
Where the A on your text tool curves over the shape click to open your text box and type your text - I chose "Luck of the Irish"
Click OK
Use your mouse to move the text slightly left or right to your liking
In your Layer palette click the + to open the Vector Layer
Hide the ellipse
Convert to raster layer
Effects / Plugins / Eye Candy 4000 / Gradient Glow
Glow width: 3.00
Soft Corners: 25
Opacity: 100
Colour: Soft Yellow
Type your name out in the same font or another one
Add Noise -
Uniform
25
Monochrome
Effects / Plugins / Eye Candy 4000 / Gradient Glow
Glow width: 3.00
Soft Corners: 25
Opacity: 100
Colour: White
Apply a slight drop shadow
Add your © copyright, licence and watermark and you're done!
Thanks for trying my tutorial
::st!na::
©Tutorial written by Stina on 5th February 2009
All rights reserved


No comments:
Post a Comment