
Supplies
Scrap kit of choice - I am using "My Way" by Vassia's Designs which can be purchased from Paradise 4 Scrappers
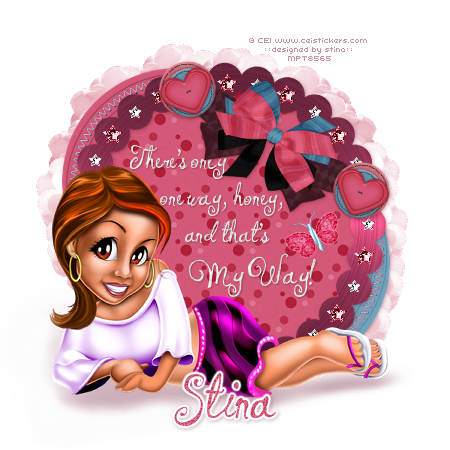
Tube of choice - I am using the delightful artwork of Half Pints by CEI which can be purchased through My PSP Tubes
**PLEASE DO NOT USE ARTWORK WITHOUT THE APPROPRIATE LICENCE**
Font of choice - I am using Ingrid Darling
Alien Skin Eye Candy 5 Impact / Perspective Shadow
Eye Candy 4000 / Gradient Glow (optional)
~ Step 1 ~
Open a new blank canvas 600 x 600 flood filled white
Paste Frame 4 as new layer and leave in position (centre)
With your magic wand click inside the frame
Selections / Modify / Expand by 10
Selections / Modify / Expand by 10
Open Paper17 or one of choice
Activate Background layer then paste paper as new layer
Activate Background layer then paste paper as new layer
Selections / Invert
Delete
Deselect
Delete
Deselect
Paste Frame 2 as new layer
Resize by 70% and position in the upper left
Move to the bottom layer and place in position so that it is partially showing behind the main frame (at the top)
Resize by 70% and position in the upper left
Move to the bottom layer and place in position so that it is partially showing behind the main frame (at the top)
Paste Frame 3 as new layer
Resize by 70% and position to the lower right
Move to the bottom layer and place in position so that it is partially showing behind the main frame (at the bottom)
Resize by 70% and position to the lower right
Move to the bottom layer and place in position so that it is partially showing behind the main frame (at the bottom)

~ Step 2 ~
Paste your tube as new layer
Resize by 90%, or as necessary
Resize by 90%, or as necessary
Effects / Plugins / Eye Candy Impact / Perspective Shadow, with the following settings:
Now using your eraser tool on the following settings:

Carefully erase around the tube giving it a blurry shadow

Paste Eyelet Ribbon2 as new layer
Image / Rotate by 30 to the right
Resize by 70%
LEAVE IN POSITION!!
Image / Rotate by 30 to the right
Resize by 70%
LEAVE IN POSITION!!
Paste Eyelet Ribbon1 as new layer
Image / Rotate by 30 the the right
Resize by 70%
(This ribbon will now be completely covering the first)
Lower the opacity of this layer to around 70
Layers / Merge / Merge Down
Image / Rotate by 30 the the right
Resize by 70%
(This ribbon will now be completely covering the first)
Lower the opacity of this layer to around 70
Layers / Merge / Merge Down
YOU CAN NOW MOVE THE RIBBONS to the upper right
Paste Bow 1 as new layer
Paste Eyelet Ribbon1 as new layer
Image / Rotate by 30 the the right
Resize by 50%
Position over the first ribbon in the centre
Paste Eyelet Ribbon1 as new layer
Image / Rotate by 30 the the right
Resize by 50%
Position over the first ribbon in the centre
Paste Button 1 as new layer
Resize by 30% and position over one eyelet COMPLETELY
Duplicate then Image / Mirror
Now place the duplicate one at the opposite end of the ribbon
Resize by 30% and position over one eyelet COMPLETELY
Duplicate then Image / Mirror
Now place the duplicate one at the opposite end of the ribbon
~ Step 3 ~
Paste Star3 as new layer
Rename PINK STARS
Resize by 30% Bicubic
Position on a part of the frame within one of the "circles"
Duplicate and place it two circles away
Duplicate again and place another two circles away and so forth
Rename PINK STARS
Resize by 30% Bicubic
Position on a part of the frame within one of the "circles"
Duplicate and place it two circles away
Duplicate again and place another two circles away and so forth
On your last star go to
Layers / Merge / Merge Down
Which will merge it to the layer below
Layers / Merge / Merge Down
Which will merge it to the layer below
Repeat till you have merged all layers back to the one named PINK STARS
Paste Star2 as new layer
Rename SILVER STARS
Resize by 20% bicubic
Position in one of the empty space on the frame
Rename SILVER STARS
Resize by 20% bicubic
Position in one of the empty space on the frame
Repeat the duplicating and position of each star
On your last star go to
Layers / Merge / Merge Down
Which will merge it to the layer below
Layers / Merge / Merge Down
Which will merge it to the layer below
And continue till you have merged all layers back to the one named SILVER STARS
Paste Flower4 as new layer
Resize by 50%
Duplicate and position around the bottom layer of frames
Lower opacity to about 70
Resize by 50%
Duplicate and position around the bottom layer of frames
Lower opacity to about 70
Crop and resize
~ Step 4 ~
In your Material Palettes Select a Silver Pattern as your background
Select your Text Tool and choose a nice font
(I'm using Ingrid Darling)
Type out "There's only one way, honey, and that's My Way"
Or a phrase of your choice
Select your Text Tool and choose a nice font
(I'm using Ingrid Darling)
Type out "There's only one way, honey, and that's My Way"
Or a phrase of your choice
Convert to raster layer
Set blend mode to Soft Light
Layers / Merge / Merge Down
Set blend mode to Soft Light
Layers / Merge / Merge Down
Paste Butterfly2 as new layer
Image / Rotate by 30 to the left
Resize by 25% and position somewhere beside the text
Duplicate and set your blend mode to Screen
Layers / Merge / Merge Down
Image / Rotate by 30 to the left
Resize by 25% and position somewhere beside the text
Duplicate and set your blend mode to Screen
Layers / Merge / Merge Down
Add a drop shadow to your element and frame layers:
H & V - 1
Opacity - 30
Blur - 5.00
Colour - #530408
H & V - 1
Opacity - 30
Blur - 5.00
Colour - #530408
Add your name and apply a Gradient Glow (optional)
Then add your © copyright, licence and watermark and you're done!
Then add your © copyright, licence and watermark and you're done!
Thank you for trying my tutorial
::st!na::
© Tutorial written by Stina on 19th Febraury 2009
All rights reserved
Great tut!!! You have an award on my blog. :) I think you do such nice tuts!
ReplyDelete