
Supplies
Scrap kit of choice - I am using the lovely "Luck O the Irish" by Rachelz Expressionz which can be purchased from Cotton Candy Kreations
Tube of choice - I am using the artwork of Tom Hoover which can be purchased from My PSP Tubes
**PLEASE DO NOT USE HIS ARTWORK WITHOUT THE APPROPRIATE LICENCE**
Becky_Mask009 here
Plugin: Alien Skin Eye Candy Impact/Glass
Plugin: Eye Candy 4000/Gradient Glow
Font of choice - I am using P22 Kilkenny
~ Step 1 ~
Open a new blank 600 x 600 canvas flood filled white
Now we are going to make our own shamrock
So to start select your Preset Shapes Tool on Heart
So to start select your Preset Shapes Tool on Heart
Set your Background to #225a28, Foreground to null
Draw out a heart on your canvas
Objects / Align / Horizontal Centre in Canvas
(just to make sure it is centred)
Objects / Align / Horizontal Centre in Canvas
(just to make sure it is centred)
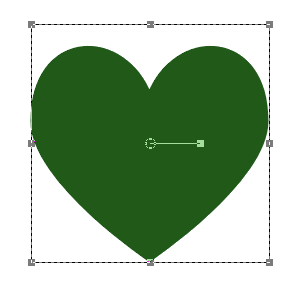
KEEP AS VECTOR LAYER
Duplicate then Image / Rotate by 130 to the left
Position slightly to the left
Position slightly to the left
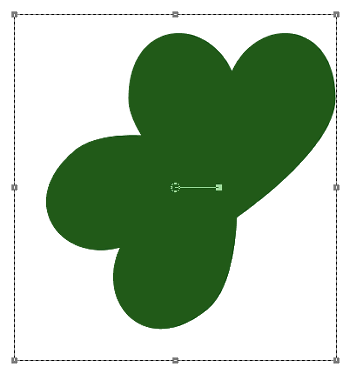
Duplicate again then Image / Mirror
Convert each layer to raster layer
Convert each layer to raster layer
Now we will make the stem
Select your Preset Shapes Tool again in Rectangle
Same colour settings
Draw out a rectangle from the bottom centre of your shamrock about the size of a stem
Same colour settings
Draw out a rectangle from the bottom centre of your shamrock about the size of a stem
Now hold your shift key and pull the bottom left node slightly to the left
Then convert to raster layer
Then convert to raster layer

Hide your background and
Layers / Merge / Merge Visble
Layers / Merge / Merge Visble
Effects / Plugins / Alien Skin Eye Candy Impact / Glass with the following settings:
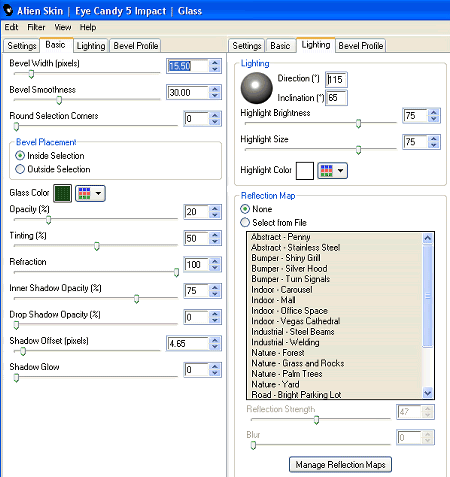
Glass colour the same that you used to make the shamrock
Now this is what you should have:

~ Step 2 ~
Now Paste TripleFrame02 as a new layer
Move it to below your shamrock
Resize by 45% and place in position
We'll leave that for the moment and come back to it later
Move it to below your shamrock
Resize by 45% and place in position
We'll leave that for the moment and come back to it later
Paste LuckyShoe1 as new layer
Position centrally over you shamrock
Position centrally over you shamrock
(it will automatically paste slightly off-centre because of the shamrock embellishments)
Apply a drop shadow:
H & V - 1
Opacity - 30
Blur - 5.00
Colour - #000000
H & V - 1
Opacity - 30
Blur - 5.00
Colour - #000000
Effects / Plugins / Eye Candy 4000 / Gradient Glow with the following settings:
Colour is a Gold setting: #fff263

Paste CloverSpray5 as a new layer
Resize by 35%
Position to the bottom left of the Shoe
Dupicate then Image / Mirror
Paste Charm1 as new layer
Resize by 25%
Position to the right
Resize by 25%
Position to the right
Paste Flower3 as new layer
Resize by 30% then Image / Mirror
Position on the upper left of the frame
Resize by 30% then Image / Mirror
Position on the upper left of the frame
Now Add the same drop shadow as above to CloverSprays, Charm and Flower
Now let's add our tube
Paste as new layer and resize as nececcary
Position in the centre
Paste as new layer and resize as nececcary
Position in the centre
Add a drop shadow:
Vertical: -1
Horiztontal: 2
Opacity: 50
Blur: 10.00
Colour: #000000
Vertical: -1
Horiztontal: 2
Opacity: 50
Blur: 10.00
Colour: #000000
Paste Sticker5 as new layer (this is the pot of gold with rainbow)
Resize by 40%
Position to the left and behind your tube
Resize by 40%
Position to the left and behind your tube
~ Step 3 ~
Now let's go back to our frame
Paste your tube again and place below left frame
Duplicate then Image / Mirror
Position in right frame opposite
Duplicate then Image / Mirror
Position in right frame opposite
Activate tube in left frame then
Layers / Merge / Merge Down
Layers / Merge / Merge Down
Activate Frame layer
With your magic wand click inside the left and right frames
Selections / Modify / Expand by 10
With your magic wand click inside the left and right frames
Selections / Modify / Expand by 10
Paste StPatrick6 paper as new layer
Move below the frame
Selections / Invert
Delete on Paper layer
Delete on tube layer
Deselect
Move below the frame
Selections / Invert
Delete on Paper layer
Delete on tube layer
Deselect
Lower opacity to 50
Add a drop shadow to your Frame layer
H & V - 1
Opacity - 50
Blur - 5.00
Colour - #000000
H & V - 1
Opacity - 50
Blur - 5.00
Colour - #000000

~ Step 4 ~
Now we want to Crop our tag
First Image / Canvas Resize to 600 wide x 500 high
First Image / Canvas Resize to 600 wide x 500 high
Activate your Background layer
Paste the StPatrick6 paper as a new layer
Layers / New Mask Layer / From Image
Locate Becky_Mask009
Source luminance
OK
Layers / New Mask Layer / From Image
Locate Becky_Mask009
Source luminance
OK
Resize your tag to your liking
Select your Preset Shapes Tool again and choose Ellipse
Hold your Shift Key down and draw out a circle
Objects / Align / Centre in Canvas
Hold your Shift Key down and draw out a circle
Objects / Align / Centre in Canvas
Select your Text Tool
Colour - #225a28
Choose your font (I am using P22 Kilkenny)
Colour - #225a28
Choose your font (I am using P22 Kilkenny)
Position over the curve of the cirle till you see the Text Tool curve
Type out your text
"I Can Be Your Lucky Charm"
or anything you like
Type out your text
"I Can Be Your Lucky Charm"
or anything you like
In your layer palette open the Vector Layer and hide the Ellipse
Convert to raster layer
Convert to raster layer
Adjust / Add/Remove Noise / Add Noise
Gaussian checked
Noise - 15
Monochrome checked
Gaussian checked
Noise - 15
Monochrome checked
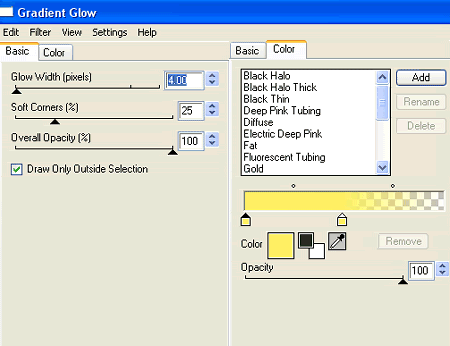
Effects / Plugins / Eye Candy 4000 / Gradient Glow
Glow width - 3.00
Soft corners - 25
Opacity - 60
Setting - Medium
Colour - #fff263
Glow width - 3.00
Soft corners - 25
Opacity - 60
Setting - Medium
Colour - #fff263
Choose another font for your name
Apply the same Gradient Glow as above
BUT CHANGE THE OPACITY TO 100!!!
Apply the same Gradient Glow as above
BUT CHANGE THE OPACITY TO 100!!!
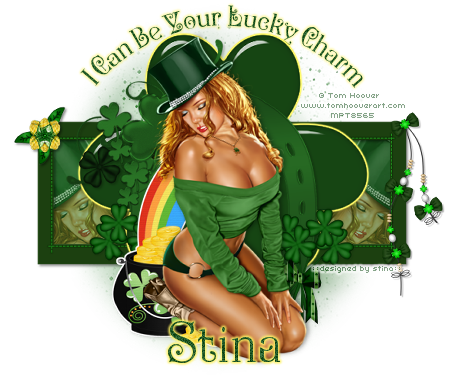
Add your © copyright, licence and watermark then save as a GIF or JPG and you're done!
Thanks for trying my tutorial
::st!na::
© Tutorial written by Stina on 26th Febraury 2009
All rights reserved
No comments:
Post a Comment