Supplies
Scrap kit of choice - I am using the lovely "I Heart You" by Captivated Visions
which can be purchased from Exquisite Scraps or Paradise4Scrappers
Thank you Rachel for this gorgeous kit! I truly enjoy working with it!
Tube of choice - I am using the gorgeous work of Joel Adams
which can be purchased from CILM with the proper licence
**PLEASE DO NOT HIS WORK WITHOUT THE APPROPRIATE LICENCE**
WSL_Mask 131 and 133 by Chelle which can be found on her blog
Font of choice - I am using A&S Snapper Script
Eye Candy 4000 Glass
~ Step 1 ~
Open Masks and font and minimise for later
Open a new blank canvas 600 x 600 flood-filled white
Paste Frame 6 as a new layer
LEAVE IN POSITION
Paste Paper 20 as new layer and move below frame layer
Position the paper slightly down ensuring one of the large hearts is somewhere
within the frame near the centre (see below)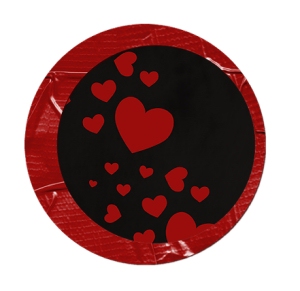
Once happy with the position activate your frame layer
Click inside the frame
Selections / Modify / Expand by 10
Back on the paper layer
Selections / Invert
Delete
KEEP SELECTED!!
Hide your paper layer
Paste Paper 07 as new layer and move below first paper layer
Position with hearts surrounding the frame (see below)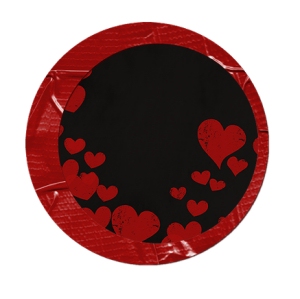
Once happy with the position activate your frame layer
Click inside the frame
Selections / Modify / Expand by 10
Back on the paper layer
Selections / Invert
Delete
Deselect
Paste Falling Hearts as new layer
Image / Mirror then position so the curve of the hearts lines up with the curve of the frame
With your Eraser Tool erase the remaining hearts
Add a drop shadow:
H & V - 2
Opacity - 60
Blur - 8.00
Colour - #000000
~ Step 2 ~
Resize your tag to 400 x 400
Image / Canvas Resize and enlarge working space to 500 x 500
Paste Flowers as new layer and resize by 20%
Image / Mirror then position to the lower right of the frame
Paste Pin 02 as new layer and resize by 12%
Image / Rotate by 20 the right
Position in the top right
Paste Bow 05 as new layer
Resize by 50% and position at the bottom of frame in the centre
Duplicate then change blend mode to Screen
Reduce the opacity of this layer to 50
Paste Bow 01 as new layer
Resize by 30% then position over the bow at the bottom of the frame
~ Step 3 ~
Paste your tube as new layer and resize if necessary
Position to the left to your liking
You may need to adjust the position of some of your elements
Activate your background layer
Paste Paper 09 as new layer (no need to resize it unless you wish to)
Duplicate and hide original layer
On duplicate layer go to
Layers / New Mask Layer / From Image
Locate WSL_Mask131 in the list
Source Luminance checked
Invert Mask Data UNchecked
OK
Layers / Merge / Merge Group
Unhide original paper layer
Layers / New Mask Layer / From Image
Locate WSL_Mask133 in the list
Source Luminance checked
Invert Mask Data UNchecked
OK
Layers / Merge / Merge Group
~ Step 4 ~
Paste WordArt 01 as new layer and resize by 35%
Position in the frame beside your tube
With your freehand tool draw around the word LOVE and hit delete, then deselect
Activiate the paper layer with the hearts and using your magic wand click inside the large heart
Selections / Promote Selection to Layer
KEEP SELECTED!!
Selections / Modify / Inside/Outside Feather with the following settings:
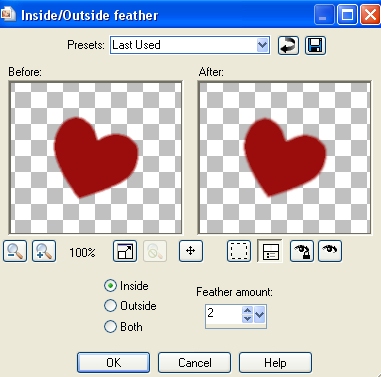
STILL SELECTED
Selections / Invert
Delete
Deselect
Still on this layer
Effects / Plugins / Eye Candy 4000 / Glass with the following settings:
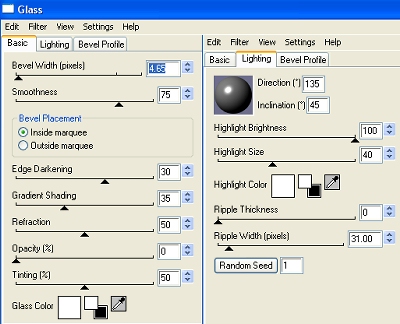
Go to your paper layers and reduce the opacity of the top one to about 50
You will see the hearts from the second papyer layer we did below show through
Add a drop shadow to the WordArt layer:
H & V - 1
Opacity - 100
Blur - 10.00
Colour - #000000
Add any other elements or embellishments you wish
Type your name in a font of your choice using a colour which matches your tube
Add your © copyright, licence and watermark and you're done!
Thank you for trying my tutorial
::st!na::
©Tutorial written by Stina on 6th February 2009
All rights reserved


No comments:
Post a Comment