Supplies
Scrap kit of choice - I am using Hoppy Easter by Swheat Creations which can be purchased from Paradise 4 Scrappers
Thanks Norma for this gorgeous kit! It is delightful!
Thanks Norma for this gorgeous kit! It is delightful!
Tube/s of choice - I am using the delightful artwork of Suzanne Richards which can be purchased from CILM
**PLEASE DO NOT USE HER ARTWORK WITHOUT THE APPROPRIATE LICENCE**
Template # by Cheri (supplied)
WSL_Mask149 by Chelle (supplied)
Fonts of choice - I am using Bickham Script Fancy and 2Peas Flea Market (both are pay fonts)
**PLEASE DO NOT USE HER ARTWORK WITHOUT THE APPROPRIATE LICENCE**
Template # by Cheri (supplied)
WSL_Mask149 by Chelle (supplied)
Fonts of choice - I am using Bickham Script Fancy and 2Peas Flea Market (both are pay fonts)
My Supplies here
~ Step 1 ~
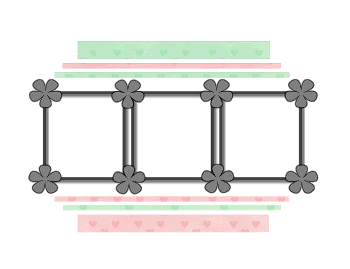
Open Template 3 by Cheri
Duplicate (Shift D) and close off original
Delete watermark layer
Duplicate (Shift D) and close off original
Delete watermark layer
Activate background
Image / Canvas Resize to 650 x 500
Flood fill the excess areas white
Image / Canvas Resize to 650 x 500
Flood fill the excess areas white
Activate BOTTOM LONG BAR layer
Using your magic wand click inside the BAR
Selections / Modify / Feather by 2
Open RoseBkg8 and paste as new layer
Resize by 70%
Selections / Invert
Delete
Deselect
Using your magic wand click inside the BAR
Selections / Modify / Feather by 2
Open RoseBkg8 and paste as new layer
Resize by 70%
Selections / Invert
Delete
Deselect
Activate BOTTOM SHORT BAR
Clickin inside it
Selections / MOdify / Expand by 2
Open RoseBkg14 and paste as new layer
Resize by 70%
Selections / Invert
Delete
Deselect
Clickin inside it
Selections / MOdify / Expand by 2
Open RoseBkg14 and paste as new layer
Resize by 70%
Selections / Invert
Delete
Deselect
Activate BOTTOM FAT BAR
Click the area inside it
Selections / Modify / Expand by 2
Paste RoseBkg8 as new layer
Resize by 70%
Selections / Invert
Delete
Deselect
Click the area inside it
Selections / Modify / Expand by 2
Paste RoseBkg8 as new layer
Resize by 70%
Selections / Invert
Delete
Deselect
Activate TOP LONG BAR
Repeat the above steps alternating the papers
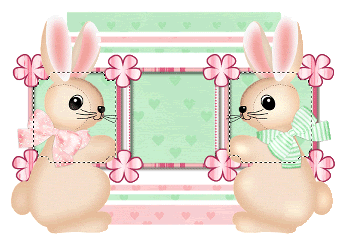
So now you should have something that looks like this:
Repeat the above steps alternating the papers
So now you should have something that looks like this:
Delete all the LONG, SHORT and FAT BARS from the template
Hide your Frame and Background
Layers / Merge / Merge Visible
Rename this later to BARS if you wish for easier identification
~ Step 2 ~
Activate your Frame layer
With your magic wand click each section of the frame till you have them all with marching ants around them:
With your magic wand click each section of the frame till you have them all with marching ants around them:
Selections / Modify / Feather by 2
Open RoseBkg7 and paste as new layer
Resize by 70% and place in position of marching ants
Selections / Invert
Delete
Deselect
Activate your Frame layer again
Using your Selection Tool draw out a rectangle around each one
OR (do as I did)
Use your Magic Wand and click inside each frame,
Using your Selection Tool draw out a rectangle around each one
OR (do as I did)
Use your Magic Wand and click inside each frame,
and again in the shadow so ALL the frame space has marching ants around it
(whichever is easiest for you as both methods work fine - I'm just a magic wand girl...lol)
Selections / Modify / Expand by 3
Activate your BARS layer
Paste RoseBkg14 as new layer
Resize if you wish or leave it as is - up to you
Resize if you wish or leave it as is - up to you
Selections / Invert
Delete
Deselect
Delete
Deselect
Activate Frame layer again
With your magic wand (Tolerance & Feather 0) click inside each of the flowers
Select RoseBkg9 and paste as new layer
Selections / Invert
Delete
With your magic wand (Tolerance & Feather 0) click inside each of the flowers
Select RoseBkg9 and paste as new layer
Selections / Invert
Delete
KEEP SELECTED!!
Selections / Invert
Selections / Modify / Expand by 2
Activate Frame Layer (yes, again...lol)
Add new raster layer
Flood fill with #ac2a57 (or a colour matching the kit and tube you are using)
Deselect
Selections / Modify / Expand by 2
Activate Frame Layer (yes, again...lol)
Add new raster layer
Flood fill with #ac2a57 (or a colour matching the kit and tube you are using)
Deselect
~ Step 3 ~
Paste BunnyNBow as new layer
Resize by 35% then Image / Mirror
Position over the frame to the left
Resize by 35% then Image / Mirror
Position over the frame to the left
Paste BunnyNBow3 as new layer
Resize by 45%
Position to the right opposite the other bunny
Resize by 45%
Position to the right opposite the other bunny
Your bunnies should be the top two layers (above the frame)
Ensure they are level - to do so, rest the feet of both under the FAT BAR at the bottom
Ensure they are level - to do so, rest the feet of both under the FAT BAR at the bottom
Now with your Magic Wand click inside the two outer frames (and the shadows) so that the whole area of the frame is selected
Selections / Modify / Feather by 2
Selections / Invert
Selections / Invert
Now activating each bunny layer carefully erase the excess - leaving the bow around the bunnies'necks overhanging
You may want to use your Freehand Tool for this
You may want to use your Freehand Tool for this
~ Step 4 ~
Paste your tube as a new layer and resize as necessary
Position in centre frame to your liking
Again with your magic wand click the area inside the frame and the shadow
Position in centre frame to your liking
Again with your magic wand click the area inside the frame and the shadow
Selections / Modify / Feather by 2
Selections / Invert
Now carefully erase the bottom of your tube leaving hands or bows, or whatever else there may be, overhanging
Set your eraser to a medium small size and your hardness to around 80
Set your eraser to a medium small size and your hardness to around 80
Paste several eggs, rotating some either way and scattering them about
Resize each by 20%
Resize each by 20%
Paste some flowers on either end of the frame
Resize and position to your liking
Resize and position to your liking
Add any extra elements you wish!
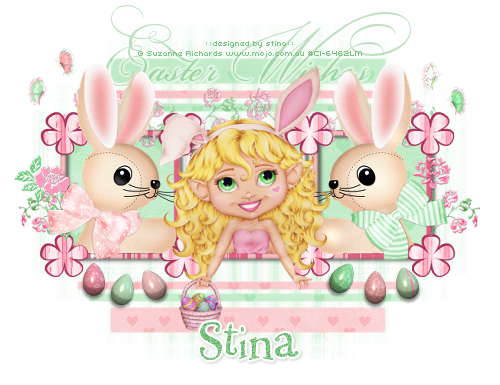
Make this creation YOUR OWN *g*
Make this creation YOUR OWN *g*
~ Step 5 ~
Activate Background layer
Paste Rosebkg12 as new layer
Paste Rosebkg12 as new layer
Layers / New Mask Layer / From Image
Locate WSL_Mask149
Source Luminance
OK
Locate WSL_Mask149
Source Luminance
OK
Layers / Merge / Merge Group
Crop and resize tag
In your Material Palette set your background to #7cc281 (or a colour matching the scrap kit you use)
Select your Text Tool and choose a font
(I am using Bickham Script Fancy)
(I am using Bickham Script Fancy)
Type out whatever text you like at the top
(I tossed between "Easter Wishes" and "Easter Bunny Wishes"
but the latter was a little too long and didn't look right *LOL*)
Objects / Align / Horizontal Centre in Canvas
Convert to raster layer
Convert to raster layer
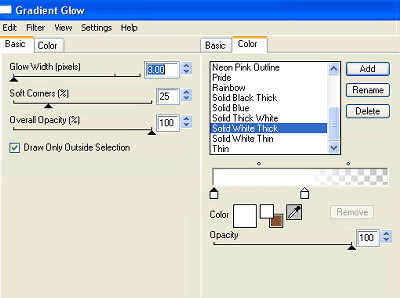
Apply a Gradient Glow:
Add your name, © copyright, licence and watermark and you're done!
Thanks for trying my tutorial
::st!na::
©Tutorial written by Stina 17th February 2009
All rights reserved


No comments:
Post a Comment