Supplies
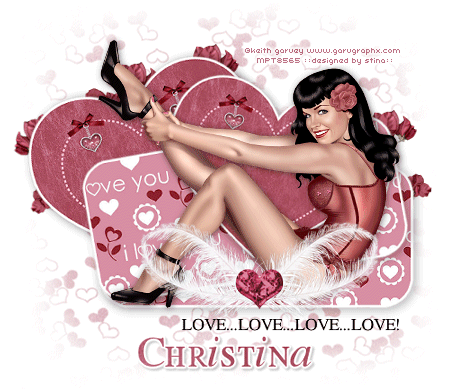
Template #57 by Yvette which you can find on her blog Essence of Creativity
Scrap kit of choice - I used "Sweethearts Day" by Just a Girl Designs which can be purchased at Exquisite Scraps
Tube of choice - I used Keith Garvey's lovely artwork featuring Bettie Page which cab be purchased from My PSP Tubes and used under licence
Vix Mask_177 by Vix at her blog VixPS
Font of choice - I used Will & Grace which can be found at daFont.com
Eye Candy 4000 Gradient Glow
~ Step 1 ~
Open your supplies in PSP and minimise
Duplicate Yvette's template (Shift +D) then close off original
Delete copyright layer
Go to Image / Canvas Size and resize canvas to 700 x 550 with the centre checked
Open a lovely patterned paper of choice (I used Background6) and resize it by 80%
Using your magic wand (Tolerance 0; Feather 1) click the grey area of the "rounded rectangle layer on your template
Paste your paper as a new layer and position it over the rectangle where the marching ants are
Selections / Invert then Delete
Deselect
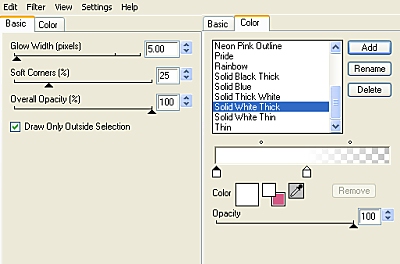
Go to Effects / Plugins / Eye Candy 4000 / Gradient Glow with the following settings:

Duplicate layer then rotate by 10 to the left
Position layer to your liking
Apply a drop shadow of choice to both layers
Delete original rounded rectangle layer
~ Step 2 ~
Choose another lovely paper (I'm using Background18 from the scrap kit) and resize by 80%
Once again, using your magic wand with the same settings click the grey "heart" layer
Paste your paper as a new layer and position over the heart
Selections / Invert then Delete
Deselect
Delete original "heart" layer
Add a new raster layer and move to the top
Using a nice colour from your tube or first paper (something in contrast to the heart) flood fill your new layer
Select the "dotted heart" layer
Go to Selections / Float / Defloat then Selections / Invert
Hit delete and deselect
With your top layer activated go to Layers / Merge / Merge Down
Your heart and dotted heart should now be one layer
Delete original "dotted heart" layer
~ Step 3 ~
Find a nice heart element
For this I used a Ribbon and Glass Heart Element in a similar colour and colourised the ribbon to complement
Resize and position along the top of the dotted heart
Duplicate and position in the same place on the opposite side
Layers / Merge / Merge Down to merge your two heart elements, then
Layers / Merge / Merge Down to merge the elements with the main heart
Duplicate so that you should now have TWO heart layers
On the original Rotate by 10 to the left
On the duplicate Rotate by 10 to the right
Position the duplicate heart slightly to the right and resize by 90%
Move the original to below the top rounded rectangle layer and position to the left to your liking
Add a drop shadow of choice
~ Step 4 ~
Open Wings1 or another element of choice and resize by 60%
Position along the bottom of the rectangle layer beneath the tip of the heart
It should be almost centre to the rectangle layer
**You may need to move the LOVE…LOVE…LOVE…LOVE word art down slightly**
Open Roses_Red, or another floral element, and resize by about 40 - 45%
Duplicate several times and place below the heart and rectangle layers - I also rotated and mirrored them, creating an almost frame-like look, so that they stick out from behind hearts etc.
Using a dark coloured paper (for this I used the same paper as I did for the heart) paste as a new layer and move to the bottom above the white background
Your Mask should be minimised so go to
Layers / Add New Mask Layer / From Image
Find Vix Mask_177
Source Luminance checked - Invert Mask Data UNchecked
Click OK
Layers / Merge / Merge Group
Resize Mask layer by 90% - Bicubic resample
~ Step 5 ~
Add your tube and position to your liking adding a drop shadow of choice
Add your name using the Will & Grace font, or one of your choice
In your materials palette, foreground blank and background (for your text) in a colour that matches your tube
You can do this by using your dropper tool to select a colour to closely match
Type out your name and convert to raster layer
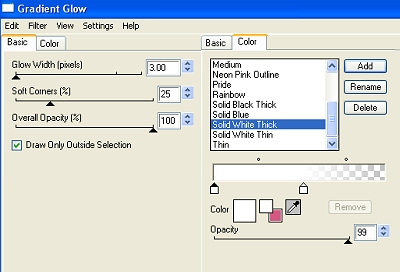
Effects / Plugins / Eye Candy 4000 / Gradient Glow with the following settings:

Add a drop shadow:
Horizontal and Vertical - 2
Opacity - 20
Blur - 3.00
Colour - #000000
Finally, add your © copyright, licence and watermark
Save as a GIF or JPG and you're done!
Thank you for trying my tutorial.
::st!na::
© Written by Stina on 22nd January 2009
All rights reserved

No comments:
Post a Comment