
Supplies
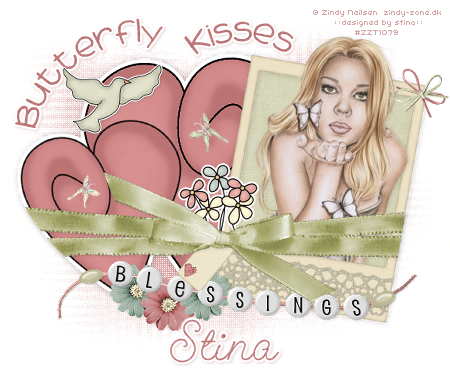
Scrap kit of choice - I am using "Heavenly Inspirations" by DMK Designs which can be purchased at Creative Scraps
Tube of choice - I am using the lovely artwork of Zindy Neilsen which can be purchased from her store
**PLEASE DO NOT USE HER ARTWORK WITHOUT THE APPROPRIATE LICENCE**
WSL_Mask81 by Chelle which can be downloaded from her blog
WSL_Mask81 by Chelle which can be downloaded from her blog
Fonts of choice - I am using 2Peas Sunshine and GeeoHhmk
Plugin: Penta.com / Color Dot
Plugin: Eye Candy 4000 Gradient Glow (optional)
~ Step 1 ~
Open a new blank canvas 600 x 600 flood filled white
Paste DoubleHeart as new layer
Position slightly the left
Add a drop shadow:
H & V - 1
Opacity - 30
Blur - 10.00
Colour - #000000
Position slightly the left
Add a drop shadow:
H & V - 1
Opacity - 30
Blur - 10.00
Colour - #000000
Paste Frame3 as new layer
Image / Rotate by 10 to the right
Resize by 40%
Position slightly to the right
Image / Rotate by 10 to the right
Resize by 40%
Position slightly to the right
With your Magic Wand select inside the frame
Selections / Modify / Expand by 8
Open Paper02 and Edit / copy
Add a new raster layer
Move below Frame layer
Then paste into selection
Deselect
Selections / Modify / Expand by 8
Open Paper02 and Edit / copy
Add a new raster layer
Move below Frame layer
Then paste into selection
Deselect
~ Step 2 ~
Paste Lace04 as new layer
Resize by 70%
Image / Rotate by 10 to the right
Position along the bottom of the frame
Resize by 70%
Image / Rotate by 10 to the right
Position along the bottom of the frame
Activate the Frame Layer and using your magic wand select OUTSIDE of the frame
Acticate the Lace layer and hit delete
Deselect
Acticate the Lace layer and hit delete
Deselect
Paste TiedRibbon02 as new layer
Resize by 70%
Position across Hearts and Frame
Resize by 70%
Position across Hearts and Frame
Apply a slight drop shadow
Paste Daisy01 and Daisy02 as new layers
Resize both by 20%
Position at the bottom of the hearts to the frame
Resize both by 20%
Position at the bottom of the hearts to the frame
Paste Dove as a new layer
Resize by 30%
Position to your liking in or around the hearts
Apply a slight drop shadow
Resize by 30%
Position to your liking in or around the hearts
Apply a slight drop shadow
Paste Flowers as new layer
Resize by 50%
Position in the centre between the Hearts and Frame, below the Ribbon
Resize by 50%
Position in the centre between the Hearts and Frame, below the Ribbon
With your Selection Tool draw out a rectangle around excess shwoing below the ribbon
Then delete
Then delete
Paste StringBow01 as new layer
Image / Rotate by 40 to the right
Position in the upper right corner of the frame
Image / Rotate by 40 to the right
Position in the upper right corner of the frame
Paste StringBow02 as new layer
Image / Rotate by 20 to the left
Position over the first bow in the upper corner of frame
Image / Rotate by 20 to the left
Position over the first bow in the upper corner of frame
Paste Butterfly02 as new layer
Resize by 50% three times
Then resize again by 60%
Image / Mirror
Position above flowers
Resize by 50% three times
Then resize again by 60%
Image / Mirror
Position above flowers
Paste Butterfly04 as new layer
Resize by 50% four times
Position to your liking
Resize by 50% four times
Position to your liking
Paste WordBeads02 as new layer
Resize by 60%
Position toward the bottom beneath the Ribbon layer
Resize by 60%
Position toward the bottom beneath the Ribbon layer
Paste Tag02 as new layer
Resize by 50% twice
Image / Rotate by 40 to the right
Position below the ribbon and above the beads
Resize by 50% twice
Image / Rotate by 40 to the right
Position below the ribbon and above the beads
Apply a slight drop shadow to elements:
H & V - 1
Opacity - 20
Blur - 3.00
Colour - #000000
H & V - 1
Opacity - 20
Blur - 3.00
Colour - #000000
Crop and resize
~ Step 3 ~
Paste your tube of choice as a new layer
Resize as necessary
Image / Rotate by 10 to the right
Position in the frame (but not under it as the top of the tube needs to protrude the frame)
Using your Magic Wand click INSIDE the frame
Selections / Modify / Feather by 2
Selections / Invert
Use your Eraser Tool to erase the excess at the bottom of the frame
Deselect
Paste Paper01 as new layer
Layers / Arrange / Move to Bottom
Resize by 50%
Layers / Arrange / Move to Bottom
Resize by 50%
Layers / New Mask Layer / From Image
Locate WSL_Mask81
Source luminance
OK
Locate WSL_Mask81
Source luminance
OK
Layers / Merge / Merge Group
Effects / Plugins / Penta.com / Color Dot
Default Settings
Default Settings
Now depending on the kind of tube you used any text you add may be different - if you choose to add text at all
Now using your Preset Shapes Tool on Ellipse draw out a circle above the heart
Select your Text Tool and choose a colour that matches your tag
Type out your text of choice - I wrote "Butterfly Kisses" with "Butterfly" on this circle
Type out your text of choice - I wrote "Butterfly Kisses" with "Butterfly" on this circle
Once happy with it's position open your Layer palette, locate the Vector Layer and hide the ellipse
Convert to Raster layer
Effects / Plugins / Eye Candy 4000 / Gradient Glow with the following settings:
Convert to Raster layer
Effects / Plugins / Eye Candy 4000 / Gradient Glow with the following settings:
Repeat the Ellispe shape slightly to the right and type the rest of your text - mine was "Kisses"
Repeat steps above
Add a drop shadow:
H & V - 1
Opacity - 20
Blur - 3.00
Colour - #be7778
H & V - 1
Opacity - 20
Blur - 3.00
Colour - #be7778
Now add your name in a nice font and same colour (if you wish)
Add your copyright, licence (if applicable) and watermark and you're done!
Thanks for trying my tutorial
::St!na::
© Tutorial written by Stina on 22nd February 2009
All rights reserved
No comments:
Post a Comment