Supplies
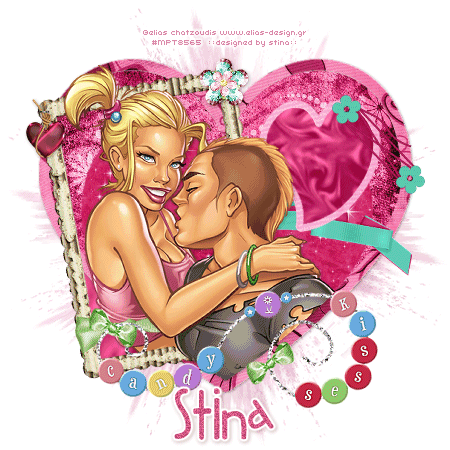
Scrap kit of choice - I am using the "Candy Kisses" kit by Babycakes Scraps
which can be purchased from her blog
Thank you Lynne for this lovely kit! I enjoyed using it!
Tube of choice - I am using the lovely artwork of Elias Chatzoudis
which can be purchased from My PSP Tubes
**PLEASE DO NOT USE HIS ARTWORK WITHOUT APPROPRIATE LICENCE**
Template Xmas 04 by Vaybs
WSL_Mask39 by Chelle
Font of choice - I am using 2Peas Fat Frog which is a pay font
Template and Mask here
~ Step 1 ~
Open template and duplicate (shift D) then close off original
Delete credit layer and Christmas Word Art layer (we won't be needing THAT for this tut…LOL)
Image / Canvas Resize and resize your working space to 650 x 650
Flood fill excess area with white on background layer
~ Step 2 ~
Activate the first heart layer
With your magic wand (Tolerance & Feather on 0) click inside the heart
Selections / Modify / Feather by 2
Open your BCS Berry Paper 4 and paste as new layer
Resize by 65%
Selections / Invert and delete
Deselect
Activate the next heart layer
Click inside heart with magic wand
Selections / Modify / Feather by 2
Open your BCS Berry Paper 3 and paste as new layer
Resize by 65%
Selections / Invert and delete
Deselect
Duplicate this layer and set blend mode to Soft Light
Click inside heart frame layer
Selections / Modify / Feather by 2
Open your BCS Berry Paper 1 and paste as new layer
Resize by 65%
Selections / Invert and delete
Deselect
Click inside small heart layer
Selections / Modify / Feather by 2
Open BCS Berry Satin Paper and paste as new layer
Resize by 65%
Selections / Invert and delete
Deselect
Click inside small heart frame layer
Selections / Modify / Feather by 2
Paste BCS Berry Paper 4 as new layer
DO NOT RESIZE
Position a light area of paper in the selected area
Selections / Invert and delete
Deselect
Duplicate this layer and set blend mode to Screen and lower opacity to 50
~ Step 3 ~
Activate top layer
Open BCS Rustic Frame and paste as new layer
Resize by 55%
Image / rotate by 10 to the left
Position frame slightly the left
Open tube and paste as new layer below the frame
With your magic wand click the inside of the first heart layer
Now activate your tube layer and with your eraser
carefully erase the bottom of the tube below the heart and frame NOT ABOVE!
Deselect
Now duplicate your tube layer and move ABOVE frame layer
**You made need to zoom in for this next step**
With your freehand tool on:
Point to Point
Add (Shift)
Feather-0
Smoothing-0
Anti-alias checked
Carefully draw along the edge of the arm of the girl and the chest of the guy
around the ribbon on the frame
Hit delete
Erase any extra that overlaps the frame so that it looks like the girl is tucked in the frame
~ Step 4 ~
Open BCS Twine Heart Berry and paste as new layer
Resize by 15% and position on the top left corner of the frame
OPen CU Berry Lime Flower and paste as new layer
Resize by 25% and position on the top right corner of frame
Open BCS Flower Eyelet and paste as new layer
Resize by 20% and position to the right as joining the smaller heart with the larger
Open BCS Ribbon 2 and paste as new layer
Resize by 45% Smart size then again by 60% Bicubic resample
Position to the right beneath the small heart
Activate top layer
Open BCS Beads and paste as new layer
Image / Rotate by 3 to the left
Position at the bottom of heart with one of the bows over the ribbon on the frame
and the other along the edge of the heart frame
Add any other elements you wish
~ Step 5 ~
Now we need to give a partial background to the frame
With your magic wand click inside the frame both above and below the ribbon
Selections / Modify / Expand by 8
Paste the BCS Satin Paper as new layer and move it below the heart layers
Selections / Invert
Hit delete
You will see the bottom corner of the frame is now filled while still keeping the heart background
With your BCS Satin Paper again paste as new layer above the white backgroun
Layers / New Mask Layer / From Image
Locate WSL_Mask38 in the drop down menu
Source luminance checked
OK
Lower opacity of this layer to about 30
With this layer still activated grab your selection tool
then click on the middle icon under "Create Selection from"
You should now see marching ants around the mask layer
Image / Crop to Selection
And resize to your liking
Add any drop shadows you wish
Don't forget to delete all the template layers as you no longer need them!
Add your name in the font of your choice
Finally, add your ©copyright, licence and watermark and you're done!
Thanks for trying my tutorial!
::st!na::
©Tutorial written by Stina on 28th January 2009
All rights reserved

No comments:
Post a Comment