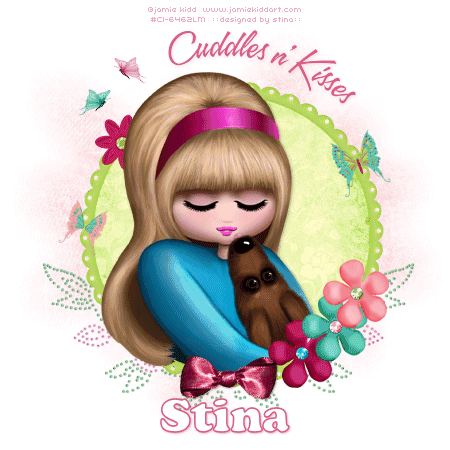
This tutorial is dedicated to my own "cuddles n' kisses" on four legs - Ciara!
This image reminds me of you, sweets.
Supplies
Scrap kit of choice - I am using "Candy Kisses" by Babycakes Scraps which you can purchase from her blog
Thank you Lynne for this lovely kit! I enjoyed using it!
Tube of choice - I am using the lovely artwork of Jamie Kidd which you can purchase with a licence from CILM
**PLEASE DO NOT USE ART WITHOUT PROPER LICENCE**
WSL_Mask7 by Chelle (supplied)
Fonts of choice - I am using A&S Speedway and Cookie (supplied)
My Supplies here
~ Step 1 ~
Open WSL_Mask7 and minimise for later
Open BCS_RoundFrame
Duplicate close off original
Resize to 400 x 400
Image / Canvas Resize and resize working space to 600 x 600
New Raster layer and flood fill with white
Send to bottom
Paste BCS_Lime Paper Five as new layer
Resize by 45%
With magic wand on following settings:
Mode: Add (shift)
Tolerance: 0
Feather: 1
Anti-alias checked
Click inside the frame and the pin
Selections / Modify / Expand by 8
Selections / Invert
Activate paper layer
Hit delete
KEEP SELECTED!!
Open tube and paste as new layer below frame
Resize as necessary (I resized by 75%)
Duplicate tube and move to layer above frame
Hide duplicate layer
Activate first tube layer and hit delete
Deselect
Unhide duplicated tube layer and with your freehand tool draw around the bottom half of the tube
Hit delete
Now it should look as thought your tube is tucked into the bottom of the frame but protruding the top
~ Step 2 ~
Open BCS_Flower Bling and paste as new layer
Resize by 50%
Image / Rotate to the left by 50
Adjust / Sharpness / Sharpen
Position to the right and just to the edge of the frame
Duplicate and Image / Mirror
Layers / Merge / Merge Down
Move this layer below the frame
You should now have something like this:

~ Step 3 ~
Open BCS Painted Bfly and paste as new layer
Resize by 30% then Image / Rotate to the left by 20
Resize by 65% with Bicubic resample
Position to the right on the frame
Paste BCS Painted Bfly Two as new layer
Resize by 30% then Image / Rotate to the right by 20
Resize by 65% with Bicubic resample
Position to the left on the frame
Open BCS Sheer Bfly and paste as new layer
Resize by 20% Smart Size Resample then resize again by 65% Bicubic Resample
Image / Mirror and position to the left above and outside the frame
Duplicate this layer then Image / Mirror
Position just above first sheer butterfly
Go to Adjust / Hue and Saturation / Colourize
with the following settings:
Hue: 240
Saturation: 135
OK
You should now have a green and a pink butterfly
Paste BCS Berry Satin bow as new layer
Resize by 25% and position in the centre of the frame at the bottom
Paste BCS Rose Paper Seven as new layer and move to the bottom above the white background
Layers / New Mask Layer / From Image
Locate WSL_Mask7 in the drop down menu
Source Luminance checked
Invert Mask Data UNchecked
OK
Layers / Merge / Merge Group
CROP AND RESIZE TAG
~ Step 4 ~
Set the colours in your Materials Palette to the following:
Foreground: #d45883
Background: #FFFFFF
Make sure your foreground is active and your background is hidden
Select your Preset Shape tool and make sure the Anti-alias and Create as Vector are CHECKED
Using the Ellipse shape and holding your shift key with one hand draw out a circle around your frame
Release your mouse and shift keys
Objects / Align / Center in Canvas
(THIS WILL ONLY WORK ON A VECTOR LAYER)
Click the arrows in your Materials Palette to swap the colours around
Unhide the background and hide the foreground
Select your text tool and when you see the A of your text tool curve on the line of the circle click to open the text box and type "Cuddles n' Kisses"
In your Layer Palette click the + to open the Vector layer and delete the Ellipse then convert to Raster Layer
Add a subtle drop shadow of your choice
Finally add your name, ©copyright, licence and watermark and you're done!
Thank you for trying my tutorial!
::st!na::
© Tutorial written by Stina on 27th Janary 2009
All rights reserved
I am using the Free version of SPAMfighter.
We are a community of 5.9 million users fighting spam.
SPAMfighter has removed 972 of my spam emails to date.
The Professional version does not have this message.

No comments:
Post a Comment