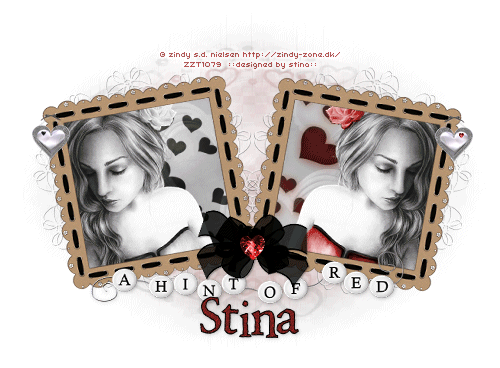
Supplies
A Black and White Scrap kit of choice - I'm using "A Hint of Red" by Babycakes Scraps which you can purchase at Creative Scraps
Black and white Tube or Image of choice - I am using the lovely art of Zindy Neilsen for which you must purchase from her site and have a licence
WSL_Mask 214 by ChelleBeaded Word Art made by Me
Font of choice - I am using 2Peas Renaissance which is a pay font
My Supplies here
~ Step 1 ~
Open Woven Frame and resize to 400 x 420
Image / Canvas Resize and resize to 700 x 500
Move frame to the left side of your canvas and rotate by 10 to the left
Resize by 70% bicubic resample
Duplicate frame then Image / Mirror
Position frames so that the bottom corners touch and the ribbons overlap slightly
Layers / Merge / Merge Down
Add new raster layer and flood fill with white
Move to bottom of canvas (this will be your background)
Open Paper 12 and paste as new layer (if using the same kit and paper you need not resize it just leave as is)
**This next step is optional but I kinda liked the effect so it is up to you**Open Paper 9 and paste as new layer (above first paper)
Resize by 70%
With your magic wand on the following settings:
Mode: Add (Shift)
Tolerance: 0
Feather: 0
Click inside both the frames
Selections / Invert
Hit delete on BOTH paper layers
Deselect
On your top paper layer reduce the opacity to around 60
~ Step 2 ~
Open your tube or image of choice (preferably B&W)
If your tube is coloured then go to
Adjust / Hue and Saturation / Colorise
Set both Hue and Saturation to 0
This will greyscale your tube
Paste your tube as a new layer and resize if necessary
Rotate by 10 to the left and position below the frame
Using your eraser tool erase the excess from around the outside of the frame
Once tube is in position, duplicate then
Image / Mirror
This will mirror your tube in the other frame (though you may need to position it slightly)
Now for the tricky bit *s*
With your freehand tool on the following settings:
Selection type: Point to point
Mode: Add (shift)
Feather: 1
Smoothing: 0
Anti-alias: checked
**You may need to zoom in to see what you are doing**
Using your freehand tool draw around a couple of points on your tube of your choosing - in this case I chose her top and the flower in her hair
(You may need to hide the frame layer to see the complete image)
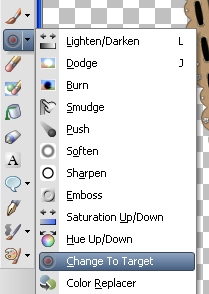
Now choose your Change to Target brush (see below)

In your Materials Palette change your foreground colour to #550000
In your Tool Options palette lower the opacity to around 40
Hold your mouse button down and shade in your selected areas
*ONLY GO OVER THE AREA ONCE OR IT WILL BRIGHTEN THE COLOUR*
With the areas still selected Selections / Promoted Selection to Layer
Change the Blend Mode of this layer to Multiple
(this will darken the red - if you want it darker still duplicate the Multiple layer and Merge Down)
Deselect
~ Step 3 ~
Open Hanging Heart and paste as new layer
Image / Mirror
Resize by 10% and position in top left corner of frame
Open Hanging Heart Four and paste as new layer
Resize by 10% and position in top right corner of frame
Open Black Bow and resize by 50%
Position at the bottom of the frames over the overlapping bows
Open Red Heart and paste as new layer
Image / Rotate by 40 to the right
Resize by 8% and position over the centre of the bow
Adjust / Sharpness / Unsharp Mask
(Radius-1.00, Strength-100, Clipping-4)
Open HintOfRed-WA_Stina (supplied) and paste as new layer
Move this layer between the frame and the bow and position to your liking
Add a slight drop shadow to your elements
~ Step 4 ~
Open your Paper 12 again and paste as new layer above background
Layers / New Mask Layer / From Image
Locate WSL_Mask214 in drop down menu
Source luminance checked and Invert Mask Data UNchecked
Apply
Layers / Merge / Merge Group
Lower opacity to 25
Add new raster layer
Flood fill with #800000
Repeat application of mask
Layers / Merge / Merge Group
Resize this layer by 85%
Lower opacity to 25
Open Lace Doily and resize by 50%
Position it centrally behind the left frame
Lower opacity to 40
Duplicate and Image / Mirror
**THIS NEXT STEP IS OPTIONAL**
On your second paper (with the hearts) layer in the frame use your magic wand to select the hearts
Add new raster layer
Flood fill selections with #800000
Deselect
Adjust / Blur / Gaussian Blur
Radius-6.00
Lower opacity to 60
~ Step 5 ~
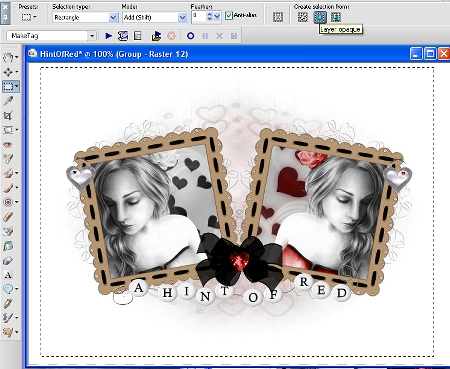
Crop your tag by activating the bottom mask layer then clicking your selection tool
In your Tool Options palette click Layer Opaque

**You will now see marching ants around the mask layer**

Go to Image / Crop to Selection
Resize your tag
Add your name using a bold enough font for a stroke
In your Materials Palette
Foreground to #000000
Background to #550000
Stroke width - 1.00
Create as Vector
Type your name
Adjust / Add/Remove Noise / Add Noise
Uniform checked
Noise 20%
Monochrome checked
Add a slight drop shadow
Add your © copyright, licence number and watermark and you're done!
Thank you for trying my tutorial.
::st!ina::
©Tutorial written by Stina on 25th January 2009
All rights reserved

No comments:
Post a Comment