

Supplies
Scrap kit of choice - I am using the "Rockin' with Attitude" Re-Grand Opening Collab available from Scraps With Attitude
Tube of choice - I am using the stunning artwork of Ismael Rac available with a licence from CILM
**PLEASE DO NOT USE HIS ARTWORK WITHOUT THE APPROPRIATE LICENCE**
**PLEASE DO NOT USE HIS ARTWORK WITHOUT THE APPROPRIATE LICENCE**
Template #163 by Missy
WSL_Mask26 by Chelle available from her blog
Fonts of choice - I am using A&S Snapper Script and Pump Demi Bold
Plugins: Eye Candy 4000 Gradient Glow and Graphics Plus Cross Shadow
Ready? Let's begin....
Open Missy's Template 163 and duplicate (Shift D)
Delete copyright layer
Delete copyright layer
Image > Canvas Resize 600 x 500 centred
Activate Background layer and flood-fill excess white
Activate Background layer and flood-fill excess white
Select STAR1 with your Magic Wand
Selections > Modify > Feather by 2
Press delete severasl times to remove star template
Paste Paper of choice INTO selection
Deselect
Selections > Modify > Feather by 2
Press delete severasl times to remove star template
Paste Paper of choice INTO selection
Deselect
Repeat process with STAR2 and MUSIC NOTE layers
Paste a MusicNote as new layer
Resize by 55%
Position OVER the music note template
Use your Pick Tool (Deformation Tool in some versions) and bring the nodes in to size with the Template
Resize by 55%
Position OVER the music note template
Use your Pick Tool (Deformation Tool in some versions) and bring the nodes in to size with the Template
Duplicate, then set blend mode to Soft Light
Layers > Merge > Merge Down
Layers > Merge > Merge Down
Paste MusicNote again as new layer
Resize by 8%
Duplicate several times
Image > Rotate by 30 to the left and right alternatively
Resize some again by 80%
Position around tag
Resize by 8%
Duplicate several times
Image > Rotate by 30 to the left and right alternatively
Resize some again by 80%
Position around tag
Paste another MusicNote as new layer and repeat, resizing by 5%
Paste a flower (glitter doodle) as new layer
Resize by 5% and duplicate a few times
Position around tag
Repeat with another colour flower of the same
Resize by 5% and duplicate a few times
Position around tag
Repeat with another colour flower of the same
Hide all layers but the MusicNotes and Flowers, then
Layers > Merge > Merge Visible
Lower opacity to 55
Layers > Merge > Merge Visible
Lower opacity to 55
Paste your tube of choice
Resize as necessary and position beside MusicNote template layer
Resize as necessary and position beside MusicNote template layer
Paste a Guitar as new layer
Resize by 8%
Position alongside tube
Resize by 8%
Position alongside tube
Paste Paper of choice as new layer
Layers > Arrange > Send to Bottom, then
Move Up above white Background
Resize by 17%
Layers > Arrange > Send to Bottom, then
Move Up above white Background
Resize by 17%
Layers > New Mask Layer > From Image
Locate WSL_Mask26
OK
Layers > Merge > Merge Group
Locate WSL_Mask26
OK
Layers > Merge > Merge Group
Crop and resize to liking
Select your Text Tool and font of choice
I am using A&S Snapper Script
Choose a colour from your tag for your text - I am using #e51f93
I am using A&S Snapper Script
Choose a colour from your tag for your text - I am using #e51f93
Type out your text
Image > Rotate 25 to the left
Position to your liking, then
Convert to raster layer
Add some noise
Image > Rotate 25 to the left
Position to your liking, then
Convert to raster layer
Add some noise
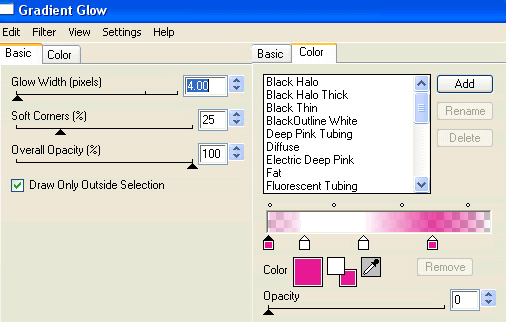
Effects > Plugins > Eye Candy 4000 > Gradient Glow with the following settings:
Select another font of choice
I am using Pump Demi Bold with the same text colour
I am using Pump Demi Bold with the same text colour
Type out your name
Objects > Align > Horiztonal Centre in Canvas
Convert to raster layer
Add some noise
Apply the same Gradient Glow as above
Objects > Align > Horiztonal Centre in Canvas
Convert to raster layer
Add some noise
Apply the same Gradient Glow as above
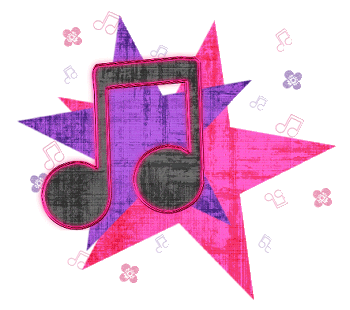
Finally, add your © copyright, licence and watermark, then save as a GIF or JPG and you're done!
** IF YOU WISH TO ANIMATE PLEASE FOLLOW THESE NEXT STEPS **
Activate the Mask Layer
Duplicate once and rename Light1 and Light2
Activate the Mask Layer
Duplicate once and rename Light1 and Light2
Leave Light1 as is and activate Light2
Effects > Plugins > Graphics Plus > Cross Shadow with default settings
Hide Light2 with only Light1 visible
Edit > Copy Merged
Open Animation Shop
Edit > Paste as New Animation
Back to PSP
Hide Light1 and activateLight2
Edit > Copy Merged
In Animation Shop
Edit > Paste AFTER Current Frame
Effects > Plugins > Graphics Plus > Cross Shadow with default settings
Hide Light2 with only Light1 visible
Edit > Copy Merged
Open Animation Shop
Edit > Paste as New Animation
Back to PSP
Hide Light1 and activateLight2
Edit > Copy Merged
In Animation Shop
Edit > Paste AFTER Current Frame
Go to Frame Properties and change to 30, then save as a GIF and you're done!
Thanks for trying my tutorial!
::st!na::
Thanks for trying my tutorial!
::st!na::
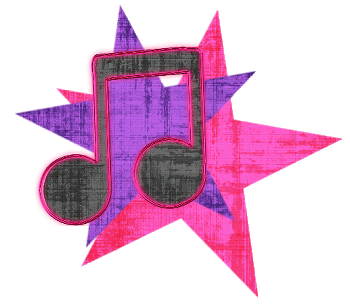
Here is a non-animated version:

© Tutorial written by Stina on 23rd May 2009
All rights reserved
All rights reserved
No comments:
Post a Comment