
Supplies
Scrap kit of choice - I am using "Rockin' Attitude" Re Grand Opening kit from Scraps with Attitude
**PLEASE DO NOT USE THIS ARTWORK WITHOUT THE APPROPRIATE LICENCE**
MPD_Template 1 from MomParadiseDesigns available from Creative Misfits
Plugin: Eye Candy 4000 Gradient Glow
Fonts of choice - I am using CopperplateTBoldCon and Astronaut
Ready? Let's begin....
Open MPD_Template 1 and duplicate (Shift D)
Delete copyright layer
Delete copyright layer
Image > Canvas Resize 650 x 500 centred (for more working space)
Flood-fill excess Background layer white
Then resize to your liking (because some of the effects we will be using don't resize very well - so we are going to resize first)
Flood-fill excess Background layer white
Then resize to your liking (because some of the effects we will be using don't resize very well - so we are going to resize first)
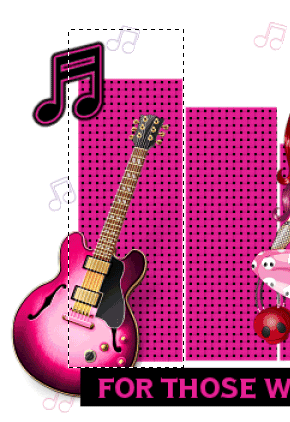
Select the BlueBars with your Magic Wand
Press delete a few times to remove the blue background
Flood-fill each rectangle bar with your colour of choice
Deselect
Rename this layer BARS
Press delete a few times to remove the blue background
Flood-fill each rectangle bar with your colour of choice
Deselect
Rename this layer BARS
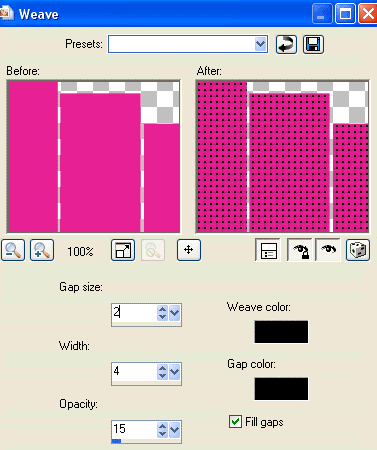
Effects > Texture Effects > Weave with the following settings:
Select the Guitar layer with your Magic Wand
Flood-fill with another colour of choice
Then deselect
I pasted a Guitar from the scrap kit
Flood-fill with another colour of choice
Then deselect
I pasted a Guitar from the scrap kit
Activate MusicNote1
Add new raster layer
Flood-fill with a colour of choice
Activate your MusicNote1 again
Selections > Select All, then Float, then Defloat, then Invert
Activate flood-filled layer
Delete then deselect
**This gives a smoother outline finish**
Add new raster layer
Flood-fill with a colour of choice
Activate your MusicNote1 again
Selections > Select All, then Float, then Defloat, then Invert
Activate flood-filled layer
Delete then deselect
**This gives a smoother outline finish**
Repeat with MusicNote2 layer
Then Merge both MusicNote layers together
Then Merge both MusicNote layers together
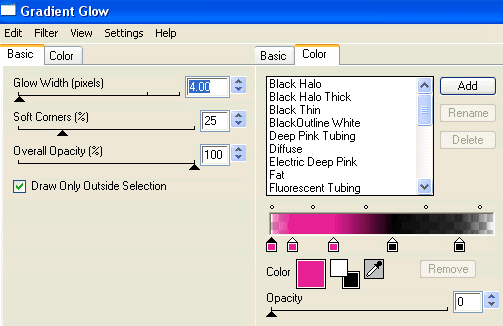
Effects > Plugins > Eye Candy 4000 > Gradient Glow with the following settings:
Select the SmallRectangle with your Magic Wand
Flood-fill with a colour of your choice
Deselect
Flood-fill with a colour of your choice
Deselect
It is up to you if you want to keep the Word Art - I wrote my own
Select Text Tool and font of choice
I used CopperplateTBoldCon
Type out Text and position
Convert to raster layer
I used CopperplateTBoldCon
Type out Text and position
Convert to raster layer
Paste Tubes of choice as new layers
Resize each as necessary
Position to liking
Resize each as necessary
Position to liking
Add any extra elements you wish
Now activate your BARS layer and duplicate it
Layers > Arrange > Send to Bottom
Rename BARS BKG
Layers > Arrange > Send to Bottom
Rename BARS BKG
Adjust > Blur > Gaussian Blur with a Radius of 20.00
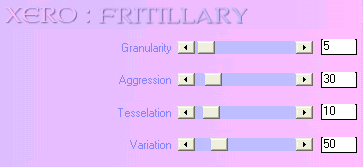
Effects > Plugins > Xero > Fritillary with the following settings:
Repeat Fritillary
Lower opacity to 55
Lower opacity to 55
Select Text Tool and font of choice
I am using Astronaut
Type out your name
Objects > Align > Horiztonal Centre in Canvas
Convert to raster layer
Apply a drop shadow of choice
I am using Astronaut
Type out your name
Objects > Align > Horiztonal Centre in Canvas
Convert to raster layer
Apply a drop shadow of choice
Finally, add your © copyright, licence and watermark, then save as a GIF or JPG and you're done!
** IF YOU WISH TO ANIMATE PLEASE FOLLOW THESE NEXT STEPS **
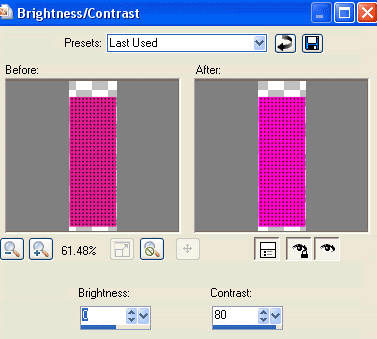
Activate the BARS Layer
Duplicate FIVE times so you have a total of six layers
Rename Bright1, Bright2, Bright3, Bright4, Bright5 and Bright6
Leave Bright1 as is and activate Bright2
With your Selection Tool draw a rectangle around the first BAR
Adjust > Brightness & Contrast > Brightness/Contrast with the following settings:
Hide Bright2 and activate Bright3
Draw a rectangle around the second bar
Apply the Brightness & Contrast
Repeat with the remaining Bars up to Bright6 layer, then
Hide Bright2 to 6 leaving Bright1 visible
Edit > Copy Merged
Open Animation Shop
Edit > Paste as New Animation
Back to PSP
Hide Bright1 and activate Bright2
Edit > Copy Merged
In Animation Shop
Edit > Paste AFTER Current Frame
Edit > Copy Merged
Open Animation Shop
Edit > Paste as New Animation
Back to PSP
Hide Bright1 and activate Bright2
Edit > Copy Merged
In Animation Shop
Edit > Paste AFTER Current Frame
Again, repeat with the other layers until you have SIX frames in Animation Shop
Go to Frame Properties and change to 20, then save as a GIF and you're done!
Thanks for trying my tutorial!
::st!na::
Thanks for trying my tutorial!
::st!na::
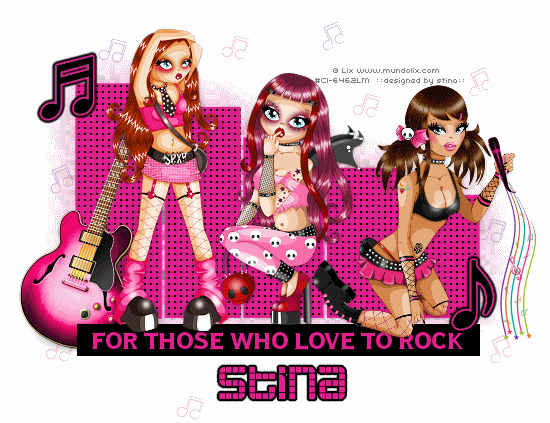
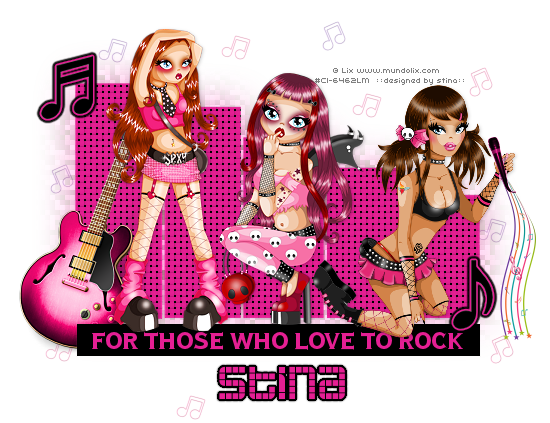
Here is a non-animated version:
© Tutorial written by Stina on 24th May 2009
All rights reserved
All rights reserved
No comments:
Post a Comment