
Supplies
Scrap kit of choice - I am using "Moonlight" by Diane of Candy's Treats available from Stargazer Scraps and her store
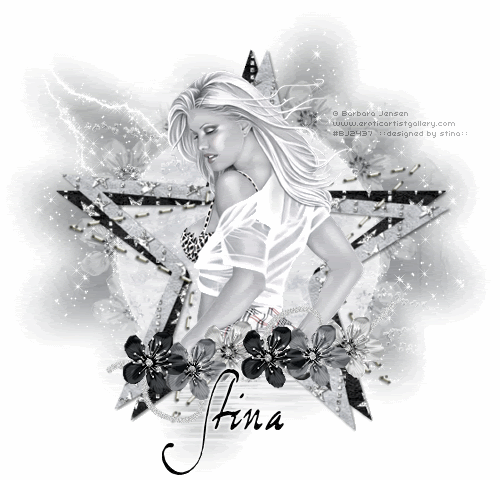
Tube of choice - I am using the lovely artwork of Barbara Jensen which can be purchased from her site
**PLEASE DO NOT USE HER ARTWORK WITHOUT THE APPROPRIATE LICENCE**
WSL_Mask7 by Chelle available from her blog
Plugin: Mura Meister Copies
Plugin: Alien Skin Xenofex 2 Constellation
Font of choice - I am using Missiva
Ready? Let's begin....
Open a new 600 x 600 blank canvas flood-filled white
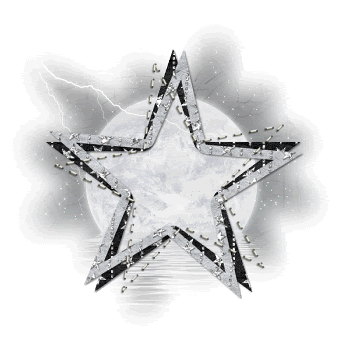
Paste FrameStar as new layer
Resize by 80%
Resize by 80%
LEAVE IN POSITION
Paste Moonlight1 as new layer (paper background)
Resize by 80%
Layers > Arrange > Send to Bottom
Resize by 80%
Layers > Arrange > Send to Bottom
Layers > Ne Mask Layer > From Image
Locate WSL_Mask7
OK
Layers > Merge > Merge Group
Locate WSL_Mask7
OK
Layers > Merge > Merge Group
Paste DarkFlowerOnString1 as new layer
Resize by 50%
Position at the bottom of Star Frame
Resize by 50%
Position at the bottom of Star Frame
Paste tube of choice as new layer
Resize as necessary
Layers > Arrange > Move Down so your Tube is below the FlowerString
Resize as necessary
Layers > Arrange > Move Down so your Tube is below the FlowerString
Select your Eraser Tool and carefully erase the excess of your Tube from below the Flowers
Paste DarkBlossom3 as new layer
Resize by 15%
Resize by 15%
LEAVE IN POSITION!!
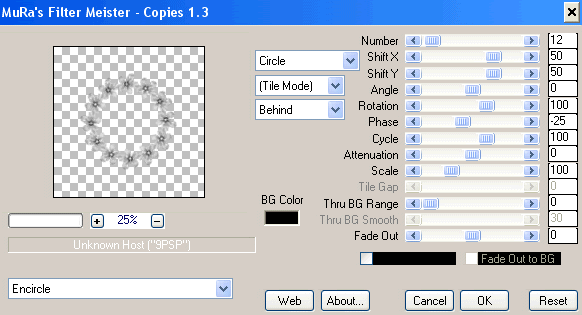
Effects > Plugins > Mura Meister > Copies with the following settings:
Paste GlitterSilverSpill2 as new layer
Resize by 85%
Set Blend Mode to Overlay and lower opacity to 65
Resize by 85%
Set Blend Mode to Overlay and lower opacity to 65
Select your Text Tool and font of choice
I am using Missiva
Set your Background to a colour matching your tag - I am using #000000
Type out your name
Objects > Align > Horizontal Centre in Canvas
Convert to raster layer
I am using Missiva
Set your Background to a colour matching your tag - I am using #000000
Type out your name
Objects > Align > Horizontal Centre in Canvas
Convert to raster layer
Finally, add your © copyright, licence and watermark, then save as a GIF or JPG and you're done!
** IF YOU WISH TO ANIMATE PLEASE FOLLOW THESE NEXT STEPS **
Duplicate Mask layer twice and rename Sparkle 1, Sparkle2 and Sparkle3
Hide Sparkle2 and Sparkle3 activating only Sparkle1
Effects > Plugins > Alien Skin Xenofex 2 > Constellation with the following settings:
Hide Sparkle2 and Sparkle3 activating only Sparkle1
Effects > Plugins > Alien Skin Xenofex 2 > Constellation with the following settings:

Hide Sparkle1 and activate Sparkle2
Apply the Constellation effect, adjusting the Random Seed
Hide Sparkle2 and activate Sparkle3
Apply same again, adjusting the Random Seed
Hide Sparkle2 and Sparkle3 again with only Sparkle1 visible
Edit > Copy Merged
Open Animation Shop
Edit > Paste as New Animation
Back to PSP
Hide Sparkle1 and activate Sparkle2
Edit > Copy Merged
In Animation Shop
Edit > Paste AFTER Current Frame
Back to PSP
Hide Sparkle2 and activate Sparkle3
Edit > Copy Merged
In Animation Shop
Edit > Paste after Current Frame
Finally, save as a GIF and you're done!!
Thanks for trying my tutorial!
::st!na::
© Tutorial written by Stina on 9th May 2009
All rights reserved
All rights reserved
Hi Stina!!!
ReplyDeleteYou've been Tagged!!!
Go to my blog: www.thedramaqueensscraps.blogspot.com to see what you've been tagged with.
xo
Sabrina