
**Grand Opening of Twilight Scraps tut**
Supplies
Scrap kit of choice - I am using "Support the Troops" by Jay of Heartbeatz Creationz available as part of the Grand Opening of Twilight Scraps
**Kit is a FREEBIE from 15th to 18th May then it goes on sale**
Tube of choice - I am using the lovely artwork of Suzanne Woolcott available from her store
WSL_Mask215 by Chelle available from her blog
Fonts of choice - I am using Centime and Chocolate Dulce
Plugins: Mura Meister Copies and Alien Skin Eye Candy 5: Nature > Fire
Ready? Let's Go...
Open Missy Template #200
Shift D to duplicate and close off original
Delete copyright layer
Shift D to duplicate and close off original
Delete copyright layer
Image > Canvas Resize 600 x 600 centred
Flood-fill excess background white
Activate CIRCLE layer
Select with your Magic Wand
Selections > Modify > Feather by 1
Press DELETE two or three times to remove circle (pressing delete several times deletes the feathering)
Paste paper of choice INTO selection
Deselect
Select with your Magic Wand
Selections > Modify > Feather by 1
Press DELETE two or three times to remove circle (pressing delete several times deletes the feathering)
Paste paper of choice INTO selection
Deselect
Activate DOTTED CIRCLE layer
Selections > Select All
Selections > Float, the Defloat
Selections > Modify > Feather by 1
Paste a paper of choice INTO selection
Deselect
Selections > Select All
Selections > Float, the Defloat
Selections > Modify > Feather by 1
Paste a paper of choice INTO selection
Deselect
Activate STAR layer
Select with your Magic Wand
Selections > Modify > Feather by 1
Press DELETE two or three times
Paste paper of choice into selection
Deselect
Select with your Magic Wand
Selections > Modify > Feather by 1
Press DELETE two or three times
Paste paper of choice into selection
Deselect
Activate STAR BACKGROUND layer
Select with your Magic Wand
Selections > Modify > Feather by 1
Press DELETE two or three times
Paste paper of choice into selection
Deselect
Select with your Magic Wand
Selections > Modify > Feather by 1
Press DELETE two or three times
Paste paper of choice into selection
Deselect
Activate STAR FRAME layer
Select with your Magic Wand
Selections > Modify > Feather by 1
Press DELETE two or three times
Flood-fill with a colour of choice from your tag into selection
Deselect
Select with your Magic Wand
Selections > Modify > Feather by 1
Press DELETE two or three times
Flood-fill with a colour of choice from your tag into selection
Deselect
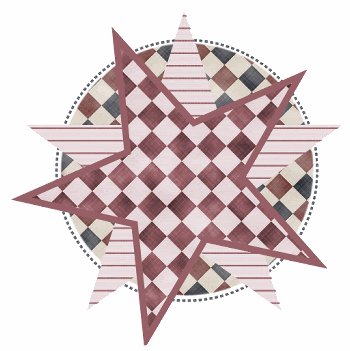
You should now have something like this:
Paste two Flowers each as new layers
Resize by around 20%
Duplicate each FOUR times
Place one of each around five points on your Template together
Resize by around 20%
Duplicate each FOUR times
Place one of each around five points on your Template together
Hide each of your Template layers and background, leaving only the flowers visible
Layers > Merge > Merge Visible
Unhide all layers
Layers > Merge > Merge Visible
Unhide all layers
Paste a Star as new layer
Resize by around 15 - 20%
Resize by around 15 - 20%
LEAVE IN POSITION
Effects > Plugins > Mura Meister > Copies with the following settings:
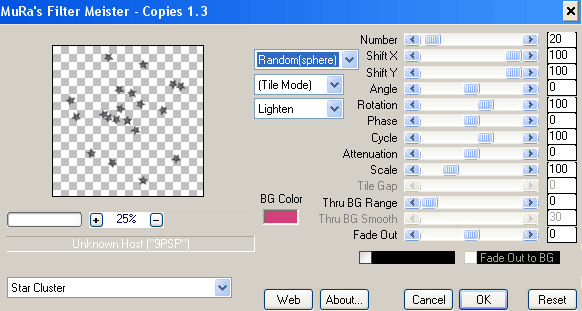
You made need to play with the Random Sphere setting a few times to get the scattering effect you want
Layers > Arrange > Send to Bottom
Activate top layer
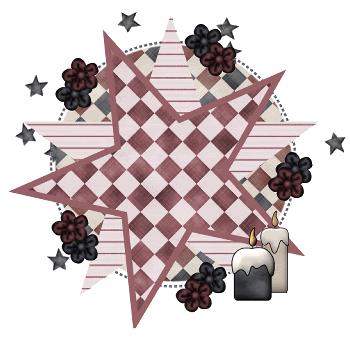
Paste a candle as new layer
Resize by 60%
Position to the lower right of tag
Resize by 60%
Position to the lower right of tag
Paste another candle as new layer
Resize by 50%
Position alongside first candle
Layers > Arrange > Move Down
(so candle is partially tucked behind first candle)
Resize by 50%
Position alongside first candle
Layers > Arrange > Move Down
(so candle is partially tucked behind first candle)
Paste Paper of choice as new layer
Layers > Arrange > Send to Bottom
Layers > Arrange > Send to Bottom
Layers > New Mask Layer > From Image
Locate WSL_Mask215
OK
Locate WSL_Mask215
OK
Open your Layer Palette and activate the Mask Layer
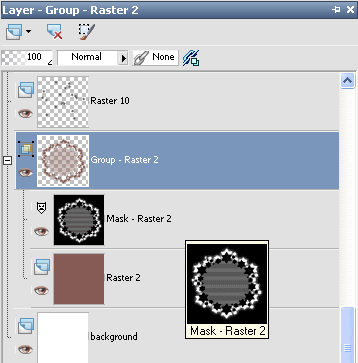
Resize by 110%
Layers > Merge > Merge Group
Lower opacity to 20
Layers > Merge > Merge Group
Lower opacity to 20
Layers > Arrange > Send to Bottom
Paste your tube as new layer
Resize as necessary
Position to your liking
Apply a slight drop shadow of choice
Resize as necessary
Position to your liking
Apply a slight drop shadow of choice
Select your Preset Shape Tool to Ellipse
Set your foreground to #000000
Draw out a circle around your tag to your liking
Set your foreground to #000000
Draw out a circle around your tag to your liking
Select your Text Tool and font of choice
I am using Centime
Choose a colour from your tag as your Background
I am using #976067
I am using Centime
Choose a colour from your tag as your Background
I am using #976067
Set your mouse on the curve and type out the text of your choice
Position to your liking
Position to your liking
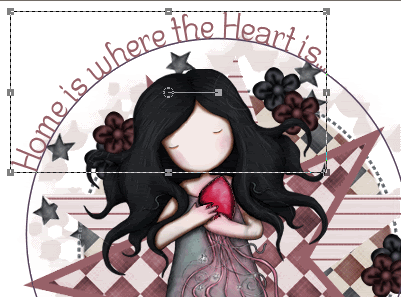
In your Layer Palette open the Vector Layer and turn off the Ellipse
Convert to raster layer
Apply a drop shadow of choice
Convert to raster layer
Apply a drop shadow of choice
Select your Text Tool again and another font of choice
I am using Chocolate Dulce and the same colour for my text
I am using Chocolate Dulce and the same colour for my text
Type out your name
Objects > Align > Horizontal Centre in Canvas
Convert to raster layer
Add some noise, a Gradient Glow and drop shadow of choice
Objects > Align > Horizontal Centre in Canvas
Convert to raster layer
Add some noise, a Gradient Glow and drop shadow of choice
Finally, add your © copyright, licence and
watermark, then save as a GIF or JPG and
you're done!
** IF YOU WISH TO ANIMATE PLEASE FOLLOW THESE
NEXT STEPS **
Firstly, carefully erase the flame of the candles on your tag
Edit > Copy Merged
Edit > Paste as New Image, then
Paste again TWICE as new layers
Edit > Copy Merged
Edit > Paste as New Image, then
Paste again TWICE as new layers
You should now have THREE of the same layer
Now with your Freehand Tool carefully draw the shape of a flame on each candle
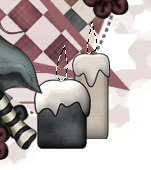
Hide the top two layers leaving Layer 1 visible
Effects > Plugins > Alien Skin Eye Candy 5: Nature > Fire
Under the settings tab select Small, Candle
Under the settings tab select Small, Candle
Then use the following settings:
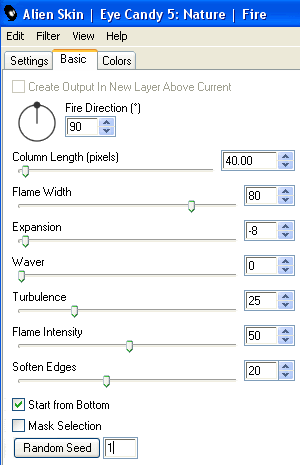
KEEP SELECTED!!
Activate the next layer (Layer 2) and repeat Fire effect, adjusting the Random Seed
Then activate Layer 3 and repeat again, adjusting the Random Seed
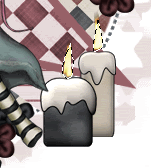
Deselect
OK....ready to animate? This is the easy part, which you can do in one or two ways:
1. Copy and then paste each layer into Animation Shop, first as New Animation then After Current Frame;
OR
2. Save as a .PSP for Animation Shop then in Animation Shop select OPEN and locate your .PSP file
Adjust Frame Properties to your liking - I set mine to 20
Adjust Frame Properties to your liking - I set mine to 20
That's it!!
Now save as a GIF and you're done!
Thanks for trying my tutorial!
::st!na::
::st!na::
© Tutorial written by Stina on 14th May 2009
All rights reserved
All rights reserved

Another great tut! I love it Stina. Thank you!
ReplyDelete