
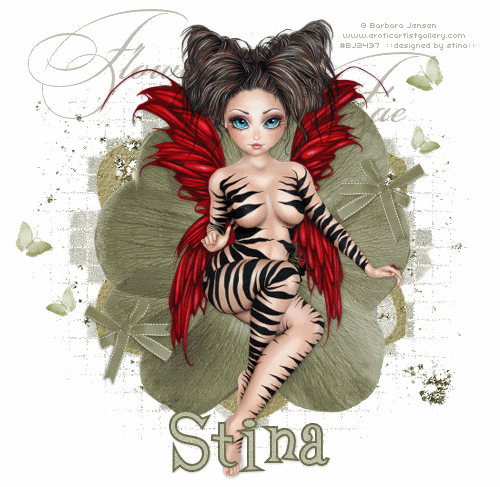
**Grand Opening of Twilight Scraps tut**
Supplies
Scrap kit of choice - I am using "Late Summer Days" by Dana's Creative Studio available as part of the Grand Opening of Twilight Scraps
**Kit is a FREEBIE from 15th to 18th May then it goes on sale**
Tube of choice - I am using the lovely artwork of Barbara Jensen available from her store
**PLEASE DO NOT USE HER ARTWORK WITHOUT THE APPROPRIATE LICENCE**
Fonts of choice - I am using Bickham Script Fancy and Flora Dora NF
Plugins: Mura Meister Copies and dsb Fluxx Bright Noise
Ready? Let's go...
Open a new 600 x 600 blank canvas flood-filled white
Paste a flower as new layer
Resize if necessary
(the flower I used I resize by 20%)
Resize if necessary
(the flower I used I resize by 20%)
Paste same flower again
Resize to around 100 x 100
The flower I used I resized by 5% (it will depend on which flower you use as to how much you need to resize)
LEAVE IN POSITION!!
Resize to around 100 x 100
The flower I used I resized by 5% (it will depend on which flower you use as to how much you need to resize)
LEAVE IN POSITION!!
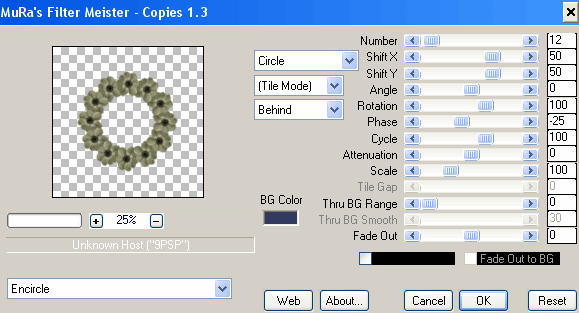
Effects > Plugins > Mura Meister > Copies with the following settings:
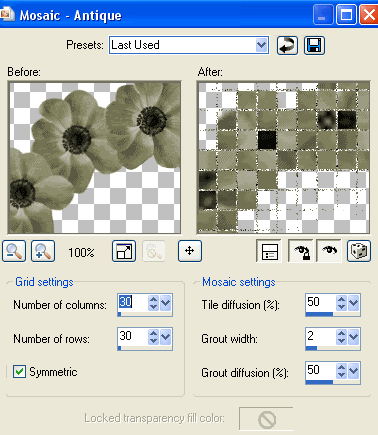
Effects > Texture Effects > Mosaic Antique with the following settings:
Lower opacity to 40
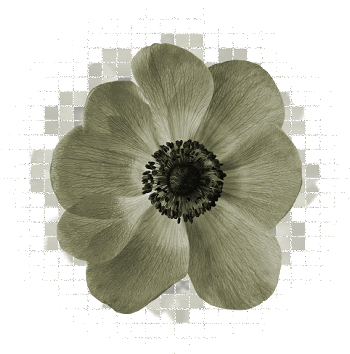
You should have something resembling this:
I pasted Flower06 as a new layer at this point and left if in position between the Mosaic and main Flower layers
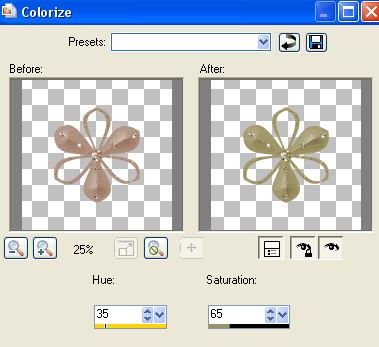
I then colourised it using the following:
Paste a Glitter spatter as new layer
Resize by 30%
Leave in position
Resize by 30%
Leave in position
Adjust > Sharpness > Sharpen
Paste Butterfly01 as new layer
Image > Rotate by 20 to the right
Resize by 2%
Image > Rotate by 20 to the right
Resize by 2%
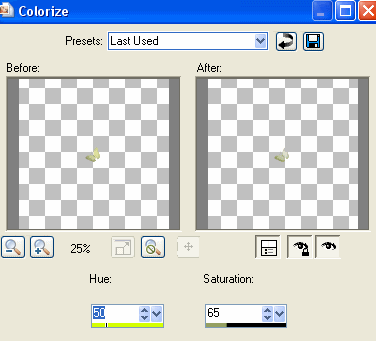
Adjust > Hue & Saturation > Colourise with the following settings:
Duplicate and Image > Mirror a few times, then
Position around tag to your liking
Position around tag to your liking
Paste your tube as new layer
Resize as necessary
Leave positioned in centre or where ever to your liking
Resize as necessary
Leave positioned in centre or where ever to your liking
Crop and resize
Select your Text Tool and font of choice
I am using Flora Dora NF
Choose two colours from your tag and set the darker as Foreground and lighter as Background:
I am using Flora Dora NF
Choose two colours from your tag and set the darker as Foreground and lighter as Background:
Foreground - #6d6d4f
Background - #bdbda5
Background - #bdbda5
Stroke width - 2.0
Type out your name
Objects > Align > Horizontal Centre in Canvas
Convert to raster layer
Add slight noise and drop shadow of choice
Objects > Align > Horizontal Centre in Canvas
Convert to raster layer
Add slight noise and drop shadow of choice
Finally, add your © copyright, licence and watermark, then save as a GIF or JPG and you're done!
** IF YOU WISH TO ANIMATE PLEASE FOLLOW THESE NEXT STEPS **
Activate the Mosaic Layer
Duplicate twice and rename Mosaic1, Mosaic2 and Mosaic3
Hide Mosaic2 and Mosaic3 activating only Mosaic1
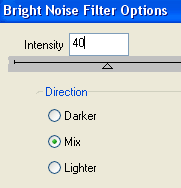
Effects > Plugins > dsb Fluxx > Bright Noise with the following settings:
Hide Mosaic1 and activate Mosaic2
Apply the Bright Noise effect, adjusting the amount to 42
Hide Mosaic2 and activate Mosaic3
Apply same again, adjusting the amount to 45
Hide Mosaic2 and Mosaic3 again with only Diamonds1 visible
Edit > Copy Merged
Open Animation Shop
Edit > Paste as New Animation
Back to PSP
Hide Mosaic1 and activate Mosaic2
Edit > Copy Merged
In Animation Shop
Edit > Paste AFTER Current Frame
Back to PSP
Hide Mosaic2 and activate Mosaic3
Edit > Copy Merged
In Animation Shop
Edit > Paste after Current Frame
Thanks for trying my tutorial!
::st!na::
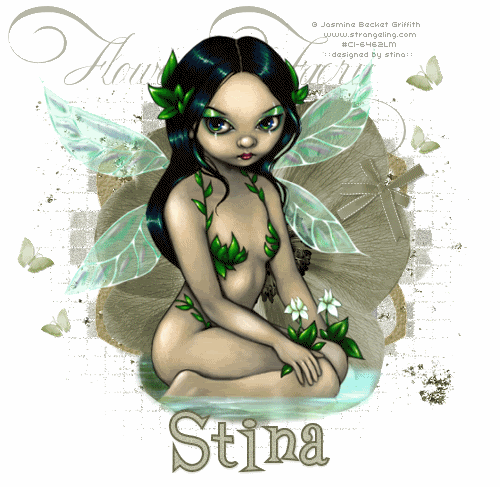
Here is another version:
© Tutorial written by Stina on 16th May 2009
All rights reserved
No comments:
Post a Comment