

**Grand Opening of Twilight Scraps tut**
Supplies
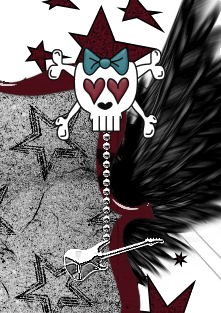
Scrap kit of choice - I am using "Born to Rock" by Soxsational Scraps
Tube of choice - I am using the lovely artwork of Ismael Rac available from My PSP Tubes
Fonts of choice - I am using Freebooter and A&S Snapper Script
Plugins: Eye Candy 4000 Gradient Glow and Alien Skin Xenofex 2 Constellation
Ready? Let's Go...
Open a new 700 x 700 blank canvas flood-filled white
Paste Frame1 as new layer
Select the inside of Frame with your Magic Wand
Selections > Modify > Expand by 10
Add new raster layer
Paste Paper (of choice) INTO selection
I used Paper8
Selections > Modify > Expand by 10
Add new raster layer
Paste Paper (of choice) INTO selection
I used Paper8
Activate your background layer
Set your Foreground to #000000 and open a paper of choice and set that as your Background
Set your Foreground to #000000 and open a paper of choice and set that as your Background
Select your Preset Shape Tool and set it to some Star shapes
Draw out various star shapes around your Frame
Convert to raster layer
Draw out various star shapes around your Frame
Convert to raster layer
Still on your Stars layer,
Paste Music (notes) as new layer
Position to your liking
Paste Music (notes) as new layer
Position to your liking
Layers > Arrange > Move Down
(so music notes are below the stars layer)
(so music notes are below the stars layer)
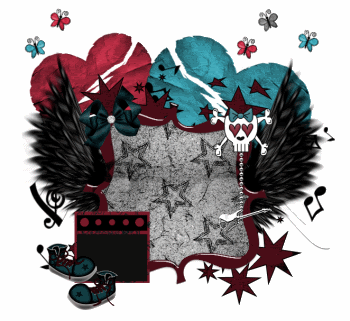
You should have something resembling this:

Paste Amp as new layer
Resize by 30%
Position in lower left
Resize by 30%
Position in lower left
Paste Shoes as new layer
Resize by 30%
Position beside Amp
Resize by 30%
Position beside Amp
Paste Skull as new layer
Resuze by 30%
Position in upper right
Resuze by 30%
Position in upper right
Paste a KeyChain (charm) as new layer
Resize by 70%
Layers > Arrange > Move Down
Position beneath the skull
Resize by 70%
Layers > Arrange > Move Down
Position beneath the skull
Apply a drop shadow to the chain:
H & V - 1
Opacity - 60
Blur - 1.00
Colour - #000000
H & V - 1
Opacity - 60
Blur - 1.00
Colour - #000000
Paste Bow as new layer
Image > Rotate by 10 to the left
Resize by 30%
Position in upper left
Image > Rotate by 10 to the left
Resize by 30%
Position in upper left
Choose two colour TornHearts
Paste the first one as new layer
Image > Rotate by 20 to the left
Resize by 60%
Position in upper left
Layers > Arrange > Send to Bottom
Paste the first one as new layer
Image > Rotate by 20 to the left
Resize by 60%
Position in upper left
Layers > Arrange > Send to Bottom
Paste second torn heart as new layer
Image > Rotate by 20 to the right
Resize by 80%
Position to the right to your liking
Image > Rotate by 20 to the right
Resize by 80%
Position to the right to your liking
Activate top layer again
Paste a butterfly as new layer
Image > Rotate by 20 to the left
Resize by 20%
Position to the left
Duplicate then Image > Mirror
Image > Rotate by 20 to the left
Resize by 20%
Position to the left
Duplicate then Image > Mirror
Paste another butterfly as new later
Image > Rotate by 20 to the right
Resize by 20%
Position to the left
Duplicate and move toward the right
Image > Rotate by 20 to the right
Resize by 20%
Position to the left
Duplicate and move toward the right
Paste another butterfly and repeat left rotation
Resize by 20% and position
Resize by 20% and position
Paste tube as new layer
Resize if necessary
Position to your liking
Resize if necessary
Position to your liking
Resize tag to your liking
Paste one of the ROCK WordArts as new layer
Resize by 75%
Position at bottom of Tube
(I used two and set the top one to Hard Light to get the colour effect of mine)
Resize by 75%
Position at bottom of Tube
(I used two and set the top one to Hard Light to get the colour effect of mine)
Select your Text Tool and font of choice
I am using Freebooter
Set your Background to a colour matching your tag
I am using #75b9bf
I am using Freebooter
Set your Background to a colour matching your tag
I am using #75b9bf
Type out "Angel of" and position above the ROCK word Art
Objects > Align > Horizontal Centre in Canvas
Convert to raster layer
Apply a Gradient Glow in BLACK
Objects > Align > Horizontal Centre in Canvas
Convert to raster layer
Apply a Gradient Glow in BLACK
Select your Text Tool again with another font of choice
I am using A&S Snapper Script
Set Foreground to #000000
Background to #75b9bf
Stroke width - 1.5
I am using A&S Snapper Script
Set Foreground to #000000
Background to #75b9bf
Stroke width - 1.5
Type out your name
Objects > Align > Horizontal Centre in Canvas
Convert to raster layer and apply a slight drop shadow
Objects > Align > Horizontal Centre in Canvas
Convert to raster layer and apply a slight drop shadow
Finally, add your © copyright, licence and watermark, then save as a GIF or JPG and you're done!
** THE FOLLOWING STEPS ARE FOR ANIMATION - IF YOU DO NOT WISH TO ANIMATE JUST SKIP THIS STEP **
Duplicate the ROCK WordArt twice
Rename Bling1, Bling2 and Bling 3
Rename Bling1, Bling2 and Bling 3
With your Selection Tool draw a rectangle around the word ROCK

Hide Bling2 and Bling3 activating only Bling1
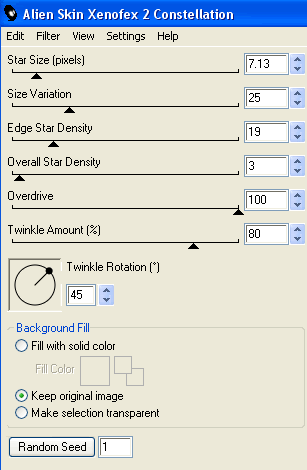
Effects > Plugins > Alien Skin Xenofex 2 > Constellation with the following settings:
Effects > Plugins > Alien Skin Xenofex 2 > Constellation with the following settings:
Hide Bling1 and activate Bling2
Apply the Constellation effect, adjusting the Random Seed
Hide Bling2 and activate Bling3
Apply same again, adjusting the Random Seed
Hide Bling2 and Bling3 again with only Bling1 visible
Edit > Copy Merged
Open Animation Shop
Edit > Paste as New Animation
Back to PSP
Hide Bling1 and activate Bling2
Edit > Copy Merged
In Animation Shop
Edit > Paste AFTER Current Frame
Back to PSP
Hide Bling2 and activate Bling3
Edit > Copy Merged
In Animation Shop
Edit > Paste after Current Frame
Finally, add your © copyright, licence and watermark, then save as a GIF or JPG and you're done!
Thanks for trying my tutorial!
::st!na::
::st!na::
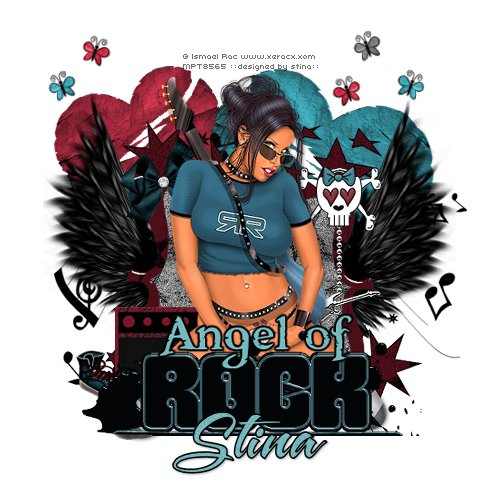
Here is a non-animated version:
© Tutorial written by Stina on 12th May 2009
All rights reserved
All rights reserved
No comments:
Post a Comment