
Supplies
Scrap kit of choice - I am using "Violaceous" by Oopsie Daisy available from Exquisite Scraps, Stargazer Scraps and Twilight Scraps
Image of choice - I am using the gorgeous artwork of Jim Warren which is free to use with the proper credit and link
Fonts of choice - I am using Juice ITC and Alex Brush
Plugins: Alien Skin Xenofex 2 Constellation and Eye Candy 4000 Glass & Gradient Glow
Ready? Let's begin....
Open a new 700 x 700 blank canvas flood-filled white
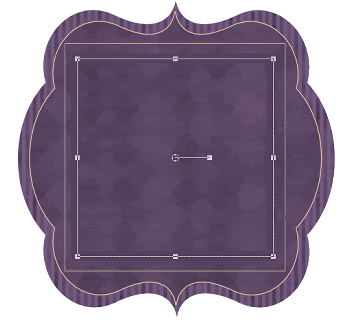
Paste Frame4 as new layer
resize by 40%
resize by 40%
LEAVE IN POSITION
Select your Preset Shape Tool and set to Rectangle
Foreground - colour of your choice
Background - null
Foreground - colour of your choice
Background - null
Stroke width - 2.00
Draw out a rectangle symmetrically centred within the Frame

Convert to raster layer
Rename Sparkle (we'll come back to this layer)
Rename Sparkle (we'll come back to this layer)
Select your Preset Shape Tool again, still on Rectangle
Change your Foreground colour to another one of your choice
Background - null
Change your Foreground colour to another one of your choice
Background - null
Stroke width - 15.00
Draw out a rectangle inside the first rectangle - keep it centred
Convert to raster layer
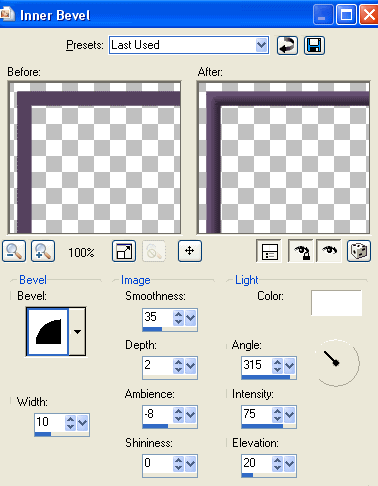
Effects > 3D Effects > Inner Bevel with the following settings:
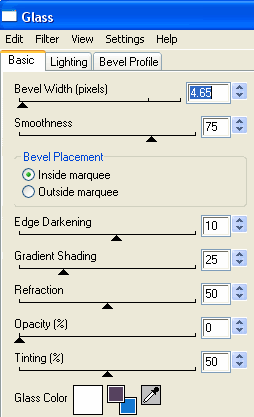
Effects > Plugins > Eye Candy 4000 > Glass with the following settings:
Paste your image of choice as new layer
Layers > Arrange > Move Down
Resize as necessary and position to your liking
Select the inside of your Frame with your Magic Wand
Selections > Modify > Expand by 10
Selections > Invert
Delete and deselect
Layers > Arrange > Move Down
Resize as necessary and position to your liking
Select the inside of your Frame with your Magic Wand
Selections > Modify > Expand by 10
Selections > Invert
Delete and deselect
Paste Bow3 as new layer
Resize by 37% (depending on size of Frame)
Position along bottom of Frame
Resize by 37% (depending on size of Frame)
Position along bottom of Frame
Select your Change to Target Brush with the following settings:
In your Material Palette set your Foreground to #56425f
Then carefully sweep your brush over your bow to colourise it slightly
Paste Cloud as new layer
Resize by 50%
Position in upper left
Set blend mode to Overlay
Duplicate then set blend mode to Soft light
Resize by 50%
Position in upper left
Set blend mode to Overlay
Duplicate then set blend mode to Soft light
Paste Birdcage as new layer
Resize by 30%
Position in upper right corner of Frame
Resize by 30%
Position in upper right corner of Frame
Paste Ivy as new layer
Resize by 50%
Position along top of Frame
Resize by 50%
Position along top of Frame
Paste one of the Violets as new layer
resize by 35%
Position in upper left
resize by 35%
Position in upper left
Adjust > Brightness/Contrast > Clarify with the Strength of Effect setting at: 10.00
Repeat once
Repeat once
Paste Floral1 as new layer
Resize by 20%
Position over Violet in upper left
Resize by 20%
Position over Violet in upper left
With your Magic Wand set to a Tolerance of around 55, select the pink part of the rose so that it is all selected
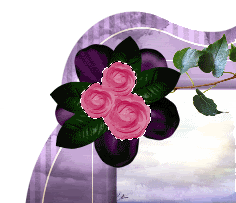
Selections > Promote Selection to Layer
Select your Change to Target Brush once more with the same settings and colour
Brush over the rose then deselect
Lower the opacity of this layer to 60
Select your Change to Target Brush once more with the same settings and colour
Brush over the rose then deselect
Lower the opacity of this layer to 60

Duplicate your Violet layer twice
Resize by 80%
Position both to the lower right of the Ribbon/Bow
Resize by 80%
Position both to the lower right of the Ribbon/Bow
Duplicate Floral1 twice
Resize by 80%
Position both over violets in lower right
Resize by 80%
Position both over violets in lower right
Paste a couple of butterflies as new layers
Image > Rotate 25 to the left or right, depending on position
Resize each as necessary
Position to liking
Image > Rotate 25 to the left or right, depending on position
Resize each as necessary
Position to liking
Paste PinkAngelWings as new layer
Resize by 50%
Layers > Arrange > Send to Bottom
Resize by 50%
Layers > Arrange > Send to Bottom
Duplicate
Image > Mirror, then Image > Flip
Image > Mirror, then Image > Flip
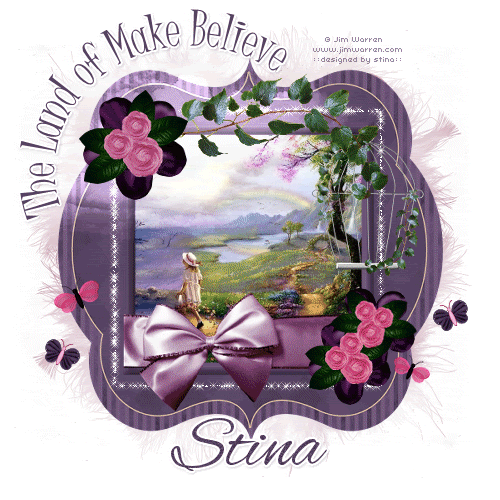
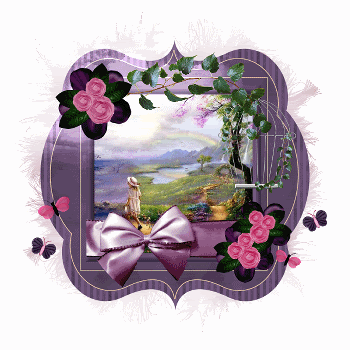
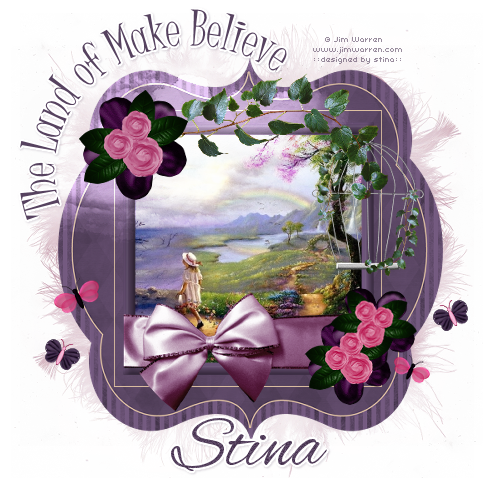
You should have something like this:
Resize tag to your liking
Select your Preset Shape Tool again this time to Ellipse
Draw out a Circle to the upper left of your tag
Draw out a Circle to the upper left of your tag
Select your Text Tool and font of choice
I am using Juice ITC
I am using Juice ITC
Set your Material Palette to:
Foreground - null
Background - colour of choice to match your tag (I am using #56425f)
Foreground - null
Background - colour of choice to match your tag (I am using #56425f)
On the curve of your circle type out the text of your choice
Position to your liking
Position to your liking
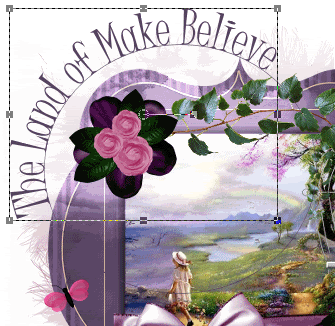
Open your Vector Layer in your Layer Palette and turn off the Ellipse
Convert to raster layer
Apply a drop shadow of choice
Select your Text Tool again and another font of choice
I am using Alex Brush and the same colour
I am using Alex Brush and the same colour
Type out your name
Objects > Align > Horizontal Centre in Canvas
Convert to raster layer
Add some slight noise, a Gradient Glow and drop shadow of choice
Objects > Align > Horizontal Centre in Canvas
Convert to raster layer
Add some slight noise, a Gradient Glow and drop shadow of choice
Finally, add your © copyright, licence and watermark, then save as a GIF or JPG and you're done!
** IF YOU WISH TO ANIMATE PLEASE FOLLOW THESE NEXT STEPS **
Activate the rectangle layer we drew and named Sparkle
Duplicate layer twice and rename Sparkle1, Sparkle2 and Sparkle3
Hide Sparkle2 and Sparkle3 activating only Bling1
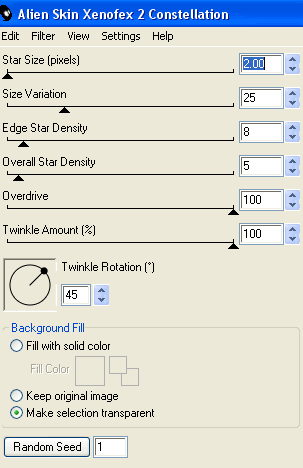
Effects > Plugins > Alien Skin Xenofex 2 > Constellation with the following settings:
Activate the rectangle layer we drew and named Sparkle
Duplicate layer twice and rename Sparkle1, Sparkle2 and Sparkle3
Hide Sparkle2 and Sparkle3 activating only Bling1
Effects > Plugins > Alien Skin Xenofex 2 > Constellation with the following settings:
Hide Sparkle1 and activate Sparkle2
Apply the Constellation effect, adjusting the Random Seed
Hide Sparkle2 and activate Sparkle3
Apply same again, adjusting the Random Seed
Hide Sparkle2 and Sparkle3 again with only Bling1 visible
Edit > Copy Merged
Open Animation Shop
Edit > Paste as New Animation
Back to PSP
Hide Sparkle1 and activate Sparkle2
Edit > Copy Merged
In Animation Shop
Edit > Paste AFTER Current Frame
Back to PSP
Hide Sparkle2 and activate Sparkle3
Edit > Copy Merged
In Animation Shop
Edit > Paste after Current Frame
Thanks for trying my tutorial!
::st!na::
::st!na::
Here is a non-animated version:
© Tutorial written by Stina on 13th May 2009
All rights reserved
All rights reserved
No comments:
Post a Comment