
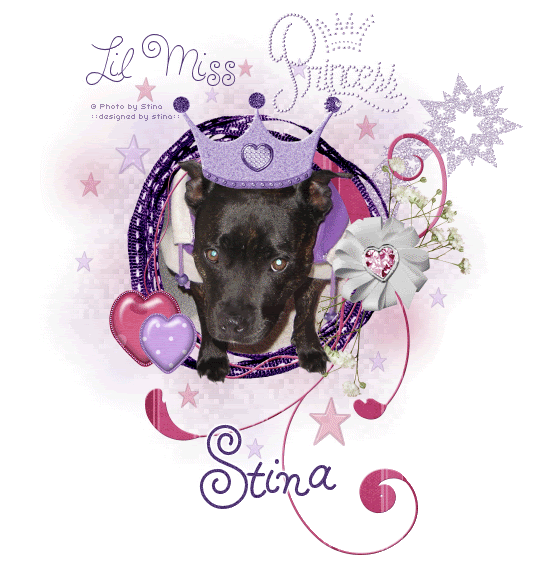
Supplies
Scrap kit of choice - I am using two parts of the "Litte Miss Princess" theme kits from Exquisite Scraps by designers Oopsie Daisy and Bits n' Bobs
The Princess Word Art is from Creative Intentionz part of the kit
Tube/Image/Photo of choice - I am using one of my own (and rather fitting for this kit I might add...lol)
Fonts of choice - I am using Hairspray
Plugin: Xero Fritillary
Paint Shop Pro and Animation Shop
The Princess Word Art is from Creative Intentionz part of the kit
Tube/Image/Photo of choice - I am using one of my own (and rather fitting for this kit I might add...lol)
Fonts of choice - I am using Hairspray
Plugin: Xero Fritillary
Paint Shop Pro and Animation Shop
Ready? Let's begin....
Open a new 600 x 600 blank canvas flood-filled white
Paste odn-lmp09-RibFrame
Resize by 25%
Resize by 25%
Paste your image or photo of choice as new layer
Layers > Arrange > Move Down
(so image is below Frame)
**Duplicate and hide (optional if you wish to have your image protruding from Frame)**
Layers > Arrange > Move Down
(so image is below Frame)
**Duplicate and hide (optional if you wish to have your image protruding from Frame)**
Select your Freehand Tool and carefully draw around the inside ribbon of Frame
Selections > Invert
Delete then deselect
Selections > Invert
Delete then deselect
Activate your duplicated image
Layers > Arrange > Bring to Top
Lower opacity so you can see Frame behind image
Layers > Arrange > Bring to Top
Lower opacity so you can see Frame behind image
Use Freehand Tool to draw around the subject in your image, choosing the points to protrude Frame
Selections > Invert
Selections > Modify > Feather by 2
Press delete two or three times
Deselect
Selections > Invert
Selections > Modify > Feather by 2
Press delete two or three times
Deselect
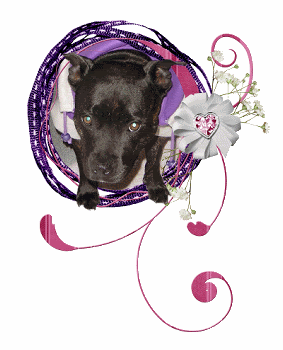
Carefully erase any remaining excess so you should have something like this:
Paste some stars around your tag, resizing as necessary
(I used BNB-brad-3 and BNB-brad-6)
Hide all layers except stars
Layers > Merge > Merge Visble
Rename Stars Blur
Unhide other layers
Still on Stars Blur layer, go to
Layers > Arrange > Send to Bottom
(I used BNB-brad-3 and BNB-brad-6)
Hide all layers except stars
Layers > Merge > Merge Visble
Rename Stars Blur
Unhide other layers
Still on Stars Blur layer, go to
Layers > Arrange > Send to Bottom
Adjust > Blur > Gaussian Blur with a Radius of 20.00
Activate top layer again
Paste some more stars around your Frame
Resize each as necessary
Hide all layers except stars
Layers > Merge > Merge Visble
Rename Stars
Lower opacity to 40
Unhide other layers
Resize each as necessary
Hide all layers except stars
Layers > Merge > Merge Visble
Rename Stars
Lower opacity to 40
Unhide other layers
Paste Heart brads as new layers
(I used BNB-brad-1 and BNB-brad-4)
Resize both, the second slightly smaller than the first
Position together on the Frame
(I used BNB-brad-1 and BNB-brad-4)
Resize both, the second slightly smaller than the first
Position together on the Frame
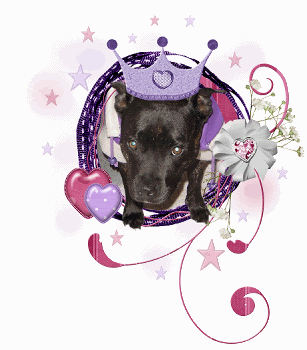
Paste a Crown as new layer
(I used BNB-princess-crown)
Resize by about 45% (depending on size of crown)
Position on the head of subject in your image/photo
(I used BNB-princess-crown)
Resize by about 45% (depending on size of crown)
Position on the head of subject in your image/photo
Paste odn-lmp09-es-starblast as new layer
Rezie by 8%
Layers > Arrange > Send to Bottom
Position slightly to the right to your liking
Rezie by 8%
Layers > Arrange > Send to Bottom
Position slightly to the right to your liking
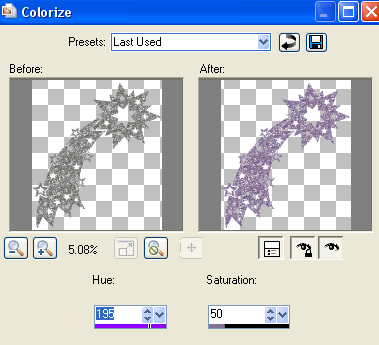
Adjust > Hue & Saturation > Colourise with the following settings:
Sharpen layer, then lower opacity to 45
Paste odn-lmp09-es-pinkstar
Resize by 30%
Layers > Arrange > Move Down
Position directly behind Frame
Resize by 30%
Layers > Arrange > Move Down
Position directly behind Frame
Duplicate then apply the same Colourisation as above
Set Blend Mode to Overlay
Layers > Merge > Merge Down
Lower opacity to 50
Set Blend Mode to Overlay
Layers > Merge > Merge Down
Lower opacity to 50
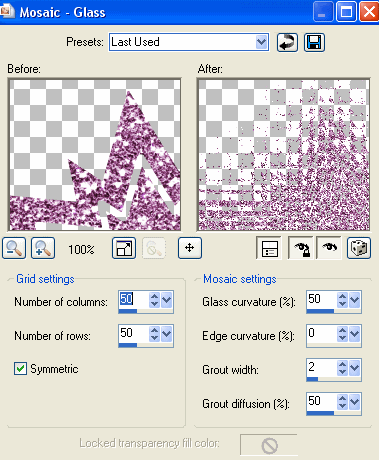
Effects > Texture Effects > Mosaic - Glass with the following settings:
Adjust > Blur > Gaussian Blur with a Radius of 20.00
Duplicate layer twice
Rename StarAni1, StarAni2 and StarAni3
Rename StarAni1, StarAni2 and StarAni3
Hide StarAni2 and StarAni3
Activate StarAni1
Activate StarAni1
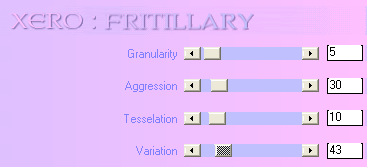
Effects > Plugins > Xero > Fritillary with the following settings:
Hide StarAni1 and activate StarAni2
Repeat Fritillary adjusting the Variation by 1
Repeat Fritillary adjusting the Variation by 1
Hide StarAni2 and activate StarAni3
Repeat Fritillary adjusting the Variation by 1 again
Repeat Fritillary adjusting the Variation by 1 again
Now activate the Princess Crown layer
With your Magic Wand select the areas on the points of the crown
Selections > Promote Selection to Layer
Duplicate twice
Deselect
With your Magic Wand select the areas on the points of the crown
Selections > Promote Selection to Layer
Duplicate twice
Deselect
Rename to Crown1, Crown2 and Crown3
Add some noise to each layer
Crown1 - 30
Crown2 - 35
Crown3 - 40
Crown1 - 30
Crown2 - 35
Crown3 - 40
Add any other elements, drop shadows or Text you wish
Add your © copyright, licence and watermark
Now as there are so many animated layers let's set up the animation!!
First, hide the following layers:
StarAni2, StarAni3, Crown2 and Crown3
StarAni2, StarAni3, Crown2 and Crown3
Edit > Copy Merged
Then Paste as NEW IMAGE
Then Paste as NEW IMAGE
Now hide layers StarAni1 and Crown1
Unhide StarAni2 and Crown2
Edit > Copy Merged
Unhide StarAni2 and Crown2
Edit > Copy Merged
Activate your NEW IMAGE
Edit > Paste as NEW LAYER
Edit > Paste as NEW LAYER
Finally, hide layers StarAni2 and Crown2
Unhide StarAni3 and Crown3
Edit > Copy Merged
Activate your NEW IMAGE again
Edit > Paste as NEW LAYER
Unhide StarAni3 and Crown3
Edit > Copy Merged
Activate your NEW IMAGE again
Edit > Paste as NEW LAYER
You should now have a new image with THREE LAYERS
Select your Text Tool and font of choice
I am using Hairspray
I am using Hairspray
Set your Foreground and Background to the same colour (one from your tag)
I chose #503776
Stroke width - 2.00
I chose #503776
Stroke width - 2.00
Type out your name
Apply a slight Gradient Glow in white
Apply a slight Gradient Glow in white
To animate, hide Layers2 and 3
Edit > Copy Merged
Edit > Copy Merged
Open Animation Shop
Edit > Paste as New Animation
Edit > Paste as New Animation
Back in PSP
Hide Layer1 and unhide Layer2
Edit > Copy Merged
Hide Layer1 and unhide Layer2
Edit > Copy Merged
In Animation Shop
Edit > Paste after Current Frame
Edit > Paste after Current Frame
Back in PSP
Hide Layer2 and unhide Layer3
Edit > Copy Merged
Hide Layer2 and unhide Layer3
Edit > Copy Merged
In Animation Shop
Edit > Paste after Current Frame
Edit > Paste after Current Frame
Finally save as a GIF and you're done!!
Thanks for trying my tutorial!
::st!na::
© Tutorial written by Stina on 2nd May 2009
All rights reserved
No comments:
Post a Comment