

Supplies
Scrap kit of choice - I am using "Her Royal Highness" by Twinky which is a special edition scrap kit available from Twinky's Dezines
Image or tube of choice - I am using one of my own photos
WSL_Mask7 by Chelle available from her blog
Plugin: Eye Candy 4000 Gradient Glow
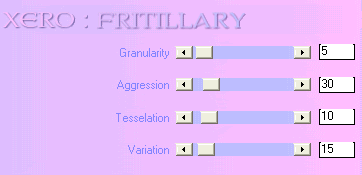
Plugin: Xero Fritillary
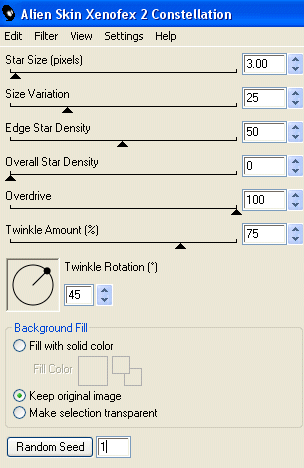
Plugin: Alien Skin Xenofex 2 > Constellation
Font of choice - I am using Chocolate Dulce
Image or tube of choice - I am using one of my own photos
WSL_Mask7 by Chelle available from her blog
Plugin: Eye Candy 4000 Gradient Glow
Plugin: Xero Fritillary
Plugin: Alien Skin Xenofex 2 > Constellation
Font of choice - I am using Chocolate Dulce
Ready? Let's begin....
Open a new 600 x 600 blank canvas flood-filled white
Paste GoldWrapFrame as new layer
Resize by 65%
Resize by 65%
Select you Freehand Tool and draw around the Gold Wrap on the frame, making sure to separate them both with your selection
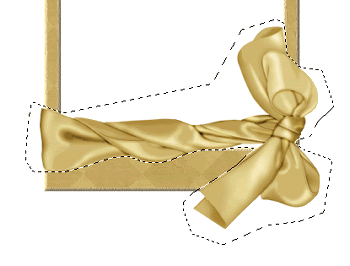
Select a colour that you will be using for your tag - I am using #d33f7b
Set it as your Foreground
Set it as your Foreground
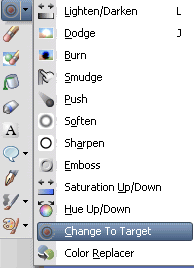
Select your Change to Target brush from your Tool Palette with the following settings:

Hold your left mouse button down and carefully colourise your selection in a brushing motion
Then deselect
Then deselect
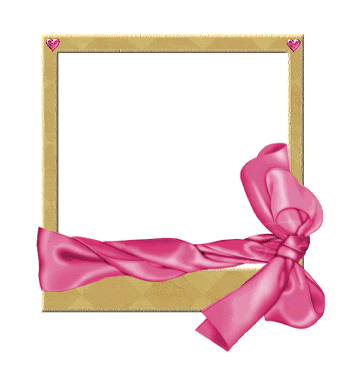
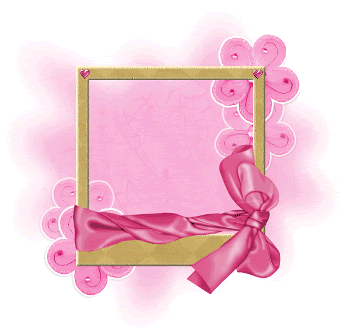
You should now have something like this:
Before we go any further, let's create our background
Paste Paper16 as new layer
Layers > Arrange > Send to Bottom
Layers > Arrange > Send to Bottom
Layers > New Mask Layer > From Image
Locate WSL_Mask7
OK
Layers > Merge > Merge Down
Resize by 85%
Locate WSL_Mask7
OK
Layers > Merge > Merge Down
Resize by 85%
Paste Flower2 as new layer
Resize by 25%
Position to the upper right on Frame corner
Resize by 25%
Position to the upper right on Frame corner
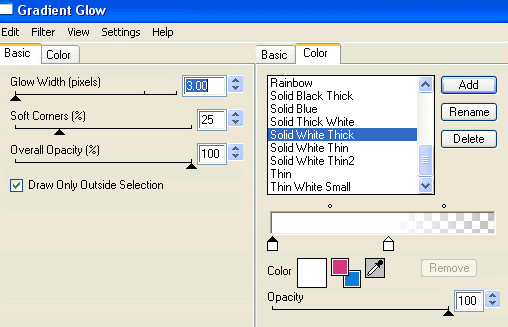
Effects > Plugins > Eye Candy 4000 > Gradient Glow with the following settings:
Apply a drop shadow:
H & V - 1
Opacity - 20
Blur - 2.00
Colour - #421225
H & V - 1
Opacity - 20
Blur - 2.00
Colour - #421225
Duplicate Flower, then Image > Mirror
Position second flower in the lower left corner of Frame
Position second flower in the lower left corner of Frame
Duplicate again
Resize by 95%
Move up slightly, then
Layers > Arrange > Move Down
Repeat
Resize by 95%
Move up slightly, then
Layers > Arrange > Move Down
Repeat
Duplicate again and Image > Mirror
Position just slightly below the first flower in the upper right
Position just slightly below the first flower in the upper right
Layers > Merge > Merge Down
Lower opacity to 65
Lower opacity to 65
Paste your Image or Tube of choice as new layer
I am using one of my own photos
Resize as necessary
Position within Frame to your liking
I am using one of my own photos
Resize as necessary
Position within Frame to your liking
Activate your Frame layer
Select the area inside Frame with your Magic Wand
Selections > Modify > Expand by 10
Selections > Invert
On your image layer press delete
Deselect
Select the area inside Frame with your Magic Wand
Selections > Modify > Expand by 10
Selections > Invert
On your image layer press delete
Deselect
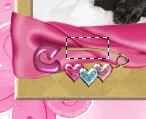
Paste HeartGem1 as new layer
Resize by 15%
Position in upper right corner
Apply the same Gradient Glow as above but with a Glow Width of 3.00
Resize by 15%
Position in upper right corner
Apply the same Gradient Glow as above but with a Glow Width of 3.00
Paste SafetyPin2 as new layer
Resize by 20%
Position somewhere in the Wrap around the Frame
Select a small portion of the pin with your Selection Tool
Resize by 20%
Position somewhere in the Wrap around the Frame
Select a small portion of the pin with your Selection Tool
Then press delete and deselect
Paste a WordArt of choice as new layer
Resize as necessary to fit
I made my own
Resize as necessary to fit
I made my own
Paste PrincessCrown1 as new layer
Image > Rotate by 20 to the right
Resize by around 15% (depending on the size of your WordArt)
Position on the end letter as if were tilting over
Apply the same Gradient Glow as the HeartGem
Image > Rotate by 20 to the right
Resize by around 15% (depending on the size of your WordArt)
Position on the end letter as if were tilting over
Apply the same Gradient Glow as the HeartGem
Crop and resize tag
Activate your Mask layer again
Effects > Plugins > Xero > Fritillary with the following settings:
Select your Text Tool and font of choice
I am using Chocolate Dulce
Set your Background to a colour matching your tag - I am using #df4e9%
I am using Chocolate Dulce
Set your Background to a colour matching your tag - I am using #df4e9%
Type out your name
Objects > Align > Horizontal Centre in Canvas
Convert to raster layer
Finally, add your © copyright, licence and watermark, then save as a GIF or JPG and you're done!
** IF YOU WISH TO ANIMATE PLEASE FOLLOW THESE NEXT STEPS **
Duplicate Mask layer twice and rename Sparkle 1, Sparkle2 and Sparkle3
Hide Sparkle2 and Sparkle3 activating only Sparkle1
Effects > Plugins > Alien Skin Xenofex 2 > Constellation with the following settings:
Hide Sparkle2 and Sparkle3 activating only Sparkle1
Effects > Plugins > Alien Skin Xenofex 2 > Constellation with the following settings:
Hide Sparkle1 and activate Sparkle2
Apply the Constellation effect, adjusting the Random Seed
Hide Sparkle2 and activate Sparkle3
Apply same again, adjusting the Random Seed
Hide Sparkle2 and Sparkle3 again with only Sparkle1 visible
Edit > Copy Merged
Open Animation Shop
Edit > Paste as New Animation
Back to PSP
Hide Sparkle1 and activate Sparkle2
Edit > Copy Merged
In Animation Shop
Edit > Paste AFTER Current Frame
Back to PSP
Hide Sparkle2 and activate Sparkle3
Edit > Copy Merged
In Animation Shop
Edit > Paste after Current Frame
Finally, save as a GIF and you're done!!
Thanks for trying my tutorial!
::st!na::
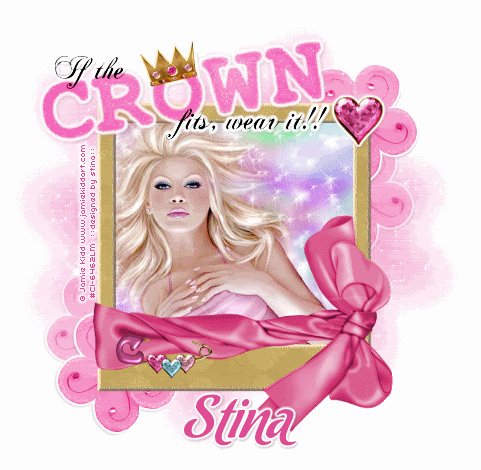
Here is another version:
© Tutorial written by Stina on 8th May 2009
All rights reserved
All rights reserved
No comments:
Post a Comment