
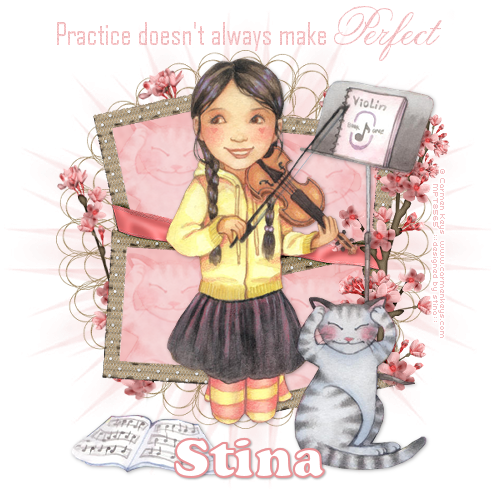
**This tutorial was a special request using this tube. I hope I was able to do it justice**
Supplies
Scrap kit of choice - I am using "A Touch of Elegance" by Julie of Bits n' Bobs available here
Tube of choice - I am using the lovely artwork of Carmen Keys available with a licence through CILM
**PLEASE DO NOT USE HER ARTWORK WITHOUT THE APPROPRIATE LICENCE**
WSL_Mask26 by Chelle available from her blog
Fonts of choice - AgencyFB, Angli Script and Cookie
No Plugins
Animation Shop
Let's begin...
Open a new 600 x 600 blank canvas flood-filled white
Paste ClusterFrame1 as new layer
Resize by 80%
Resize by 80%
Select inside of Frame with Magic Wand
Selections > Modify > Expand by 10
Add new raster layer
Layers > Arrange > Move Down
Paste Paper of choice INTO selection
Selections > Modify > Expand by 10
Add new raster layer
Layers > Arrange > Move Down
Paste Paper of choice INTO selection
Adjust > Blur > Gaussian Blur with a Radius of 3.00
Deselect
Deselect
Select one of the Frames with your Magic Wand
Selections > Modify > Expand by 10
Paste a portion of your tube as new layer
Resize up if necessary (I resized up by 110%)
Position within Frame
Selections > Invert
Delete then deselect
Selections > Modify > Expand by 10
Paste a portion of your tube as new layer
Resize up if necessary (I resized up by 110%)
Position within Frame
Selections > Invert
Delete then deselect
Repeat with other 3 Frames as you like
Set blend mode to Soft Light for each layer
Set blend mode to Soft Light for each layer
Rename each to Cat1, Cat2, Cat3 and Cat4 (or whatever you wish to call them to identify them)
Activate top layer
Paste Tube of choice as new layer
Resize as necessary and position
Resize as necessary and position
Paste CherryBlossom as new layer
Image > Mirror
Position to the right behind tube layer
Duplicate and position alongside branch to liking
Erase any excess from bottom branch
Layers > Merge > Merge Down
Image > Mirror
Position to the right behind tube layer
Duplicate and position alongside branch to liking
Erase any excess from bottom branch
Layers > Merge > Merge Down
Paste LaceMat as new layer
Resize by 95%
Layers > Arrange > Send to Bottom
Resize by 95%
Layers > Arrange > Send to Bottom
Paste CherryBlossom branch again as new layer
Image > Rotate by 10 to the right
Image > Mirror
Position to the left
Image > Rotate by 10 to the right
Image > Mirror
Position to the left
Paste Paper of choice as new layer
Layers > Arrange > Send to Bottom
Adjust > Blur > Gaussian Blur with a Radius of 5.00
Layers > Arrange > Send to Bottom
Adjust > Blur > Gaussian Blur with a Radius of 5.00
Layers > New Mask Layer > From Image
Apply WSL_Mask26
Apply WSL_Mask26
DO NOT MERGE YET!
Resize by 105%
Layers > Merge > Merge Group
Duplicate, then Layers > Merge > Merge Down
Duplicate, then Layers > Merge > Merge Down
Crop and resize to liking
Select your Text Tool and font of choice
I am using AgencyFB and AngliaScript
Text Colour to match tag - I am using #f4c2c4
I am using AgencyFB and AngliaScript
Text Colour to match tag - I am using #f4c2c4
Type out Text of choice
Objects > Align > Horizontal Centre in Canvas
Apply a drop shadow of choice
Objects > Align > Horizontal Centre in Canvas
Apply a drop shadow of choice
Select another font of choice
I am using Cookie
Foreground - #f4c2c4
Background - #FFFFFF
Stroke width - 2.00
I am using Cookie
Foreground - #f4c2c4
Background - #FFFFFF
Stroke width - 2.00
Type out your name
Objects > Align > Horizontal Centre in Canvas
Convert to raster layer
Duplicate and set blend mode to Multiply
Apply drop shadow of choice
Objects > Align > Horizontal Centre in Canvas
Convert to raster layer
Duplicate and set blend mode to Multiply
Apply drop shadow of choice
Finally, add your © copyright, licence and watermark, then save as a GIF or JPG and you're done!
** IF YOU WISH TO ANIMATE PLEASE FOLLOW THESE NEXT STEPS **
Activate your Cat1 layer
Set to Normal blend mode and reduce opacity to 55
Edit > Copy Merged
Set to Normal blend mode and reduce opacity to 55
Edit > Copy Merged
Open Animation Shop
Edit > Paste as New Animation
Edit > Paste as New Animation
Back to PSP
Set Cat1 back to Soft Light and opacity to 100
Activate Cat3, set to Normal and opacity to 55
Edit > Copy Merged
Set Cat1 back to Soft Light and opacity to 100
Activate Cat3, set to Normal and opacity to 55
Edit > Copy Merged
In Animation Shop
Edit > Paste after Current Frame
Edit > Paste after Current Frame
Back to PSP
Set Cat3 back to Soft Light and opacity to 100
Activate Cat2, set to Normal and opacity to 55
Edit > Copy Merged
Set Cat3 back to Soft Light and opacity to 100
Activate Cat2, set to Normal and opacity to 55
Edit > Copy Merged
In Animation Shop
Edit > Paste after Current Frame
Edit > Paste after Current Frame
Back to PSP
Set Cat2 back to Soft Light and opacity to 100
Activate Cat4, set to Normal and opacity to 55
Edit > Copy Merged
Set Cat2 back to Soft Light and opacity to 100
Activate Cat4, set to Normal and opacity to 55
Edit > Copy Merged
In Animation Shop
Edit > Paste after Current Frame
Edit > Paste after Current Frame
Back to PSP
Set Cat4 back to Soft Light and opacity to 100
Edit > Copy Merged
Edit > Copy Merged
In Animation Shop
Edit > Paste after Current Frame
Edit > Paste after Current Frame
Select All, and change Frame Properties to 100
Now save as a GIF and you're done!
Now save as a GIF and you're done!
Thanks for trying my tutorial!
::st!na::
Here is a non-animated version:
© Tutorial written by Stina on 25th August 2009
All rights reserved
Stina, this is absolutely adorable!!!! I love it so much :):):) Thank you sooooo much for your awesome creativity with this tube!! :):) xoxoxo
ReplyDelete