

Supplies
Scrap kit of choice - I am using "Love, Sex & Magic" by Soxsational Scraps
Tube of choice - I am using the artwork of PsycoJimi available with a FTU licence from MistakenArt
Font of choice - I am using Misfortune and Pump Demi Bold LET
Plugins: Eye Candy 4000 > Gradient Glow
Let's begin...
Open a new 600 x 600 blank canvas flood-filled white
Paste Beaded Frame1 as new layer
Resize by 70%
Resize by 70%
Select the inside of inner frame with your Magic Wand
Selections > Modify > Expand by 2
Add a new raster layer
Layers > Arrange > Move Down
Paste Paper of choice INTO selection
Deselect
Selections > Modify > Expand by 2
Add a new raster layer
Layers > Arrange > Move Down
Paste Paper of choice INTO selection
Deselect
Duplicate and set blend mode to Multiply
Lower opacity to 60
Layers > Merge > Merge Down
Rename Frame Background
Lower opacity to 60
Layers > Merge > Merge Down
Rename Frame Background
Paste ClockFace as new layer
Resize by 53%
Set blend mode to Multiply
Duplicate, then
Layers > Merge > Merge Down
Resize by 53%
Set blend mode to Multiply
Duplicate, then
Layers > Merge > Merge Down
Paste Sparkle as new layer
Resize by 70%
Position in centre
Set blend mode to Soft Light
Rename Sparkle
Resize by 70%
Position in centre
Set blend mode to Soft Light
Rename Sparkle
Paste Lady Silhouette of choice as new layer
Resize by 60%
Position in centre
Resize by 60%
Position in centre
Select the outer frame with your Magic wand
Selections > Modify > Expand by 2
Activate Frame Background layer
Paste another paper of choice as new layer
Layers > Promote Selection to Layer
Set blend mode to Multiply
Deselect
Layers > Merge > Merge Down
Selections > Modify > Expand by 2
Activate Frame Background layer
Paste another paper of choice as new layer
Layers > Promote Selection to Layer
Set blend mode to Multiply
Deselect
Layers > Merge > Merge Down
Paste Bow of choice as new layer
Resize by 50%
Position in upper centre
Resize by 50%
Position in upper centre
Paste Tube as new layer
Resize as necessary and position
Resize as necessary and position
Paste Flower1 as new layer
Layers > Arrange > Send to Bottom
Layers > Arrange > Send to Bottom
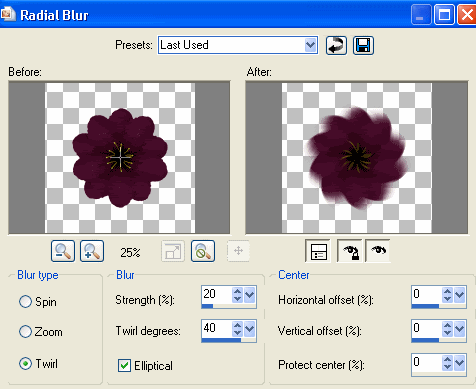
Adjust > Blur > Radial Blur with the following settings:
Resize by 95%
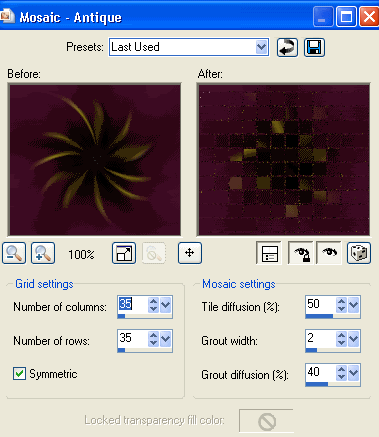
Effects > Texture Effects > Mosaic - Antique with the following settings:
Lower opacity to 70
Crop and resize
Select your Preset Shape Tool and set to Ellipse
Foreground - #000000
Background - null
Foreground - #000000
Background - null
Hold your shift key and draw out a circle around your tag
Objects > Align > Centre in Canvas
Objects > Align > Centre in Canvas
Select your Text Tool and font of choice
I am using Misfortune
Text colour of choice - I am using #480e2a
I am using Misfortune
Text colour of choice - I am using #480e2a
On the curve type out your text of choice
Position to your liking
Position to your liking
Open the Layer Palette and Vector layer
Hide ellipse and convert to raster layer
Lower opacity to 65
Select another font of choice
I am using Pump Demi Bold LET
Foreground - #000000
Background - #480e2a
Stroke width - 2.00
I am using Pump Demi Bold LET
Foreground - #000000
Background - #480e2a
Stroke width - 2.00
Type out your name
Objects > Align > Horizontal Centre in Canvas
Convert to raster layer
Apply a Gradient Glow and drop shadow of choice
Objects > Align > Horizontal Centre in Canvas
Convert to raster layer
Apply a Gradient Glow and drop shadow of choice
Finally, add your © copyright, licence and watermark, then save as a GIF or JPG and you're done!
** IF YOU WISH TO ANIMATE PLEASE FOLLOW THESE NEXT STEPS **
This is a very easy animation!
Activate Sparkle layer and duplicate
Rename Sparkle1 and Sparkle2
Rename Sparkle1 and Sparkle2
Activate Sparkle1 and hide Sparkle2
Edit > Copy Merged
Edit > Copy Merged
Open Animation Shop
Edit > Paste as New Animation
Edit > Paste as New Animation
Back to PSP
Hide Sparkle1 and activate Sparkle2
Edit > Copy Merged
Hide Sparkle1 and activate Sparkle2
Edit > Copy Merged
In Animation Shop
Edit > Paste After Current Frame
Edit > Paste After Current Frame
Select All and change Frame Properties to 50
Now save as a GIF and you're done!
Now save as a GIF and you're done!
Thanks for trying my tutorial!
::st!na::
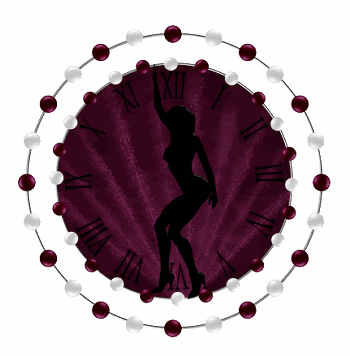
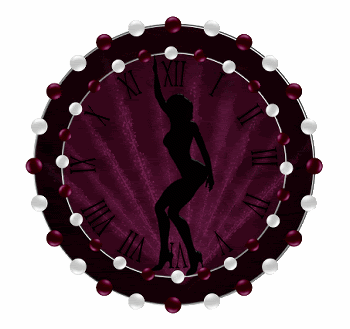
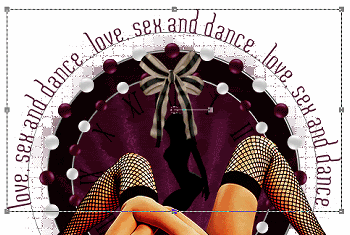
Here is a non-animated version:

© Tutorial written by Stina on 5th August 2009
All rights reserved
Gorgeous tut, thanks Jean
ReplyDelete