
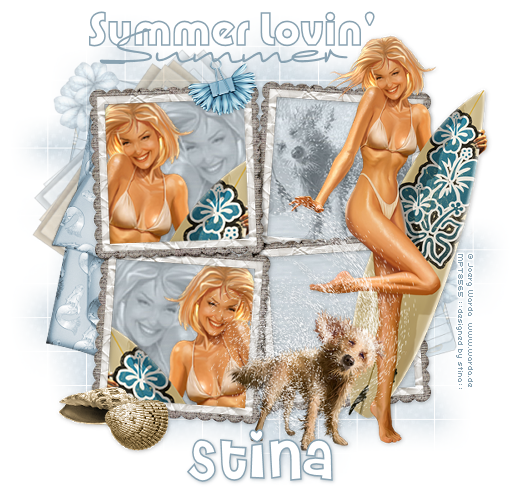
Supplies
Scrap kit of choice - I am using the lovely "At the Beach" by Bits N Bobs available at Exquisite Scraps
Tube of choice - I am using the artwork of Joerg Warda which can be purchased from My PSP Tubes
**PLEASE DO NOT USE HIS ARTWORK WITHOUT THE APPROPRIATE LICENCE**
WSL_Mask84 by Chelle available from her blog
Fonts of choice - I am using Pump Demi Bold LET, Sincerely and Cheri
Let's go!!
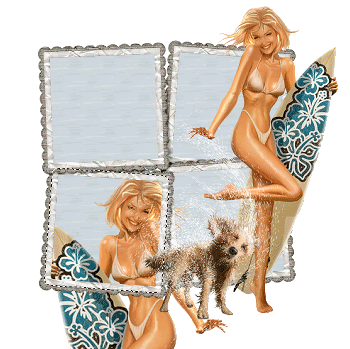
Open a new 600 x 600 blank canvas flood-filled white
Paste ClusterFrame2 as new layer
Resize by 85%
Resize by 85%
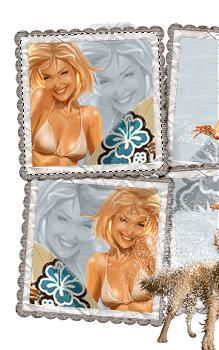
Select the inside of each frame with your Magic Wand
Selections > Modify > Expand by 10
Add a new raster layer
Paste Paper1 into Selection
Deselect
Layers > Arrange > Move Down
Selections > Modify > Expand by 10
Add a new raster layer
Paste Paper1 into Selection
Deselect
Layers > Arrange > Move Down
Paste your tube as new layer
Resize if necessary
Position to the right
Resize if necessary
Position to the right
Duplicate tube and Image > Mirror
Resize by 120%
Position in lower left Frame
Select the inner frame with magic Wand
Selections > Modify > Expand by 10
Selections > Invert
Delete
Resize by 120%
Position in lower left Frame
Select the inner frame with magic Wand
Selections > Modify > Expand by 10
Selections > Invert
Delete
KEEP SELECTED
Duplicate layer and resize by 140%
Layers > Arrange > Move Down
Position slightly to the left of tube as if in the background
Delete again then deselect
Set blend mode to Luminance (Legacy)
Lower opacity to 50
Layers > Arrange > Move Down
Position slightly to the left of tube as if in the background
Delete again then deselect
Set blend mode to Luminance (Legacy)
Lower opacity to 50
Back to main tube layer and duplicate again
Position over upper left Frame
Layers > Arrange > Move Down
Repeat again
Resize by 120%
Position in upper frame
Select the inner frame with Magic Wand
Selections > Modify > Expand by 10
Selections > Invert
Delete
Position over upper left Frame
Layers > Arrange > Move Down
Repeat again
Resize by 120%
Position in upper frame
Select the inner frame with Magic Wand
Selections > Modify > Expand by 10
Selections > Invert
Delete
KEEP SELECTED
Duplicate layer and resize by 140%
Layers > Arrange > Move Down
Position slightly to the right of tube as a mirror image of the previous one
Delete again then deselect
Set blend mode to Luminance (Legacy)
Lower opacity to 50
Layers > Arrange > Move Down
Position slightly to the right of tube as a mirror image of the previous one
Delete again then deselect
Set blend mode to Luminance (Legacy)
Lower opacity to 50
Duplicate main tube layer again
Position another portion in upper right frame
Layers > Arrange > Move Down
Repeat
Resize by 110%
Place in desired position
Select the inner frame with Magic Wand
Selections > Modify > Expand by 10
Selections > Invert
Delete then deselect
Set blend mode to Luminance (Legacy)
Lower opacity to 50
Position another portion in upper right frame
Layers > Arrange > Move Down
Repeat
Resize by 110%
Place in desired position
Select the inner frame with Magic Wand
Selections > Modify > Expand by 10
Selections > Invert
Delete then deselect
Set blend mode to Luminance (Legacy)
Lower opacity to 50
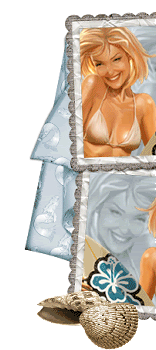
Paste PaperFold3 as new layer
Resize by 40%
Position in upper left
Resize by 40%
Position in upper left
Adjust > Hue & Saturation > Colourise with the following settings:

Duplicate and set blend mode to Screen
Lower opacity to 65
Layers > Merge > Merge Down
Then Layers > Arrange > Send to Bottom
Lower opacity to 65
Layers > Merge > Merge Down
Then Layers > Arrange > Send to Bottom
Paste Shell1 as new layer
Resize by 50%
Position in lower left
Resize by 50%
Position in lower left
Paste Shell2 as new layer
Resize by 40%
Position in lower left alongside first shell
Resize by 40%
Position in lower left alongside first shell
Paste FlowerClip as new layer
Layers > Arrange > Bring to Top
Image > Rotate by 60 to the right
Resize by 35%
Position along the top of Frame to your liking
Duplicate and apply the same Hue & Saturation > Colourise as above
Set blend mode to Overlay
Layers > Merge > Merge Down
Layers > Arrange > Bring to Top
Image > Rotate by 60 to the right
Resize by 35%
Position along the top of Frame to your liking
Duplicate and apply the same Hue & Saturation > Colourise as above
Set blend mode to Overlay
Layers > Merge > Merge Down
Add a drop shadow to each of your layers
H & V - 1
Opacity - 30
Blur - 8.00
Colour - #000000
H & V - 1
Opacity - 30
Blur - 8.00
Colour - #000000
Paste Frame as new layer
Image > Rotate by 40 to the left
Image > Mirror
Resize by 60%
Layers > Arrange > Send to Bottom
Position protruding along edge
Image > Rotate by 40 to the left
Image > Mirror
Resize by 60%
Layers > Arrange > Send to Bottom
Position protruding along edge
Paste Frame2 as new layer
Image > Rotate by 50 to the left
Image > Mirror
Resize by 60%
Layers > Arrange > Send to Bottom
Position protruding from edge of first frame
Layers > Merge > Merge Down
Image > Rotate by 50 to the left
Image > Mirror
Resize by 60%
Layers > Arrange > Send to Bottom
Position protruding from edge of first frame
Layers > Merge > Merge Down

Paste Journal as new
Image > Mirror
Image > Rotate by 10 to the left
Resize by 60%
Position in upper left
Layers > Arrange > Send to Bottom
Place in position
Layers > Merge > Merge Down
Image > Mirror
Image > Rotate by 10 to the left
Resize by 60%
Position in upper left
Layers > Arrange > Send to Bottom
Place in position
Layers > Merge > Merge Down
Paste Journal as new layer again
Image > Rotate by 15 to the left
Resize by 60%
Position to the right
Layers > Arrange > Send to Bottom
Position behind tube and Frame
Layers > Merge > Merge Down
Image > Rotate by 15 to the left
Resize by 60%
Position to the right
Layers > Arrange > Send to Bottom
Position behind tube and Frame
Layers > Merge > Merge Down
Your bottom frames and journals should now all be on one layer as you positioned them
Lower the opacity of them to around 40
Lower the opacity of them to around 40
Resize 500 x 500 all layers CHECKED
Image > Canvas Resize 550 x 550
Add new raster layer
Selections > Select All
Paste Paper5 into Selection
Deselect
Layers > Arrange > Send to Bottom
Selections > Select All
Paste Paper5 into Selection
Deselect
Layers > Arrange > Send to Bottom
Layers > New Mask Layer > From Image
Locate WSL_Mask84
OK
Layers > Merge > Merge Group
Lower opacity to around 55
Locate WSL_Mask84
OK
Layers > Merge > Merge Group
Lower opacity to around 55
Crop tag
Select your Text Tool and a bold font of choice
I am using Pump Demi Bold LET
Choose a colour from your tag and set your Material Palette:
I am using Pump Demi Bold LET
Choose a colour from your tag and set your Material Palette:
Foreground - #89a2b1
Background - #FFFFFF
Stroke width - 1.5
Background - #FFFFFF
Stroke width - 1.5
Type out your text of choice - I used "Summer Lovin' "
You can select a script font if you wish to type a "shadow" word - as I did with the word "Summer"
You can select a script font if you wish to type a "shadow" word - as I did with the word "Summer"
Select another font of choice and type out your name
I am using Cheri
Objects > Align > Horizontal Centre in Canvas
Convert to raster layer
Apply a drop shadow:
H & V 1
Opacity - 30
Blur - 5.00
Colour - #243e4e
I am using Cheri
Objects > Align > Horizontal Centre in Canvas
Convert to raster layer
Apply a drop shadow:
H & V 1
Opacity - 30
Blur - 5.00
Colour - #243e4e
Finally add your © copyright, licence and watermark then save as a GIF or JPG and you're done!
Thank you for trying my tutorial!
::st!na::
© Tutorial written by Stina on 14th April 2009
All rights reserved
Fab job hunny thank you :)
ReplyDelete