
Supplies
"Sweet as Easter" scrap kit by Pamela of The Posh Box Scraps which is a freebie available on her blog
Preset Shape - Ellipse
Satin Fill Patterns (supplied)
WSL_Mask7 by Chelle (supplied)
Fonts of choice - I am using Centime and 2Peas Typo
Plugin: Alien Skin Eye Candy 5 Impact / Glass
Plugin: dsb Flux Linear Transmission
Plugin: Eye Candy 4000 Gradient Glow
Plugins here
My Supplies here
~ Step 1 ~
Open a new 700 x 400 blank canvas flood-filled white
Open your Satin Fill Patterns and minimise them
Select your Preset Shapes Tool to Ellipse
In your Materials Palette set
Foreground to NULL
Background to one of the SatinFill Patterns of your choice
In your Materials Palette set
Foreground to NULL
Background to one of the SatinFill Patterns of your choice
Draw out the shape of an oval
Convert to raster layer
Select another colour and draw out another oval
Repeat till you have six ovals of each colour
Repeat till you have six ovals of each colour
~ Step 2 ~
Select your Text Tool and a font of your choice
I am using Centime
I am using Centime
Set your Background to White (#FFFFFF)
Activate the FIRST oval shape and type the letter E
Position then convert to raster layer
Layers / Merge / Merge Down
Rename layer to E
Position then convert to raster layer
Layers / Merge / Merge Down
Rename layer to E
Activate the SECOND oval shape
Type the letter A
Position then convert to raster layer
Layers / Merge / Merge Down
Rename layer to A
Type the letter A
Position then convert to raster layer
Layers / Merge / Merge Down
Rename layer to A
Activate the THIRD oval shape
Type the letter S
Position then convert to raster layer
Layers / Merge / Merge Down
Rename layer to S
Type the letter S
Position then convert to raster layer
Layers / Merge / Merge Down
Rename layer to S
Activate the FOURTH oval shape
Type the letter T
Position then convert to raster layer
Layers / Merge / Merge Down
Rename layer to T
Type the letter T
Position then convert to raster layer
Layers / Merge / Merge Down
Rename layer to T
Activate the FIFTH oval shape
Type the letter E
Position then convert to raster layer
Layers / Merge / Merge Down
Rename layer to E
Type the letter E
Position then convert to raster layer
Layers / Merge / Merge Down
Rename layer to E
Activate the LAST oval shape
Type the letter R
Position then convert to raster layer
Layers / Merge / Merge Down
Rename layer to R
Type the letter R
Position then convert to raster layer
Layers / Merge / Merge Down
Rename layer to R
You should now have something resembling this:

~ Step 3 ~
Activate the first E layer
Effects / 3D Effects / Inner Bevel with the following settings:
Effects / Plugins / Alien Skin Eye Candy 5 Impact / Glass with the following settings:
Repeat for each Lettered Oval
Now activate the First E layer again
Image / Rotate by 15 to the right
Image / Rotate by 15 to the right
Activate the A layer
Image / Rotate by 10 to the left
Image / Rotate by 10 to the left
Activate the S layer
Image / Rotate by 10 to the right
Image / Rotate by 10 to the right
Activate the T layer
Image / Rotate by 15 to the left
Image / Rotate by 15 to the left
Activate the Second E layer
Image / Rotate by 10 to the right
Image / Rotate by 10 to the right
Activate the R layer
Image / Rotate by 10 to the left
Image / Rotate by 10 to the left
Position each so they look like a bunch of Easter Eggs forming the word EASTER
Once you are satisfied with their position hide your Background layer
Layers / Merge / Merge Visible
Once you are satisfied with their position hide your Background layer
Layers / Merge / Merge Visible
Duplicate layer
Set blend mode to Multiply
Lower opacity to around 55
Set blend mode to Multiply
Lower opacity to around 55
~ Step 4 ~
Paste the BunnieFence as new layer
Position behind the Eggs and over the T
Position behind the Eggs and over the T
Paste some Flowers from the Flowers1 psp file
Resize by 30%
Place along the top around the Bunnie and eggs
Resize by 30%
Place along the top around the Bunnie and eggs
Paste a bed of Flowers from the Flowers4 psp file
Resize by 20%
Position along the bottom of the "easter eggs"
Resize by 20%
Position along the bottom of the "easter eggs"
Paste Small Butterfly as new layer
Image / Rotate by 10 to the left
Resize by 20%
Position to the left
Image / Rotate by 10 to the left
Resize by 20%
Position to the left
Duplicate
Image / Mirror
Position to the right
Image / Mirror
Position to the right
Duplicate
Image / Mirror
Resize by 70%
Position to the right
Image / Mirror
Resize by 70%
Position to the right
Duplicate
Image / Mirror
Position to the left
Image / Mirror
Position to the left
Duplicate
Image / Mirror
Position near the centre
Image / Mirror
Position near the centre
~ Step 5 ~
Paste Paper11 as new layer
Resize by 120%
Layers / Arrange / Send to Bottom
Layers / New Mask Layer / From Image
Locate WSL_Mask7
OK
Layers / Merge / Merge Group
Resize by 120%
Layers / Arrange / Send to Bottom
Layers / New Mask Layer / From Image
Locate WSL_Mask7
OK
Layers / Merge / Merge Group
Effects / Plugins / Dsb Flux / Linear Transmission with the following settings:
Crop and resize
Select your Text Tool and font of choice
I am using 2Peas Typo
Select a colour for your font
I am using #ad5cc1
I am using 2Peas Typo
Select a colour for your font
I am using #ad5cc1
Type out your name
Objects / Align / Horizontal Centre in Canvas
Convert to raster layer
Apply a Gradient Glow
Add a drop shadow:
H & V - 1
Opacity - 30
Blur - 3.00
Colour - #7b5783
Objects / Align / Horizontal Centre in Canvas
Convert to raster layer
Apply a Gradient Glow
Add a drop shadow:
H & V - 1
Opacity - 30
Blur - 3.00
Colour - #7b5783
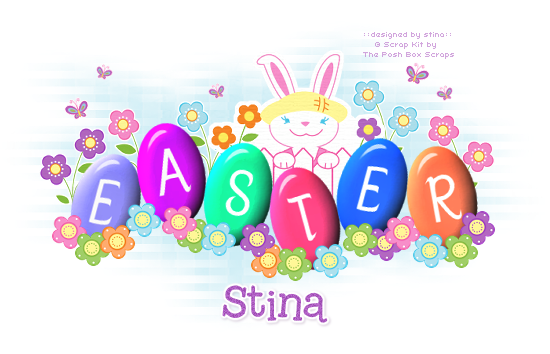
Finally, add your © copyright and watermark
Save as a GIF or JPG and you're done!
Thanks for trying my tutorial!
::st!na::
© Tutorial written by Stina on 31st March 2009
All rights reserved
No comments:
Post a Comment