

Supplies
Scrap kit of choice - I am using "Easter Fun" by Shanmomt4 Designs available from Paradise 4 Scrappers
Image and Tube of choice - I am using the lovely artwork of Joanna Bromley which can be purchase from My PSP Tubes
WSL_Mask7 by Chelle available from her blog
Fonts of choice - I am using 2Peas Groovy Bloom, 2 Peas Sonnet Script and Black Jack
Let's begin....
Open a new 600 x 600 blank canvas flood-filled white
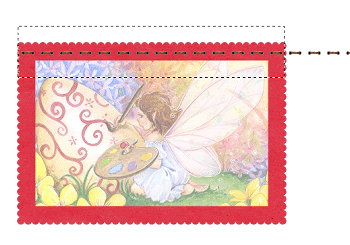
Paste Frame5 as new layer
(no need to resize)
(no need to resize)
Paste Image of choice as new layer
Layers > Arrange > Move Down
Resize and position below Frame to your liking
Layers > Arrange > Move Down
Resize and position below Frame to your liking
Activate Frame layer
Select inside area with Magic Wand
Selections > Modify > Expand by 10
Selections > Invert
Activate Image layer
Delete
Select inside area with Magic Wand
Selections > Modify > Expand by 10
Selections > Invert
Activate Image layer
Delete
KEEP SELECTED!!
Selections > Invert
Activate Background Layer
Selections > Promote Selection to Layer
Deselect
Activate Background Layer
Selections > Promote Selection to Layer
Deselect
Lower the opacity of your image layer to around 50
Layers > Merge > Merge Down
Layers > Merge > Merge Down
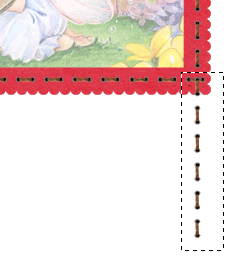
Paste Stitching as new layer
Position along top of Frame
Draw a selection around this area
Selections > Invert
Press delete and deselect
Position along top of Frame
Draw a selection around this area
Selections > Invert
Press delete and deselect
Duplicate then Image > Flip
Duplicate again
Image > Rotate by 90
Position along side of Frame
Draw a selection around the excess
Duplicate again
Image > Rotate by 90
Position along side of Frame
Draw a selection around the excess
Delete and deselect
Duplicate then Image > Mirror
Duplicate then Image > Mirror
Hide all layers except for the Stitching
Layers > Merge > Merge Visible
Unhide layers
Layers > Merge > Merge Visible
Unhide layers
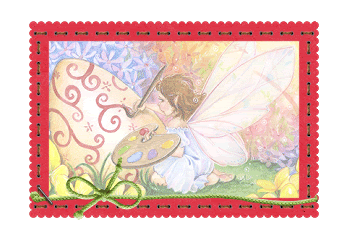
Paste String2 as new layer
Resize by 15%
Position along bottom of Frame
Resize by 15%
Position along bottom of Frame
Paste Staple as new layer
Image > Rotate by 50 to the right
Resize by 50%
Position over String to secure it to the Frame
Image > Rotate by 50 to the right
Resize by 50%
Position over String to secure it to the Frame
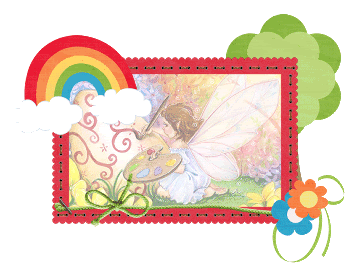
You should have something a little like this:
Paste Flower2 as new layer
Using your Magic Wand Tool with a Tolerance set to around 25 click INSIDE the stem, leaves and pot
Press delete and deselect
Using your Magic Wand Tool with a Tolerance set to around 25 click INSIDE the stem, leaves and pot
Press delete and deselect
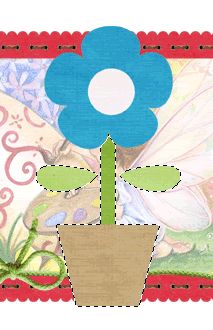
Resize by 60%
Position in lower right corner
Position in lower right corner
Paste Flower3 as new layer
Select the inside of stem, leaves and pot
Delete and deselect
Select the inside of stem, leaves and pot
Delete and deselect
Resize by 60%
Position alongside first flower
Position alongside first flower
Paste Doodle as new layer
Image > Mirror, then Image > Flip
Image > Rotate by 20 to the left
Resize by 35%
Position in lower right
Layers > Arrange > Send to Bottom
Image > Mirror, then Image > Flip
Image > Rotate by 20 to the left
Resize by 35%
Position in lower right
Layers > Arrange > Send to Bottom
Paste Tree as new layer (still on bottom layer)
Resize by 55%
Position to the right
Resize by 55%
Position to the right
Paste Rainbow as new layer
Resize by 55% - 60%
Position in upper left corner
Resize by 55% - 60%
Position in upper left corner
Paste Tube of choice as new layer
Resize as necessary and position to your liking
Resize as necessary and position to your liking
Paste various Easter eggs
Resize and rotate them to your liking
Position them to the left of your tube
Resize and rotate them to your liking
Position them to the left of your tube
Paste Worm as new layer
Resize by 30%
Position to the lower right
Resize by 30%
Position to the lower right
Paste Tag2 as new layer
Image > Rotate by 20 to the right
Resize by 30%
Position in lower left
Drag layer to below the Staple
Image > Rotate by 20 to the right
Resize by 30%
Position in lower left
Drag layer to below the Staple
Image > Canvas Resize 600 wide by 500 high centred
paste Paper5 as new layer
Layers > Arrange > Send to Bottom
Layers > Arrange > Send to Bottom
Layers > New Mask Layer > From Image
Locate WSL_Mask7
OK
Layers > Merge > Merge Group
Locate WSL_Mask7
OK
Layers > Merge > Merge Group
Apply drop shadows to your elements:
H & V - 1
Opacity - 20
Blur - 5.00
Colour - #000000
H & V - 1
Opacity - 20
Blur - 5.00
Colour - #000000
Select your Text Tool and font of choice
I am using three different fonts for the Phrase -
2Peas Groovy Bloom,
2Peas Sonnet Script (Painting Dreams), and
Black Jack (of Rainbows & Things)
I am using three different fonts for the Phrase -
2Peas Groovy Bloom,
2Peas Sonnet Script (Painting Dreams), and
Black Jack (of Rainbows & Things)
Pick a colour from your tube or scrap
Type in any text or phrase of your choice
Convert to raster layer
Type in any text or phrase of your choice
Convert to raster layer
Select another font and type out your name
Apply a Gradient Glow (optional) and drop shadow of choice
Apply a Gradient Glow (optional) and drop shadow of choice
Finally, add your © copyright, licence and watermark the save as a GIF or JPG and you're done
Thanks for trying my tutorial!
::st!na::
© Tutorial written by Stina on 7th April 2009
All rights reserved
Great tut. I love what you did with my kit. Thanks again!
ReplyDeleteBEAUTIFUL!!!!
ReplyDelete