
Supplies
Scrap kit of choice - I am using "Groovylicious" by Just a Girl Designs exclusive to Exquisite Scraps
Tube of choice - I am using the lovely artwork of Joel Adams which can be purchased from CILM
**PLEASE DO NOT USE HIS ARTWORK WITHOUT THE APPROPRIATE LICENCE**
WSL_Mask36 by Chelle available from her blog
WSL_Mask36 by Chelle available from her blog
Fonts of choice - I am using Chick, CCThingamajig and Bell Bottom.Laser
This is a fairy easy animated tutorial
Let's get started!!
Open a new 600 x 600 blank canvas flood-filled white
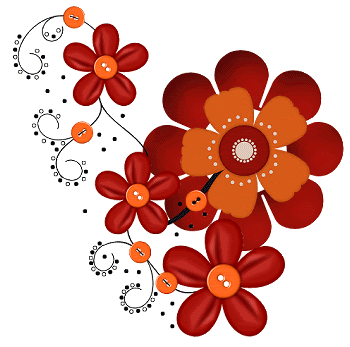
Paste FlowerPower3 as new layer
Paste Flowers as new layer
Resize by 85%
Position first flower directly beneath the orange flower
Resize by 85%
Position first flower directly beneath the orange flower
Paste Record as new layer
Resize by 55%
Position beneath first flower we pasted
Resize by 55%
Position beneath first flower we pasted
Paste Silhouette as new layer
Position in lower right
Position in lower right
Paste Bkg6 as new layer
Resize by 65%
Layers > Arrange > Send to Bottom
Resize by 65%
Layers > Arrange > Send to Bottom
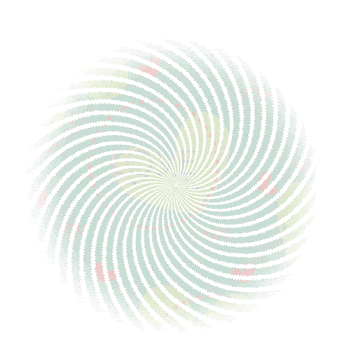
Layers > New Mask Layer > From Image
Locate WSL_Mask36
Layers > Merge > Merge Group
Lower opacity to 50
Locate WSL_Mask36
Layers > Merge > Merge Group
Lower opacity to 50
Paste PeaceSign as new layer
Resize by 18%
Position over centre of orange flower
Resize by 18%
Position over centre of orange flower
Paste HappyFace as new layer
Resize by 10%
Position over large red flower
Resize by 10%
Position over large red flower
Duplicate then resize by 80%
Duplicate again
Place over centre of both remaining flowers
Duplicate again
Place over centre of both remaining flowers
Crop and resize
Open a paper of choice and minimise it
Select your Text Tool and font
I am using Chick
I am using Chick
Set your Material Properties as follows:
Foreground - #000000
Background - Paper of choice
Stroke width - 2.00
Foreground - #000000
Background - Paper of choice
Stroke width - 2.00
Type out the word "Groovy"
Convert to raster layer
Convert to raster layer
Change your Material Properties:
Foreground - null
Background - #022202
Foreground - null
Background - #022202
Set your font to another one of choice
I am using CCThingamajig
I am using CCThingamajig
Type out the word "baby"
Convert to raster layer
Convert to raster layer
Paste your tube as a new layer
Resize as necessary
Position to your liking
Resize as necessary
Position to your liking
Now minimise another paper of choice
Select your Text Tool and choose another font
I am using Bellbottom.Laser
I am using Bellbottom.Laser
Set your Material Properties to the same as above using a different paper of choice
Type out your name
Objects > Align > Horizontal Centre in Canvas
Convert to raster layer
Objects > Align > Horizontal Centre in Canvas
Convert to raster layer
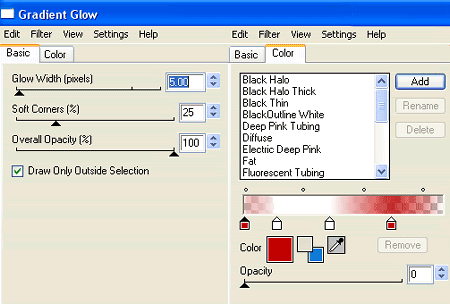
Effects > Plugins > Eye Candy 4000 > Gradient Glow with the following settings:
Apply a slight drop shadow
Add your © copyright, licence and watermark
Now let's animate!
Hide ALL LAYERS except for your Mask layer
Edit > Copy Merged
Edit > Copy Merged
Go to Animation Shop
Edit > Paste as New Animation
Then Effects > Insert Image Effect with the following settings:
Edit > Paste as New Animation
Then Effects > Insert Image Effect with the following settings:
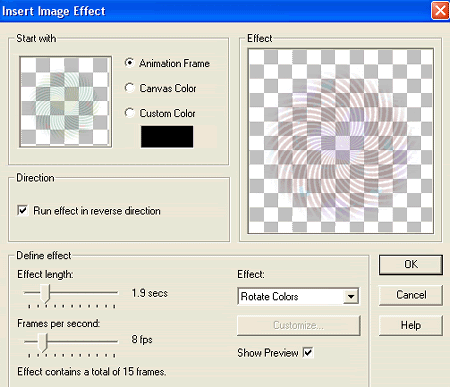
You should now have 16 Frames
Go back to PSP
Activate your White Background layer
Edit > Copy
Activate your White Background layer
Edit > Copy
Back to Animation Shop
Edit > Paste as New Animation
Then Edit > Paste After Current Frame UNTIL YOU HAVE A TOTAL OF 16 FRAMES
Edit > Select All
Edit > Paste as New Animation
Then Edit > Paste After Current Frame UNTIL YOU HAVE A TOTAL OF 16 FRAMES
Edit > Select All
Activate the Animation we applied the effect to
Edit > Select All
Edit > Copy
Activate the new "animation" of white background
Edit > Propogate Paste
Then Edit > Paste into Selected Frame
Click to release animation
Edit > Select All
Edit > Copy
Activate the new "animation" of white background
Edit > Propogate Paste
Then Edit > Paste into Selected Frame
Click to release animation
Back to PSP (last time *g*)
Hide your white background and mask layers and unhide EVERy OTHER LAYER
Edit > Copy Merged
Hide your white background and mask layers and unhide EVERy OTHER LAYER
Edit > Copy Merged
In Animation Shop
Edit > Paste into Selected Frame
Edit > Paste into Selected Frame
**PROPOGATE PASTE MUST BE SELECTED TO ENSURE A SINGLE FRAME IS THEN PASTE INTO MULTIPLE FRAMES**
Finally, save as a GIF and you're done!
Thanks for trying my tutorial!
::st!na::
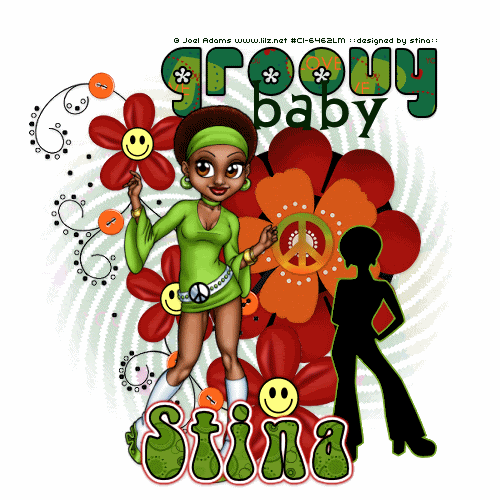
Here is a non-animated version:

© Tutorial written by Stina on 8th April 2009
All rights reserved
No comments:
Post a Comment