
Supplies
"Vintage Easter" freebie scrap kit available from Pixel Music
Tube of choice - I am using the lovely artwork of Marjolein Gulinski which can be purchased from My PSP Tubes
**PLEASE DO NOT USE HER ARTWORK WITHOUT THE APPROPRIATE LICENCE**
WSL_Mask251 by Chelle available from her blog
Plugin: Eye Candy 4000 Gradient Glow
Font of choice - I am using Isabella
This is an easy tutorial ideal for Beginners
Let's begin!
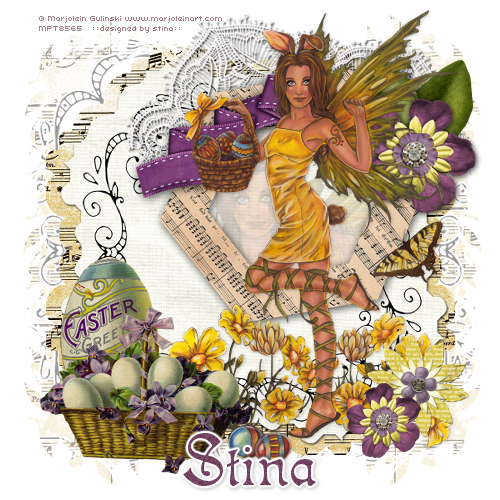
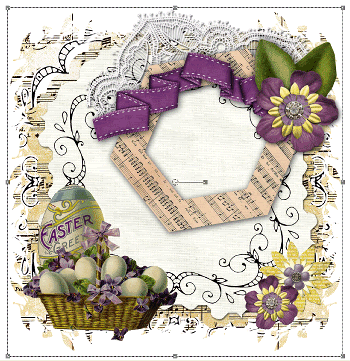
Open a new 600 x 600 blank canvas flood-filled white
Paste Textbox3 as new layer
Resize by 35%
Leave in position
Resize by 35%
Leave in position
Paste ClusterFrame as new layer
Resize by 50%
Position up and slightly to the right
Resize by 50%
Position up and slightly to the right
Paste Basket as new layer
Resize by 25%
Position in the lower left corner
Resize by 25%
Position in the lower left corner
Paste EasterEgg as new layer
Resize by 20%
Layers > Arrange > Move Down
Position behind the Basket and slightly up
Resize by 20%
Layers > Arrange > Move Down
Position behind the Basket and slightly up
Paste YellowFlower as new layer
Resize by 15%
Position in lower right
Resize by 15%
Position in lower right
Paste PurpleFlower as new layer
Resize by 20%
Position in lower right overlapping the Yellow flower
Resize by 20%
Position in lower right overlapping the Yellow flower
Add a new raster layer
Selections > Select All
Paste SheetMusicBorder INTO selection
Deselect
Resize by 95%
Layers > Arrange > Send to Bottom
Selections > Select All
Paste SheetMusicBorder INTO selection
Deselect
Resize by 95%
Layers > Arrange > Send to Bottom
Layers > New Mask Layer > From Image
Locate WSL_Mask251
Locate WSL_Mask251
In your Layer Palette locate your Mask layer
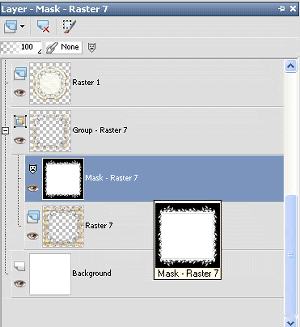
With your Pick Tool use the nodes to pull the layer up at the top and down at the bottom
Layers > Merge > Merge Group
Lower opacity to around 40
Lower opacity to around 40
Crop and Resize
Paste your tube below cluster frame
Enlarge/resize to fit partially inside cluster frame
With your Magic Wand select inside the frame (be sure to select the shadow as well to include the entire inside)
Selections > Modify > Expand by 10
Enlarge/resize to fit partially inside cluster frame
With your Magic Wand select inside the frame (be sure to select the shadow as well to include the entire inside)
Selections > Modify > Expand by 10
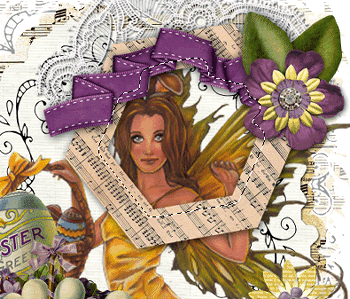
Selections > Invert
Delete and deselect
Delete and deselect

Paste your tube as new layer again
Layers > Arrange > Move Up (one layer above frame)
Resize as necessary and place in position
Apply drop shadow of choice
Layers > Arrange > Move Up (one layer above frame)
Resize as necessary and place in position
Apply drop shadow of choice
Select your Text Tool and font of choice
I am using Isabella
Choose a colour from your tube or scrap
Set your Material Properties:
Foreground - null
Background - #734360
I am using Isabella
Choose a colour from your tube or scrap
Set your Material Properties:
Foreground - null
Background - #734360
Apply a Gradient Glow and drop shadow:
H & V - 1
Opacity - 30
Blur - 5.00
Colour - #301826
H & V - 1
Opacity - 30
Blur - 5.00
Colour - #301826
Finally, add your © copyright, licence and watermark then save as a GIF or JPG and you're done!
Thanks for trying my tutorial
::st!na::
© Tutorial written by Stina on 9th April 2009
All rights reserved
Hi Stina,
ReplyDeleteThank you sweetie, for this gorgeous tutorial, when iread you are another Aussie, i justhad to say G'day :-) i love your blog ... hugs from.. Triple_e