Supplies
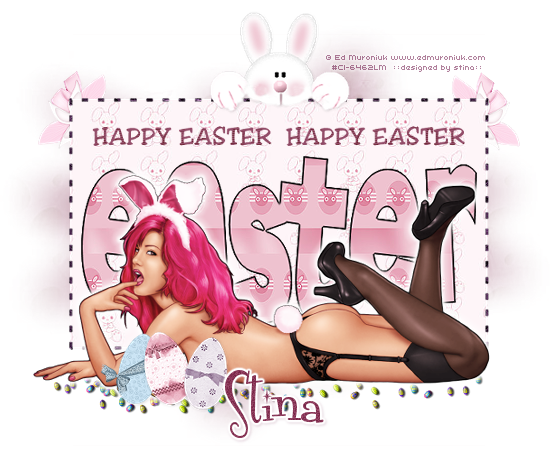
Scrap kit of choice - I am using "Hip Hop Easter" by Stacey's Designs available from Creative Scraps Store
Tube of choice - I am using the artwork of Ed Muroniuk which can be purchased from CILM
**PLEASE DO NOT USE HIS ARTWORK WITHOUT THE APPROPRIATE LICENCE**
Easter Template 02 by Me (supplied)
WSL_Mask7 by Chelle (supplied)
Painted Eggs tube (supplied)
Font of choice - QK Katie
Plugin: Eye Candy 4000 Gradient Glow
My Supplies here
~ Step 1 ~
Open EasterTemplate02 made by me
Shift D to duplicate then close off original
Image / Canvas Resize by 800 x 600 - we'll resize later
Shift D to duplicate then close off original
Image / Canvas Resize by 800 x 600 - we'll resize later
Activate the EASTER words layer
Selections / All
Selections / Float
Selections / Defloat
Selections / Modify / Contract by 2
Selections / All
Selections / Float
Selections / Defloat
Selections / Modify / Contract by 2
Paste Paper12 as new layer
Resize by 70%
Resize by 70%
Selections / Invert
Selections / Modify / Feather by 1
Delete then deselect
Selections / Modify / Feather by 1
Delete then deselect
Layers / Merge / Merge Down
You should now have a black border around your word
Activate the DASHED BORDER
Selections / All
Selections / Float
Selections / Defloat
Selections / All
Selections / Float
Selections / Defloat
Paste Paper16 into Selection
Deselect
Deselect
Grab your Selection Tool and draw out a rectangle around the DASHED BORDER

Paste Paper7 as new layer
Layers / Arrange / Send to Bottom
Position to your liking
Selections / Invert
Delete then deselect
Layers / Arrange / Send to Bottom
Position to your liking
Selections / Invert
Delete then deselect
Activate HAPPY EASTER words
Selections / All
Selections / Float
Selections / Defloat
Add a new raster layer
Paste Paper5 into Selection
Deselect
Delete previous layer and rename this one to HAPPY EASTER
Selections / All
Selections / Float
Selections / Defloat
Add a new raster layer
Paste Paper5 into Selection
Deselect
Delete previous layer and rename this one to HAPPY EASTER
~ Step 2 ~
Paste LightPinkDecoratedEgg as new layer
Image / Rotate by 15 to the left
Resize by 20%
Position on the opposite side of the Bunny
Image / Rotate by 15 to the left
Resize by 20%
Position on the opposite side of the Bunny
Duplicate then set blend mode to Multiply
Lower opacity to 70
Layers / Merge / Merge Down
Lower opacity to 70
Layers / Merge / Merge Down
Paste PurpleDecoratedEgg as new layer
Image / Rotate by 10 to the right
Resize by 18%
Position alongside Pink Egg
Image / Rotate by 10 to the right
Resize by 18%
Position alongside Pink Egg
Paste BlueDecoratedEgg as new layer
Image / Rotate by 10 to the right
Resize by 17%
Position along the other side of Pink Egg
Image / Rotate by 10 to the right
Resize by 17%
Position along the other side of Pink Egg
Paste PinkBunnyHeart as new layer
Select your Freehand Tool
Mode - Add (Shift)
Feather - 2
Select your Freehand Tool
Mode - Add (Shift)
Feather - 2
Draw carefully around the Heart and Bow
Remember we want the Rabbit!
Remember we want the Rabbit!

Now press delete and deselect
There will be some blank spaces where there should be "bunny" so let's use our Clone Tool
to cover them up and add some more
to cover them up and add some more
Select your Clone Brush Tool with the following settings:

Then right click the colour you wish to clone and carefully left click to the area you wish to drop it
Be careful that where ever you move the Clone Tool does too - picking up colour
Be careful that where ever you move the Clone Tool does too - picking up colour
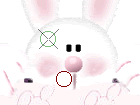
See where the circle is with the X through it - that is where the colour is being picked up from
The circle below is where you are dropping it
You move to the right your Clone circle with the X moves too
If you move too far you will be picking up another colour you don't want
Just play around with it to see what I mean
The circle below is where you are dropping it
You move to the right your Clone circle with the X moves too
If you move too far you will be picking up another colour you don't want
Just play around with it to see what I mean
Once you have completed your cloning position the Bunny where you want it to sit
Apply a slight drop shadow:
H & V - 1
Opacity - 15
Blur - 5.00
Colour - #000000
Apply a slight drop shadow:
H & V - 1
Opacity - 15
Blur - 5.00
Colour - #000000
Paste LightPinkSatinFlower as new layer
Resize by 15%
Position in upper left
Duplicate
Image / Mirror
Layers / Merge / Merge Down
Duplicate
Set blend mode to Overlay
Layers / Merge / Merge Down
Resize by 15%
Position in upper left
Duplicate
Image / Mirror
Layers / Merge / Merge Down
Duplicate
Set blend mode to Overlay
Layers / Merge / Merge Down
Layers / Arrange / Send to Bottom
Crop and resize
~ Step 3 ~
Paste tube as new layer and position along the bottom (a "laying" tube is best for this)
Resize if necessary
Duplicate
Resize if necessary
Duplicate
On duplicate layer
Adjust / Hue & Saturation / Colourise with the following settings:
Adjust / Hue & Saturation / Colourise with the following settings:
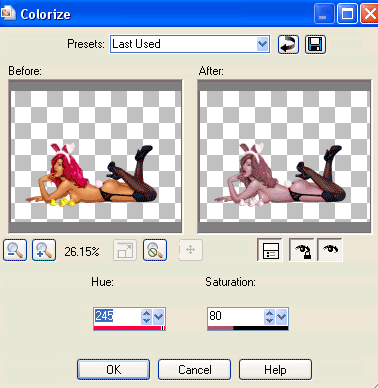
Set the blend mode to Screen and lower the opacity to 60
Layers / Merge / Merge Down
Layers / Merge / Merge Down
Adjust / Plugins / Eye Candy 4000 / Gradient Glow with the following settings:
Glow width - 8.00
Soft Corners - 25
Opacity - 100
Setting - Diffuse
Colour - #FFFFFF
Glow width - 8.00
Soft Corners - 25
Opacity - 100
Setting - Diffuse
Colour - #FFFFFF
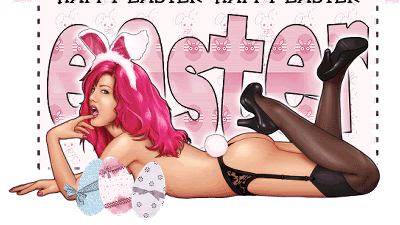
I strategically placed the Easter Eggs in front of the woman
Then added a slight drop shadow to each
Then added a slight drop shadow to each
Add a new raster layer
Select your Picture Tube Tool and find the tube "Painted Eggs"
Set your scale to 10
Scatter some painted eggs along the bottom of your tube by clicking for each egg
They should look like a bunch of those little eggs
Select your Picture Tube Tool and find the tube "Painted Eggs"
Set your scale to 10
Scatter some painted eggs along the bottom of your tube by clicking for each egg
They should look like a bunch of those little eggs
Layers / Arrange / Move Down
Repeat till the tiny eggs are below your tube layer
Repeat till the tiny eggs are below your tube layer
Now activate your Background layer
Paste Paper5 as new layer
Layers / New Mask Layer / From Image
Locate WSL_Mask7
OK
Layers / Merge / Merge Group
Paste Paper5 as new layer
Layers / New Mask Layer / From Image
Locate WSL_Mask7
OK
Layers / Merge / Merge Group
Select a colour from your tube and a font of choice
I am using QK Katie
Foreground - null
Background - #893758 (my colour)
I am using QK Katie
Foreground - null
Background - #893758 (my colour)
Type out your name
Objects / Align / Horizontal Centre in Canvas
Convert to raster layer
Apply a Gradient Glow with a width of 3.00 Setting FAT and colour #FFFFFF
Add a slight drop shadow
Objects / Align / Horizontal Centre in Canvas
Convert to raster layer
Apply a Gradient Glow with a width of 3.00 Setting FAT and colour #FFFFFF
Add a slight drop shadow
Finally, add your © copyright, licence and watermark then save as a GIF or JPG and you're done!
Thanks for trying my tutorial!
::st!na::
© Tutorial written by Stina on 1st April 2009
All rights reserved

Thank you so much for this amazing tutorial!!! I love it!!! Hugs Stacey
ReplyDelete