

Supplies
Scrap kit of choice - I am using "Hip Hop Easter" by Stacey's Designs available from Creative Scraps Store
Tube of choice - I am using the artwork of Suzanne Woolcott which can be purchased from her store
**PLEASE DO NOT USE HER ARTWORK WITHOUT THE APPROPRIATE LICENCE**
WSL_Mask214 by Chelle available from her blog
Font of choice - LainieDaySH
~ Step 1 ~
Open a new 700 x 500 blank canvas flood-filled white
Paste DarkPinkTripleFrame as new layer
Resize by 85%
Resize by 85%
Select inside each frame with your Magic Wand
Selections / Modify / Expand by 10
Selections / Modify / Expand by 10
Paste Paper7 as new layer
Resize by 85%
Selections / Invert
Delete
Layers / Arrange / Move Down
Resize by 85%
Selections / Invert
Delete
Layers / Arrange / Move Down
KEEP SELECTED
Paste your first tube of choice as new layer
Position to the left
Resize to fit within Frame
Press delete to delete excess
Position to the left
Resize to fit within Frame
Press delete to delete excess
Paste second tube of choice as new layer
Position to the right
Resize to fit within Frame
Press delete to delete excess
Position to the right
Resize to fit within Frame
Press delete to delete excess
STILL KEEP SELECTED!
Paste your main tube as new layer into centre Frame
Resize as necessary
Layers / Arrange / Move Up
(this layer will be on top of the Frame)
Position to your liking
Resize as necessary
Layers / Arrange / Move Up
(this layer will be on top of the Frame)
Position to your liking
Selections / Invert
Selections / Modify / Contract by 10
Use your Eraser Tool to erase the excess from the bottom of the tube along the bottom of Frame
Deselect
Adjust your tube into position if needed
Selections / Modify / Contract by 10
Use your Eraser Tool to erase the excess from the bottom of the tube along the bottom of Frame
Deselect
Adjust your tube into position if needed
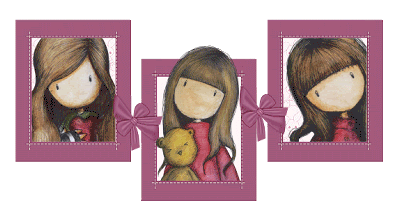
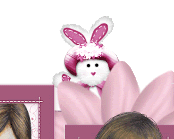
You should now have something like this:
~ Step 2 ~
Paste PurpleAndLightPinkFastner as new layer
Layers / Arrange / Send to Bottom
Position so that flower surrounds frame
Layers / Arrange / Send to Bottom
Position so that flower surrounds frame
Draw a selection around each end that is showing
Press delete then deselect
Paste LightPinkRibbonBow as new layer
Resize by 50%
Place over the bottom of the centre Frame
Resize by 50%
Place over the bottom of the centre Frame
Activate Frame layer
Select the area outside of the Frame with your Magic Wand
Selections / Modify / Feather by 1
Select the area outside of the Frame with your Magic Wand
Selections / Modify / Feather by 1
Activate your Ribbon layer
Use your Eraser Tool to erase both ends of the ribbon
Use your Eraser Tool to erase both ends of the ribbon
Duplicate and position carefully on the bottom of the left Frame
Duplicate again, then
Image / Mirror
Duplicate again, then
Image / Mirror
Paste DarkPinkSatinFlower as new layer
Resize by 10%
Position in upper left Frame
Duplicate
Image / Mirror
Position in upper right
Resize by 10%
Position in upper left Frame
Duplicate
Image / Mirror
Position in upper right
Paste DarkPinkEyeletRibbon as new layer
Resize by 5%
Position over Bow on Frame
Duplicate
Image / Mirror
Position over other Bow
Resize by 5%
Position over Bow on Frame
Duplicate
Image / Mirror
Position over other Bow
Paste DarkPinkSatinFlowerBow as new layer
Resize by 15%
Position over centre ribbon in middle Frame
Resize by 15%
Position over centre ribbon in middle Frame
Paste LightPinkDecoratedEgg as new layer
Image / Rotate by 15 to the left
Resize by 15%
Position to the left on corner of Frame
Duplicate then set blend mode to multiply
Layers / Merge / Merge Down
Image / Rotate by 15 to the left
Resize by 15%
Position to the left on corner of Frame
Duplicate then set blend mode to multiply
Layers / Merge / Merge Down
Duplicate, then Image / Mirror
Resize by 85%
Then position alongside first egg
Layers / Merge / Merge Down
Resize by 85%
Then position alongside first egg
Layers / Merge / Merge Down
Duplicate then Image / Mirror
Hide your Background layer
Layers / Merge / Merge Visible
Layers / Merge / Merge Visible
Crop and resize
~ Step 3 ~
Paste DarkPinkStandingBunny as new layer
Image / Rotate by 15 to the left
Resize by 20%
Position Bunny to appear above flower
Layers / Arrange / Send to Bottom
Duplicate then set blend mode to Overlay
Layers / Merge / Merge Down
Image / Rotate by 15 to the left
Resize by 20%
Position Bunny to appear above flower
Layers / Arrange / Send to Bottom
Duplicate then set blend mode to Overlay
Layers / Merge / Merge Down
Paste Paper11 as new layer
Layers / Arrange / Send to Bottom
Layers / Arrange / Send to Bottom
Layers / New Mask Layer / From Image
Locate WSL_Mask214
OK
Layers / Merge / Merge Group
Locate WSL_Mask214
OK
Layers / Merge / Merge Group
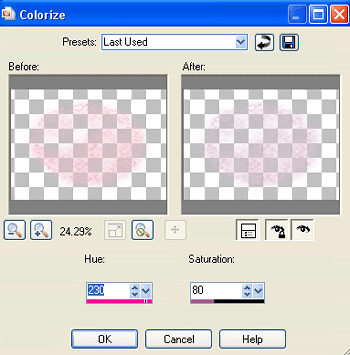
Adjust / Hue & Saturation / Colourise with the following settings:
Add your © copyright, licence and watermark
Select your Text Tool and font of your choice
I am using LainieDaySH
I am using LainieDaySH
Foreground - null
Background - #a25c7e (or colour of choice)
Background - #a25c7e (or colour of choice)
Type out your name
Objects / Align / Horiztonal Centre in Canvas
Convert to raster layer
Objects / Align / Horiztonal Centre in Canvas
Convert to raster layer
Apply a drop shadow:
H & V - 1
Opacity - 20
Blur - 10.00
Colour - #7e385e (or one of your choice)
Repeat
H & V - 1
Opacity - 20
Blur - 10.00
Colour - #7e385e (or one of your choice)
Repeat
~ Step 4 ~
**THIS NEXT STEP IS FOR ANIMATION! IF YOU DO NOT WISH TO ANIMATE YOU MAY SKIP THIS STEP AND SAVE YOUR CREATION NOW**
Activate your Bunny
Duplicate it
Now space them in layers
Rename them Bunny1 and Bunny2 (from bottom to top)
Duplicate it
Now space them in layers
Rename them Bunny1 and Bunny2 (from bottom to top)
LEAVE THEM IN POSITION!
Turn the visibility off on all Bunnies
Edit / Copy Merged
Edit / Copy Merged
Open Animation Shop and Paste as new Animation
Go back to PSP
Turn the visibility Bunny1
Edit / Copy Merged
Turn the visibility Bunny1
Edit / Copy Merged
In Animation Shop
Edit / Paste AFTER Current Frame
Edit / Paste AFTER Current Frame
Back to PSP
Turn off Bunny1 and turn on Bunny2
Edit / Copy Merged
Turn off Bunny1 and turn on Bunny2
Edit / Copy Merged
In Animation Shop
Edit / Paste After Current Frame
Edit / Paste After Current Frame
You should now have 3 Frames
Edit / Select All
Animation / Frame Properties
Set to 30
Go to your last frame
Animation / Frame Properties (again)
Set to 100
Animation / Frame Properties
Set to 30
Go to your last frame
Animation / Frame Properties (again)
Set to 100
Finally save as a GIF and you're done!
Thank you for trying my tutorial!
::st!na::
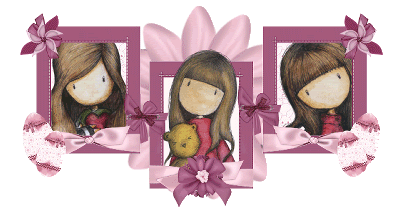
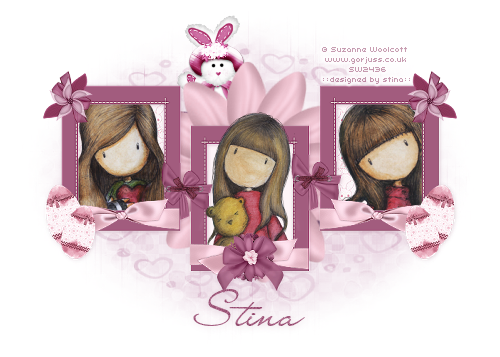
Below is a non-aminated version:
© Tutorial written by Stina on 3rd April 2009
All rights reserved
No comments:
Post a Comment