
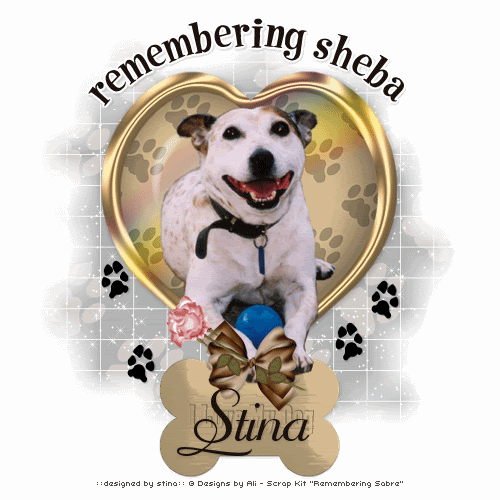
Tutorial written and dedicated to the memory of my beloved Sheba,
who crossed Rainbow Bridge 22nd September 2008 (last year)....after two strokes, doggy dementia, the loss of the use of her back legs and many many years of love
Always Remembered
Supplies
Scrap kit of choice - I am using the RSPCA charity kit "Remembering Sabre" by Designs by Ali available fromStargazer Scraps
Tube of choice - I am using one from the scrap kit
WSL_Mask84 by Chelle available from her blog
Plugin: Eye Candy 4000 Gradient Glow
Plugin: Alien Skin Xenofex 2 Constellation
Fonts of choice - I am using 2Peas Tiger Tails and Mayfair
Let's begin!
Open a new 600 x 600 blank canvas flood-filled white
Paste DBA Brad2 as new layer
LEAVE IN POSITION
LEAVE IN POSITION
Paste DBA Rainbow1 as new layer
Position over the brad
Set blend mode to Soft Light
Position over the brad
Set blend mode to Soft Light
With your Magic Wand select the outer area of the heart
Press delete
Press delete
KEEP SELECTED
Paste tube of choice as new layer
Resize as necessary
Position within the heart Brad
Resize as necessary
Position within the heart Brad
Selections > Modify > Expand by 23
Selections > Modify > Feather by 2
Use your Eraser to erase the excess you wish to remove
Deselect
Selections > Modify > Feather by 2
Use your Eraser to erase the excess you wish to remove
Deselect
Reposition tube so it sits along the gold trim edge of the Brad heart
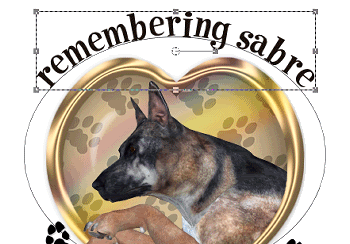
Paste DBA Dog Tag1 as new layer
Resize by 35%
Position at the bottom of the Heart
Layers > Arrange > Send to Bottom
Resize by 35%
Position at the bottom of the Heart
Layers > Arrange > Send to Bottom
Paste LadySnowflake-Sabre-Bow3 as new layer
Layers > Arrange > Bring to Top
Resize by 30%
Position over the base of the Heart joining the Tag
Layers > Arrange > Bring to Top
Resize by 30%
Position over the base of the Heart joining the Tag
Paste LadySnowflake-Sabre-Rose as new layer
Image > Mirror, then
Image > Rotate by 60 to the left
Resize by 35%
Position over the Bow
Image > Mirror, then
Image > Rotate by 60 to the left
Resize by 35%
Position over the Bow
Use your Freehand Tool to draw around the Rose head (not the stem!)
Go to Adjust > Hue & Saturation > Colourise with the following settings:
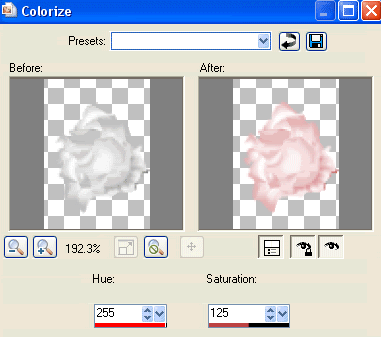
Still selected go to Selections > Promote Selection to Layer
Set blend mode to Multiply
Then deselect
Layers > Merge > Merge Down
Set blend mode to Multiply
Then deselect
Layers > Merge > Merge Down
Now with your Freehand Tool again draw around the knot in the Bow and the excess leaves
Lower the opacity of the Rose and Zoom in for a better view
Lower the opacity of the Rose and Zoom in for a better view

Now delete and deselect
Paste DBA PawPrints1 as new layer
Image > Rotate by 15 to the left
Resize by 12%
Position to the right
Duplicate, then Image > Mirror
Repeat to your liking
Image > Rotate by 15 to the left
Resize by 12%
Position to the right
Duplicate, then Image > Mirror
Repeat to your liking
Image > Canvas Resize 600 w x 650 h
Centre top CHECKED
Centre top CHECKED
Image > Canvas Resize 550 x 550
Centre CHECKED
Centre CHECKED
Resize tag
Select your Preset Shape Tool to Ellipse
Foreground - #000000
Background - null
Foreground - #000000
Background - null
Draw out an oval and shape to your liking
Select your Text Tool and font of choice
I am using 2Peas Tiger Tails
I am using 2Peas Tiger Tails
Choose a colour from your tag
I am using #1c120e
I am using #1c120e
On the curve type your text
Position to your liking
Position to your liking
In your Layer Palette open the Vector Layer
Turn off the Ellipse and convert to raster layer
Apply a Gradient glow and slight drop shadow
H & V - 1
Opacity - 20
Blur - 2.00
Colour - #000000
Opacity - 20
Blur - 2.00
Colour - #000000
Add a new raster layer
Selections > Select All
Paste DBA Paper22 into Selection
Deselect
Selections > Select All
Paste DBA Paper22 into Selection
Deselect
Layers > Arrange > Send to Bottom
Layers > New Mask Layer > From Image
Locate WSL_Mask84
OK
Layers > Merge > Merge Group
Lower opacity to around 30
Locate WSL_Mask84
OK
Layers > Merge > Merge Group
Lower opacity to around 30
Duplicate twice and rename layers to:
Sparkle1, Sparkle2 and Sparkle3
Sparkle1, Sparkle2 and Sparkle3
Hide Sparkle2 and Sparkle3 and activate Sparkle1
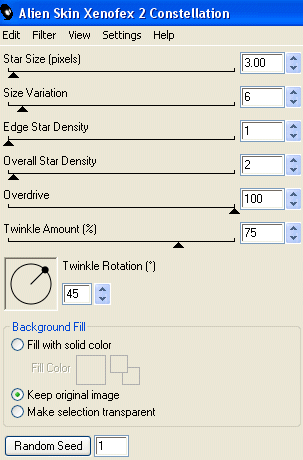
Effects > Plugins > Alien Skin Xenofex 2 > Constellation with the following settings:
Effects > Plugins > Alien Skin Xenofex 2 > Constellation with the following settings:
Hide Sparkle1 and activate Sparkle2
Repeat the Constellation effect, adjusting the Random Seed
Hide Sparkle2 and activate Sparkle3
Repeat the Constellation effect, adjusting the Random Seed
Repeat the Constellation effect, adjusting the Random Seed
Hide Sparkle2 and activate Sparkle3
Repeat the Constellation effect, adjusting the Random Seed
Select your Text Tool and font of choice
I chose Mayfair
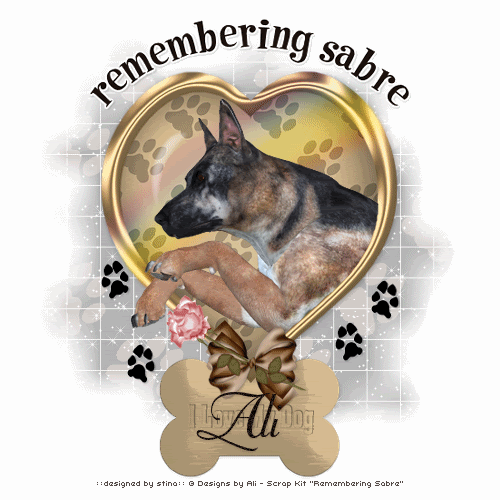
Type out your name and place in the Tag
Apply a slight drop shadow
I chose Mayfair
Type out your name and place in the Tag
Apply a slight drop shadow
Add your © copyright, licence and watermark
To animate, copy merged with each respective Mosaic layer into Animation Shop
Each new layer to PASTE AFTER CURRENT FRAME
Leave Frame Properties at 10
Each new layer to PASTE AFTER CURRENT FRAME
Leave Frame Properties at 10
Finally, save as a GIF and you're done!
Thank you for trying my tutorial!
::st!na::
Tag for Ali:
© Tutorial written by Stina on 13th April 2009
All rights reserved
All rights reserved
No comments:
Post a Comment