
Supplies
Scrap kit of choice - I am using "Exquisite Love" by Soxsational Scraps
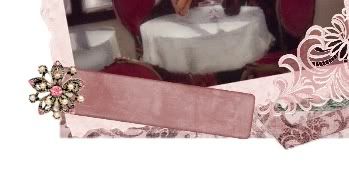
Image of choice or any of those I supplied
Template #38 by Missy which can found on her blog
Becky_Mask022 (supplied)
Font of choice - I am using BakerScript (pay font - not supplied)
Plugins: Xero Porcelain and Xero Radiance
My Supplies here
~ Step 1 ~
Open mask and minimise for later
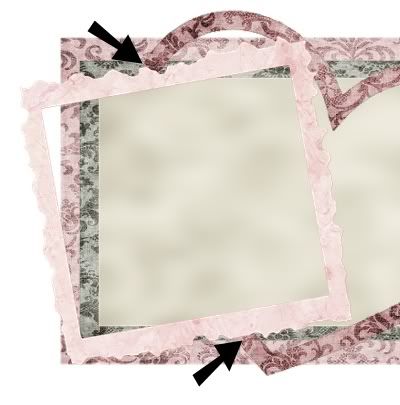
Open the Template and resize canvas to 620 wide x 550 high
Flood fill excess area white on Background layer
Delete copyright info
Flood fill excess area white on Background layer
Delete copyright info
Open Paper4
Edit / Copy
Edit / Copy
Activate Rectangle3
With your Magic Wand click the area inside the rectangle
Selections / Modify / Feather by 2
Edit / Paste into Selection
Deselect
With your Magic Wand click the area inside the rectangle
Selections / Modify / Feather by 2
Edit / Paste into Selection
Deselect
Open Paper6
Edit / Copy
Edit / Copy
Activate Rectangle1 and click inside it
Selections / Modify / Feather by 2
Edit / Paste into Selection
Deselect
Selections / Modify / Feather by 2
Edit / Paste into Selection
Deselect
Open Paper11
Adjust / Blur / Gaussian Blur
Radius – 20.00
Repeat
Edit / Copy
Adjust / Blur / Gaussian Blur
Radius – 20.00
Repeat
Edit / Copy
Activate Rectangle2 and click inside it
Selections / Modify / Feather by 2
Edit / Paste into Selection
Deselect
Selections / Modify / Feather by 2
Edit / Paste into Selection
Deselect
Apply a drop shadow to each layer:
H & V – 1
Opacity – 30
Blur – 8.00
H & V – 1
Opacity – 30
Blur – 8.00
Back to Paper4
Edit / Copy
Edit / Copy
Activate Heart and click inside it
Selections / Modify / Feather by 2
Edit / Paste into Selection
Deselect
Duplicate then set blend mode to Multiply
Layers / Merge / Merge Down
Selections / Modify / Feather by 2
Edit / Paste into Selection
Deselect
Duplicate then set blend mode to Multiply
Layers / Merge / Merge Down
Apply a drop shadow to this layer:
H & V – 1
Opacity – 20
Blur – 8.00
H & V – 1
Opacity – 20
Blur – 8.00
~ Step 2 ~
Paste Frame3 as new layer
Image / Rotate by 10 to the left
Resize by 65%
Position to the left between the two ends of the heart that "appear" to tuck behind top rectangle
Image / Rotate by 10 to the left
Resize by 65%
Position to the left between the two ends of the heart that "appear" to tuck behind top rectangle
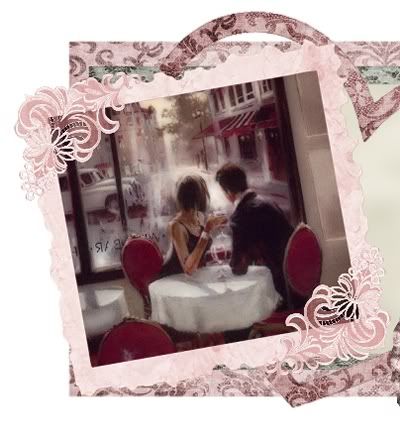
Open your image of choice and paste as new layer
Image / Rotate by 10 to the left
Resize if necessary and to your liking
(I resized the one I used by 70%)
Layers / Arrange / Move Down
Position beneath Frame
Image / Rotate by 10 to the left
Resize if necessary and to your liking
(I resized the one I used by 70%)
Layers / Arrange / Move Down
Position beneath Frame
With your Magic Wand click inside the Frame
Selections / Modify / Expand by 5
Selections / Invert
Delete and deselect
Selections / Modify / Expand by 5
Selections / Invert
Delete and deselect
Duplicate your image layer, then
Effects / Plugins / Xero / Porcelain with the following settings:
Effects / Plugins / Xero / Porcelain with the following settings:
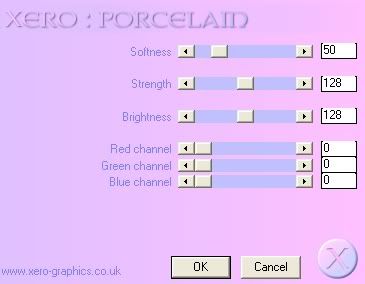
Then Effects / Plugins / Xero / Radiance with the following settings:

Lower the opacity of this layer to 90
Layers / Merge / Merge Group
Layers / Merge / Merge Group
Apply a drop shadow to Frame layer:
H & V – 1
Opacity – 30
Blur – 5.00
H & V – 1
Opacity – 30
Blur – 5.00
Paste Deco1 as new layer
Resize by 30% and position on the upper left corner of the Frame
Duplicate then Image / Mirror
Image / Flip
Then Position in lower right of Frame
Resize by 30% and position on the upper left corner of the Frame
Duplicate then Image / Mirror
Image / Flip
Then Position in lower right of Frame
Paste Tag4 as new layer
Image / Rotate by 10 to the right
Resize by 35%
Position in the lower left of the Frame
Image / Rotate by 10 to the right
Resize by 35%
Position in the lower left of the Frame
Paste Jewel1 as new layer
Resize by 35%
Position over the Floral part of the tag
Resize by 35%
Position over the Floral part of the tag
Using your Eraser carefully erase the bits of green you can see beneath the Jewel element
Apply a drop shadow to these layers:
H & V – 1
Opacity – 30
Blur – 5.00
H & V – 1
Opacity – 30
Blur – 5.00
Paste PostCard as new layer
Duplicate and hide layer
Duplicate and hide layer
On original layer
Resize by 50%
Adjust / Hue & Saturation / Colourise with the following settings:
Hue – 30
Saturation – 55
Position behind Frame and Image layer slightly protruding
Resize by 50%
Adjust / Hue & Saturation / Colourise with the following settings:
Hue – 30
Saturation – 55
Position behind Frame and Image layer slightly protruding
Go back to your Duplicate and turn the visibility back on
Image / Rotate by 10 to the right
Resize by 50%
Adjust / Hue & Saturation / Colourise with the following settings:
Hue – 15
Saturation – 20
Position behind Frame and Image layer and over first postcard slightly protruding
Image / Rotate by 10 to the right
Resize by 50%
Adjust / Hue & Saturation / Colourise with the following settings:
Hue – 15
Saturation – 20
Position behind Frame and Image layer and over first postcard slightly protruding
Apply a drop shadow to this layer:
H & V – 1
Opacity – 20
Blur – 5.00
H & V – 1
Opacity – 20
Blur – 5.00
Paste Fan3 as new layer
Resize by 50%
Position in lower right at the edge of the middle rectangle
Resize by 50%
Position in lower right at the edge of the middle rectangle
Paste Tulips as new layer
Resize by 50%
Position in lower left over the partial edge of the fan
Resize by 50%
Position in lower left over the partial edge of the fan
Apply a drop shadow to these layers:
H & V – 1
Opacity – 30
Blur – 5.00
H & V – 1
Opacity – 30
Blur – 5.00
~ Step 3 ~
Paste WordArt1 as new layer
Layers / Arrange / Bring to Top
Position at the top in the centre
Layers / Arrange / Bring to Top
Position at the top in the centre
Add new raster layer
Flood fill this layer with #520b1f
Flood fill this layer with #520b1f
Back to Word Art layer
Selections / Float
Selections / Defloat
Selections / Modify / Feather by 1
Selections / Invert
Activate Flood-filled layer and press delete
Deselect
Selections / Float
Selections / Defloat
Selections / Modify / Feather by 1
Selections / Invert
Activate Flood-filled layer and press delete
Deselect
Go to original WordArt layer and lower the opacity to 50
Activate top layer then
Layers / Merge / Merge Down
Activate top layer then
Layers / Merge / Merge Down
This layer will automatically lighten
Duplicate
Add a drop shadow to this layer:
H & V – 1
Opacity – 30
Blur – 5.00
Duplicate
Add a drop shadow to this layer:
H & V – 1
Opacity – 30
Blur – 5.00
Activate Background layer and paste Paper7 as new layer
Layers / New Mask Layer / From Image
Locate Becky_Mask022
Source luminance
OK
Layers / New Mask Layer / From Image
Locate Becky_Mask022
Source luminance
OK
Use your Pick (or Deformation) Tool to pull the nodes of the Mask layer to your liking

Select your Text Tool and choose your font
I am using BakerScript which is a pay font
I am using BakerScript which is a pay font
Set your Materials Palette with:
Foreground – null
Background - #520b1f
Foreground – null
Background - #520b1f
Type out your name (short names work best)
Image / Rotate by 10 to the right
Position over the Tag
Convert to raster layer
Image / Rotate by 10 to the right
Position over the Tag
Convert to raster layer
Add a slight drop shadow:
H & V – 1
Opacity – 30
Blur – 3.00
H & V – 1
Opacity – 30
Blur – 3.00
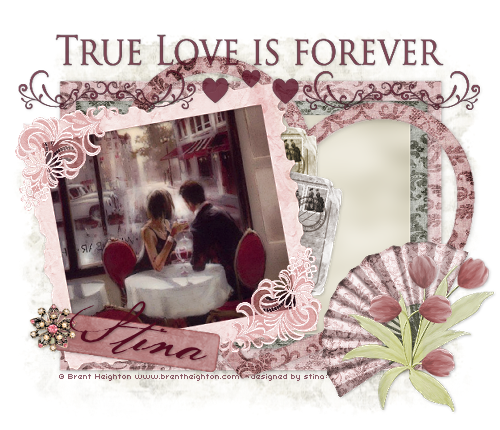
Finally add your © copyright (if you are using any of the images I supplied please provide credit back to
© Brent Heighton www.brentheigton.com), your watermark then save as a GIF or JPG and you're done!
Thanks for trying my tutorial
::st!na::
© Tutorial written by Stina on 5th March 2009
All rights reserved
Hi, your work es awesome and I like it very much. I take your blinkie to my blog site. Thanks so much for your tutos.
ReplyDeletehugs... Aisha