
Supplies
Scrap kit of choice - I am using the lovely "Heritage Love" kit by Creative Intentionz which is available from Exquisite Scraps and Paradise 4 Scrappers
Images of choice
CrossStitch (supplied)
CrossStitch (supplied)
Becky_Mask022 (supplied)
Fonts of choice - I used Celtic Garamond and Be Safe (supplied)
Plugin: Filters Unlimited Photo Aging Kit (supplied)
Plugin: Eye Candy 4000 Glass and Gradient Glow
My Supplies here
~ Step 1 ~
Open a new 600 x 400 blank canvas flood-filled white
Open Paper3 and minimise
Select your Preset Tool to Rounded Rectangle
Line Width - 10.00
Line Width - 10.00
In your Materials Palette set the following:
Foreground - Paper3
Background - null
Foreground - Paper3
Background - null
On the left draw out a rectangle
Convert to raster layer
Duplicate then Image / Mirror
Layers / Merge / Merge Down
Effects / Plugins / IC Net Software / Filters Unlimited
Select Photo Aging Kit / Cracked Paper with the following settings:
Select Photo Aging Kit / Cracked Paper with the following settings:
Apply an Inner Bevel with the following settings:
Effects / Plugins / Eye Candy 4000 / Glass with the following settings:
Open Paper11
Edit / Copy
On your working canvas select the area inside the left frame with your Magic Wand
Selections / Modify / Expand by 5
Add new raster layer
Edit / Paste into selection
Deselect
Layers / Arrange / Move Down
Selections / Modify / Expand by 5
Add new raster layer
Edit / Paste into selection
Deselect
Layers / Arrange / Move Down
Select inside the right frame
Selections / Modify / Expand by 5
Activate existing layer with paperfor left frame on
Edit / Paste into Selection (should still be in clipboard memory)
Deselect
Selections / Modify / Expand by 5
Activate existing layer with paperfor left frame on
Edit / Paste into Selection (should still be in clipboard memory)
Deselect
Open CrossStitch (supplied separately)
Edit / Copy
Paste as new layer on your canvas
Image / Rotate by 10 to the left
Resize by 35%
Place between the Frames
Duplicate four times
Space evenly down the centre joining the two frames
Edit / Copy
Paste as new layer on your canvas
Image / Rotate by 10 to the left
Resize by 35%
Place between the Frames
Duplicate four times
Space evenly down the centre joining the two frames
Hide your background, Frames and Frame background
Layers / Merge / Merge Visible
Unhide your layers
Layers / Merge / Merge Visible
Unhide your layers
You should now have something like this:
~ Step 2 ~
Paste PaperCurtain1 as new layer
Resize by 30%
Position along the top of the Frame
Layers / Arrange / Move
Repeat
Resize by 30%
Position along the top of the Frame
Layers / Arrange / Move
Repeat
Duplicate then Image / Mirror
Paste Organza1 as new layer
Resize by 25%
Position to the left
Resize by 25%
Position to the left
Paste Organza3 as new layer
Resize by 25%
Position to the left overlapping the first flower
Resize by 25%
Position to the left overlapping the first flower
Paste Organza5 as new layer
Resize by 25%
Position to the left overlapping both flowers
Resize by 25%
Position to the left overlapping both flowers
Now repeat on the other side with Flowers1, 3 and 5 but resizing them by 30%
Paste Draperies5 as new layer
Resize by 35%
Position to the left
Resize by 35%
Position to the left
Open your images or tubes of choice
Edit / Copy
Edit / Copy
Select the inside of your left frame
Selections / Modify / Expand by 5
Paste Image/Tube as new layer and resize if necessary
Position to your liking
Selections / Invert
Delete
Selections / Modify / Expand by 5
Paste Image/Tube as new layer and resize if necessary
Position to your liking
Selections / Invert
Delete
Repeat steps for other image in right Frame
Layers / Merge / Merge Down
Move these images below Paper Curtain layers beneath the Frame layer
Paste Wrap3 as new layer
Resize by 43%
Position to the edge of the right frame with the bow in the centre
Duplicate then Image / Mirror
Layers / Merge / Merge Down
Resize by 43%
Position to the edge of the right frame with the bow in the centre
Duplicate then Image / Mirror
Layers / Merge / Merge Down
Paste Wrap1 as new layer
Repeat step above
Repeat step above
Once Wrap1 is merged Resize by 85% Bicubic and position over Wrap3 (brown wrap)
You should have something like this:
Paste Bouganville2 as new layer
Resize by 30%
Place to the left beneath Bow Wraps
Resize by 30%
Place to the left beneath Bow Wraps
Now paste Bougainville5 as new layer
Resize by 30%
Place to the right above the first
Resize by 30%
Place to the right above the first
Layers / Merge / Merge Down
Layers / Arrange / Send to Bottom
Layers / Arrange / Send to Bottom
This should bring them to below the Frame layers
Apply drop shadows to your elements
~ Step 3 ~
Paste Paper3 as new layer
Layers / Arrange / Send to Bottom
Layers / Arrange / Send to Bottom
Layers / New Mask Layer / From Image
Locate Becky_Mask022
OK
Locate Becky_Mask022
OK
Resize by 95%
Apply Filters Unlimited Cracked Paper with default settings to Mask Layer
Select your Text Tool and font
Set your colour to something that matches your tag
Set your colour to something that matches your tag
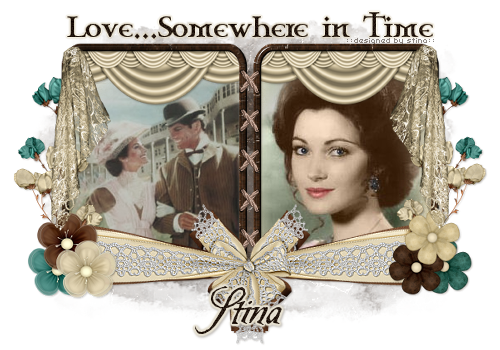
Type out words of your choice above the tag - what I chose related to the images from the movie I featured in mine
Convert to raster layer
Apply a Gradient Glow with the following settings:
Glow width - 3.00
Soft corners - 25
Opacity - 100
Setting - Thin
Colour - #c4b695
Apply a Gradient Glow with the following settings:
Glow width - 3.00
Soft corners - 25
Opacity - 100
Setting - Thin
Colour - #c4b695
Select a script font and type out your name
Objects / Align / Horizontal Centre in Canvas
Convert to raster layer
Objects / Align / Horizontal Centre in Canvas
Convert to raster layer
Apply a Gradient Glow with similar settings as above, changing the following:
Setting - Fat
Colour - #e6e0d0
Setting - Fat
Colour - #e6e0d0
Add a slight drop shadow
Finally, add your © copyright, licence and watermark
Save as a GIF or JPG and you're done!
Thank you for trying my tutorial
::st!na::
© Tutorial written by Stina on 12th March 2009
All rights reserved
No comments:
Post a Comment