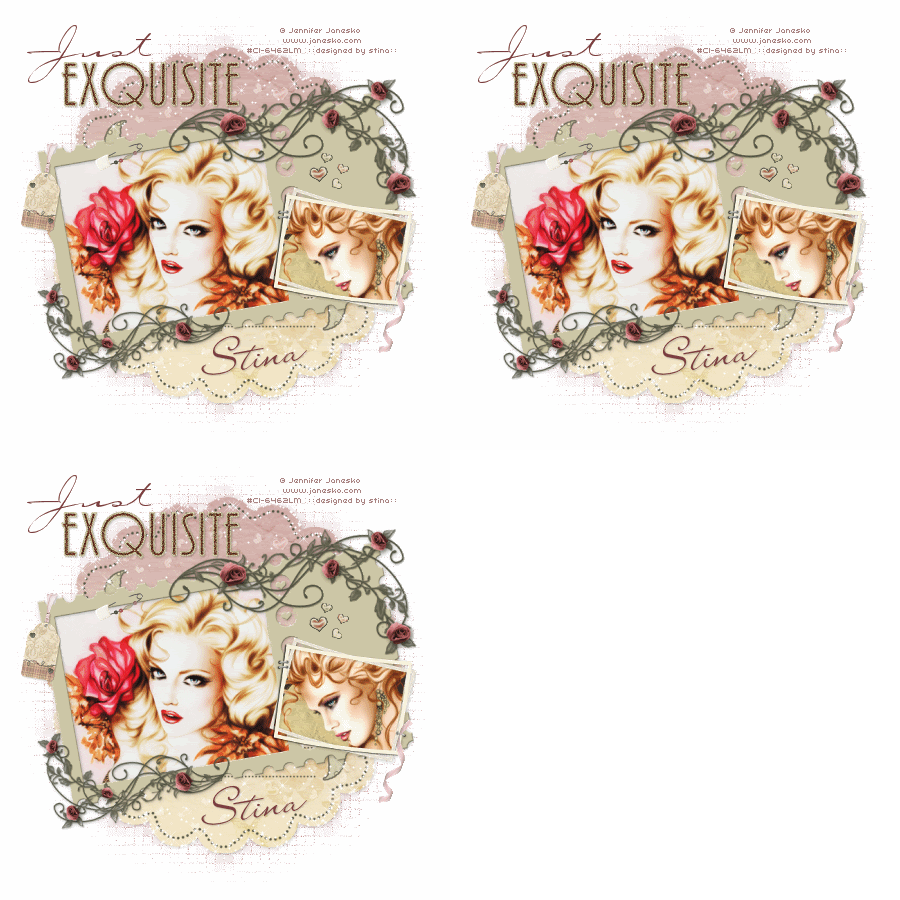
Supplies
"Exquisite Love" by Sam's Scraps available exclusively at her store
Images of choice - I used the lovely artwork of Jennifer Janesko which can be purchased from CILM
**PLEASE DO NOT USE HER ARTWORK WITHOUT THE APPROPRIATE LICENCE**
WSL_Mask133 by Chelle available from her blog
Fonts of choice - Carpenter Script and LainieDay
Plugin: Alien Skin Xenofex 2 Constellation
~ Step 1 ~
Open a new 600 x 600 blank canvas flood-filled white
Paste Journal Tag as new layer
Resize by 70%
Leave in position
Resize by 70%
Leave in position
Paste Frame1 as new layer
Resize by 35%
Image / Rotate by 10 to the left
Resize by 35%
Image / Rotate by 10 to the left
Paste your first image of choice as new layer
Image / Rotate by 10 to the left
Layers / Arrange / Move Down
Position beneath Frame to your liking
Resize if necessary
Image / Rotate by 10 to the left
Layers / Arrange / Move Down
Position beneath Frame to your liking
Resize if necessary
Draw around the outside of your Frame with your Freehand Tool
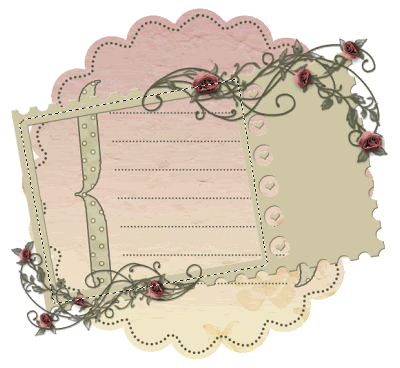
Selections / Invert
Delete
Deselect
Delete
Deselect
Add a drop shadow to the Frame
Paste Frame2 as new layer
Image / Rotate by 10 to the right
Resize by 11%
Position to the right of the first Frame as if it is stapled
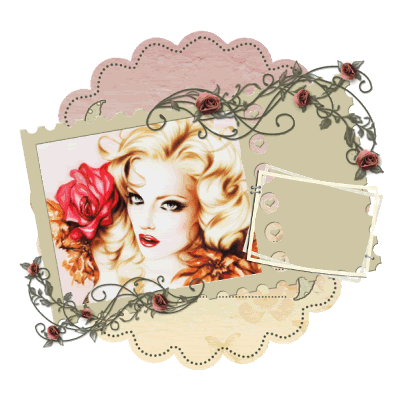
Paste your second image of choice as new layer
Image / Rotate by 10 to the right
Resize as necessary
Layers / Arrange / Move Down
Position below Frame
Image / Rotate by 10 to the right
Resize as necessary
Layers / Arrange / Move Down
Position below Frame
Click inside Frame with your Magic Wand
Selections / Modify / Expand by 3
Selections / Invert
Delete
Deselect
Selections / Modify / Expand by 3
Selections / Invert
Delete
Deselect
Add a drop shadow of choice
~ Step 2 ~
Paste Heart Border as new layer
Image / Rotate by 10 to the left
Resize by 10%
Position along the bottom of the Journal Tag
Image / Rotate by 10 to the left
Resize by 10%
Position along the bottom of the Journal Tag
Duplicate and move to the top
Erase any excess hearts from outside of the tag on both layers
Layers / Merge / Merge Down
Blend mode to Soft Light
Blend mode to Soft Light
Back to the HeartBorder
Using your Freehand Tool draw around various hearts
Paste them each as new layers
Resize by 10%
Position them above your second Frame
Using your Freehand Tool draw around various hearts
Paste them each as new layers
Resize by 10%
Position them above your second Frame
Once satisfied with their position
Layers / Merge / Merge Down on each till you have one layer (for the hearts)
Layers / Merge / Merge Down on each till you have one layer (for the hearts)
Set the Blend mode to Multiply
Duplicate and set the blend mode of this layer to Soft Light
Duplicate and set the blend mode of this layer to Soft Light
Paste Safety Pin With Beads as new layer
Image / Rotate by 30 to the left
Resize by 12%
Position anywhere to your liking
Use your Eraser Tool to carefully erase a small part of the pin to look as though it is "pinned" to the Frame
Image / Rotate by 30 to the left
Resize by 12%
Position anywhere to your liking
Use your Eraser Tool to carefully erase a small part of the pin to look as though it is "pinned" to the Frame
Paste Tag as new layer
Image / Rotate by 10 to the right
Resize by 8%
Position in upper left of first frame
Add a drop shadow of choice
Image / Rotate by 10 to the right
Resize by 8%
Position in upper left of first frame
Add a drop shadow of choice
Paste Ribbon1 as new layer
Image / Rotate by 40 to the left
Resize by 8%
Position over the staple in the lower left of second frame
Add a drop shadow of choice
Image / Rotate by 40 to the left
Resize by 8%
Position over the staple in the lower left of second frame
Add a drop shadow of choice

~ Step 3 ~
Add a new raster layer
Selections / Select All
Copy Paper1 then Paste into Selection
Deselect
Copy Paper1 then Paste into Selection
Deselect
Layers / Arrange / Move to Bottom
Layers / New Mask Layer / From Image
Locate WSL_Mask133
OK
Locate WSL_Mask133
OK
Layers / Merge / Merge Group
Image / Canvas Resize to 650 x 650 centred
Activate Mask Layer
Effects / Texture Effects / Mosiac - Antique with following settings:
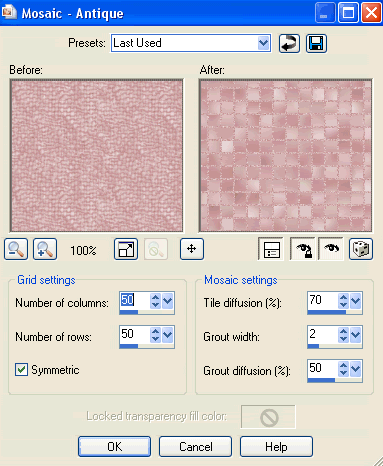
Open the WordArt and with your Selection Tool make a selection around the word "Exquisite"
Edit / Copy
Then paste as new layer
Resize by 15%
Position in the upper left
Edit / Copy
Then paste as new layer
Resize by 15%
Position in the upper left
Resize your tag (I resized mine to 450 x 450)
Select your Text Tool
Set your colour to one that matches your images - I chose mine from the roses on the Frame (#7d4141)
Set your colour to one that matches your images - I chose mine from the roses on the Frame (#7d4141)
Set your Foreground to null
And your Background to #7d4141 (or one of your choice)
And your Background to #7d4141 (or one of your choice)
In a script font type the word "Just" and place it above the word "Exquisite"
In the same colour choose another script font and type your name
Image / Rotate by 10 to the left
Apply a drop shadow and place at the bottom of the Journal Tag
Image / Rotate by 10 to the left
Apply a drop shadow and place at the bottom of the Journal Tag
Add your © copyright, licence and watermark
~ Step 4 ~
**This next step is if you wish to animate**
Activate your Journal Tag layer
Duplicate three times to give you a total of FOUR layers
Duplicate three times to give you a total of FOUR layers
Rename them from the bottom up:
Journal Tag (your original)
Journal Tag (your original)
Sparkle1
Sparkle2
Sparkle3
Hide Sparkle2 & 3
Give the Journal Tag layer a drop shadow:
H & V - 1
Opacity - 2-
Blur - 5.00
Colour - #000000
(this layer will remain visible at all times to give each of your animated layers the drop shadow)
Effects / Plugins / Alien Skin Xenofex 2 / Constellation with the following settings:
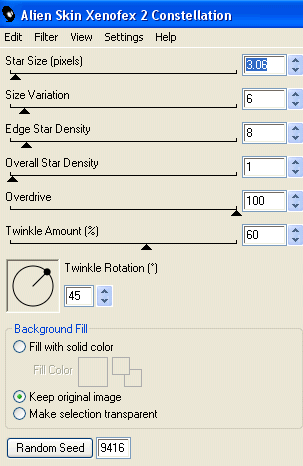
Repeat the Constellation effect on the other two layers changing the Random Seed each time
Deselect
Once again hide the top two layers (Sparkle2 & 3) leaving Sparkle1 visible
Edit / Copy Merged
Open Animation Shop
Edit / Paste as new animation
Edit / Paste as new animation
Back in PSP
Turn off visibility of Sparkle1 and turn on next layer Sparkle2
Edit / Copy Merged
Turn off visibility of Sparkle1 and turn on next layer Sparkle2
Edit / Copy Merged
In Animation Shop
Edit / Paste after Current Frame
Edit / Paste after Current Frame
Back in PSP
Turn off visibility of Sparkle2 and turn on last layer Sparkle3
Edit / Copy Merged
Turn off visibility of Sparkle2 and turn on last layer Sparkle3
Edit / Copy Merged
In Animation Shop
Edit / Paste after current frame
Edit / Paste after current frame
Select All frames
Go to Frame Properties and change to 20
Go to Frame Properties and change to 20
Finally save as a GIF and you're done!
Thank you for trying my tutorial
::st!na::
Here is a non-animated version:
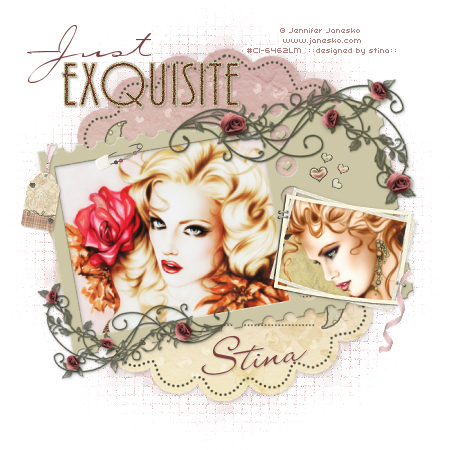
© Tutorial written by 10th March 2009
All rights reserved

Hey Stina can you change the store link on this to my store please http://digital-scrapbooking-sigtags.com/ & I will put the kit up tonight thankies hun miss you mwah
ReplyDelete