
Supplies
Scrap kit of choice - I am using Swheat Creations part of the "Share Love Live" charity collab for Nora of Coquettas Designz brother
which is available at Paradise 4 Scrappers for just $6.50!!
Tube of choice - I am using the artwork of Elias Chatzoudis which can be purchased from CILM
**PLEASE DO NOT USE HIS ARTWORK WITHOUT THE APPROPRIATE LICENCE**
WSL_Mask214 by Chelle available on her blog
Font of choice - I am using Cheri
Plugin: Xero Improver and Soft Mood
Plugin: Eye Candy 4000 Gradient Glow
~ Step 1 ~
Open a new 600 x 600 blank canvas flood-filled white
Paste Circle-Copy as new layer
Resize by 60%
Resize by 60%
Paste Tree1 as new layer
Resize by 60%
Layers / Arrange / Move Down
Position behind Circle so the hearts are showing in a "spray"
Resize by 60%
Layers / Arrange / Move Down
Position behind Circle so the hearts are showing in a "spray"

~ Step 2 ~
Paste Heart1 as new layer
Resize by 15%
Position in lower right
Paste Heart2 as new layer
Resize by 15%
Position in lower right over first heart
Resize by 15%
Position in lower right over first heart
Paste Bkg11 as new layer
Layers / Arrange / Send to Bottom
Layers / Arrange / Send to Bottom
Layers / New Mask Layer / From Image
Locate WSL_Mask214
OK
Resize by 90%
Move Mask layer so that it is centralised behind the circle layer
Locate WSL_Mask214
OK
Resize by 90%
Move Mask layer so that it is centralised behind the circle layer
Paste your tube as a new layer
Resize as necessary
Place in position
Resize as necessary
Place in position
Lower opacity so you can see what you are doing
Use your Freehand Tool to draw along the bottom of the "frame"
Use your Freehand Tool to draw along the bottom of the "frame"
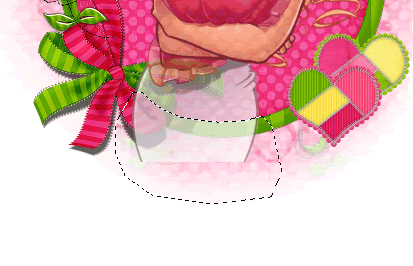
Selections / Modify / Contract by 5
Selections / Modify / Feather by 5
Press delete twice
Deselect
Effects / Plugins / Xero / Improver
Default settings
Duplicate
Effects / Plugins / Xero / Soft Mood
Default settings
Set blend mode to Screen
Lower opacity to 55
(the blend mode and opacity will depend on your tube)
Default settings
Duplicate
Effects / Plugins / Xero / Soft Mood
Default settings
Set blend mode to Screen
Lower opacity to 55
(the blend mode and opacity will depend on your tube)
Paste Bow1 as new layer
Image / Mirror, then Image / Flip
Image / Rotate by 42 to the right
Resize by 30%
Position over the bow in the lower left as close as possibly can to the original bow
Image / Mirror, then Image / Flip
Image / Rotate by 42 to the right
Resize by 30%
Position over the bow in the lower left as close as possibly can to the original bow
Grab your Magic Wand
Activate your tube layer and select the area around it
Activate your Circle Frame
Then delete and deselect
Activate your tube layer and select the area around it
Activate your Circle Frame
Then delete and deselect

Paste Flower2 as new layer
Resize by 20%
LEAVE IN POSITION
Paste Flower4 as new layer
Resize by 15%
Layers / Merge / Merge Down
LEAVE IN POSITION
Paste Flower3 as new layer
Resize by 10%
Layers / Merge / Merge Down
Resize by 20%
LEAVE IN POSITION
Paste Flower4 as new layer
Resize by 15%
Layers / Merge / Merge Down
LEAVE IN POSITION
Paste Flower3 as new layer
Resize by 10%
Layers / Merge / Merge Down
Duplicate
Place one Flower over the centre of the Bow
Place the other alongside the hearts
Duplicate and position this one
Place one Flower over the centre of the Bow
Place the other alongside the hearts
Duplicate and position this one
Paste Flower as new layer
Resize by 15%
Place behind one of the flowers beside the hearts
Resize by 15%
Place behind one of the flowers beside the hearts
Crop and resize
~ Step 3 ~
Select your Preset Shape Tool to Ellipse
Foreground - #000000
Background - null
Foreground - #000000
Background - null
Hold your Shift key and draw out a circle around your tag
Objects / Align / Centre in Canvas
Select your Text Tool with your font of choice (I am using Cheri)
Choose a colour from your tube
Choose a colour from your tube
Foreground - null
Background - #e92d70 (colour I am using)
Background - #e92d70 (colour I am using)
Type out your text of choice on the curve
Position to your liking
Position to your liking
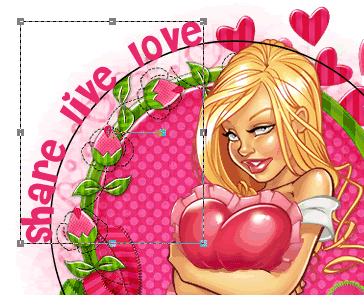
In your Layer Palette open the Vector Layer and hide the Ellipse
Convert to raster layer
Add some noise - 15
Effects / Plugins / Eye Candy 4000 / Gradient Glow with the following settings:
Glow width - 3.00
Soft corners - 25
Opacity - 100
Setting - Fat
Colour - White
Glow width - 3.00
Soft corners - 25
Opacity - 100
Setting - Fat
Colour - White
Apply a drop shadow:
H & V - 1
Opacity - 30
Blur - 3.00
Colour - #35190f
H & V - 1
Opacity - 30
Blur - 3.00
Colour - #35190f
Select your Text Tool again
Same colour and font
Objects / Align / Horizontal Centre in Canvas
Convert to raster layer
Apply the same effects as above
Same colour and font
Objects / Align / Horizontal Centre in Canvas
Convert to raster layer
Apply the same effects as above
Finally, add your © copyright, licence and watermark
Then save as a GIF or JPG and you're done!
Thank you for trying my tutorial!
::st!na::
© Tutorial written by Stina on 21st March 2009
All rights reserved

No comments:
Post a Comment