
Supplies
"Sea Life" scrap kit by Bel Vidotti Scraps which is a freebie available on her blog
Tube of choice - I am using the artwork of Suzanne Richards which can be purchased from CILM
**PLEASE DO NOT USE HER ARTWORK WITHOUT THE APPROPRIATE LICENCE**
WSL_Mask33 by Chelle (supplied)
Fonts of choice - Girls are Weird and GeeoHhmk (supplied
Plugin: Mura Meister Copies (supplied)
Plugin: Eye Candy 4000 Gradient Glow
My Supplies here
~ Step 1 ~
Open a new 600 x 600 blank canvas flood-filled white
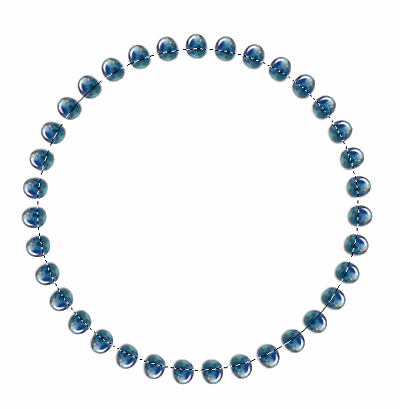
Paste FramePebble as new layer
Resize by 80%
Leave in position
Resize by 80%
Leave in position
Grab your Selection Tool and choose Circle
Now this is the part I always find fiddly *g*
Position your point in the centre of the canvas – you will see in your Status bar at the bottom the co-ordinates
You need to position your pointer at Y – 300 and X – 300
Now this is the part I always find fiddly *g*
Position your point in the centre of the canvas – you will see in your Status bar at the bottom the co-ordinates
You need to position your pointer at Y – 300 and X – 300

Then draw out your circle till it reaches the centre of the pebbles on the frame
Add new raster layer
Layers / Arrange / Move Down
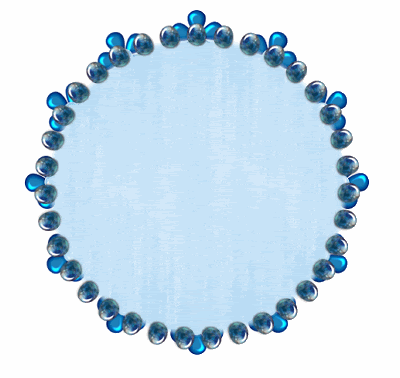
Open Paper06
Edit / Copy
Then Edit / Paste into Selection
KEEP SELECTED
Selections / Invert
Selections / Modify / Feather by 10
On the Paper layer press delete once or twice
Deselect
Layers / Arrange / Move Down
Open Paper06
Edit / Copy
Then Edit / Paste into Selection
KEEP SELECTED
Selections / Invert
Selections / Modify / Feather by 10
On the Paper layer press delete once or twice
Deselect
Paste Flower01 as new layer
Resize by 25%
Effects / Plugins / Mura Meister / Copies with the following settings:
Resize by 25%
Effects / Plugins / Mura Meister / Copies with the following settings:
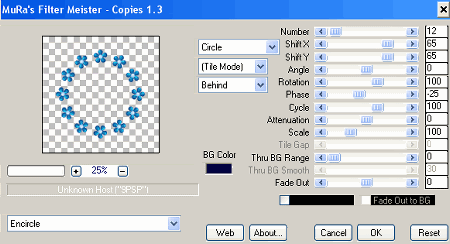
Layers / Arrange / Send to Bottom
You should now have something like this:
~ Step 2 ~
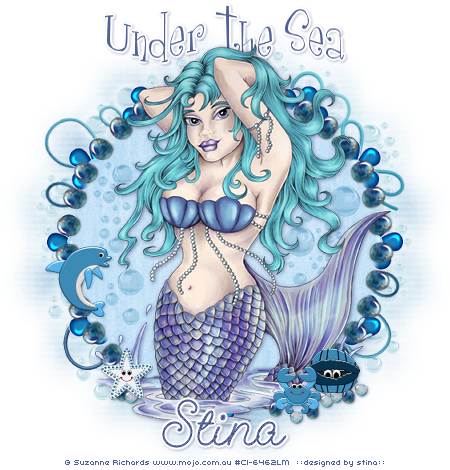
Paste your tube as new layer
Resize as necessary and position to your liking
Resize as necessary and position to your liking
Paste Bubbles03 as new layer
Place into position and set blend mode to Multiply
Place into position and set blend mode to Multiply
Paste Bubbles02 as new layer
Image / Mirror
Place into position
Set blend mode to Multiply
Image / Mirror
Place into position
Set blend mode to Multiply
Paste Dolphin as new layer
Resize by 20%
Place to the left to your liking
Resize by 20%
Place to the left to your liking
Paste Clam as new layer
Resize by 15%
Place to the lower right
Resize by 15%
Place to the lower right
Paste Crab as new layer
Resize by 15%
Place alongside Clam
Resize by 15%
Place alongside Clam
Paste Starfish as new layer
Resize by 12%
Position in the lower left
Resize by 12%
Position in the lower left
Paste Pebble01 and Pebble02 as new layers
Resize them by 15% and place them in various positions to your liking
Resize them by 15% and place them in various positions to your liking
~ Step 3 ~
Paste some bubbles around the frame
Once you are happy with their position merge each of them down till they are one layer then
Layers / Arrange / Send to Bottom
Duplicate
Once you are happy with their position merge each of them down till they are one layer then
Layers / Arrange / Send to Bottom
Duplicate
Activate Background layer
Paste Paper04 as new layer
Resize by 75%
Paste Paper04 as new layer
Resize by 75%
Layers / New Mask Layer / From Image
Locate WSL_Mask33
Source Luminance
OK
Locate WSL_Mask33
Source Luminance
OK
Layers / Merge / Merge Group
Add some drop shadows to your elements
Crop and resize
Select your Text tool, font and colour of choice to match your tube and kit
I chose #516097
I chose #516097
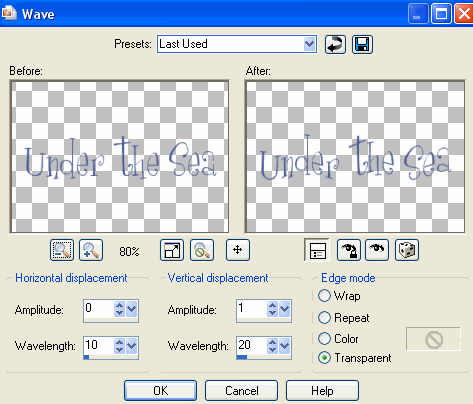
Type out "Under the Sea" or anything you like
Effects / Distortion Effects / Wave with the following settings:
Add a Gradient Glow and drop shadow:
H & V – 1
Opacity – 25
Blur – 2.00
Coloir - #000040
Choose another font for your name
Finally add your © copyright, licence and watermark
Then save as a GIF or JPG and you're done!
Finally add your © copyright, licence and watermark
Then save as a GIF or JPG and you're done!
Thanks for trying my tutorial
::st!na::
©Tutorial written by Stina on 8th March 2009
All rights reserved
No comments:
Post a Comment