
Supplies
Flower Preset Shapes
Satin Fill Patterns
Flower Frame by Yvette
Paper of choice
Fonts of choice - I am using Chick and Candy
Tube of choice - I am using the delightful artwork of Rion Vernon and PinUpToons
which can be purchased from CILM
**PLEASE DO NOT USE HIS ARTWORK WITHOUT THE APPROPRIATE LICENCE**
Plugin: DBX Linear Transmission
Plugin: Eye Candy 4000 Gradient Glow (optional)
My Supplies here
Level: Beginner Animation
Place the Patterns in your PSP Patterns Folder
and your Flower shapes into your PSP Preset Shapes Folder
The Linear Transmission file goes into your Plugins folder for PSP
~ Step 1 ~
Open a new 700 x 500 blank canvas flood-filled white
Paste Yvette Flower Frame as new layer
Resize by 50%
Resize by 50%
Using your Magic Wand select the inner light grey area of the frame
Selections / Modify / Feather by 2
Add new raster layer
Flood fill with one of the pattern colours provided
Deselect
Selections / Modify / Feather by 2
Add new raster layer
Flood fill with one of the pattern colours provided
Deselect

Activate Frame again
Selections / Float, then Selections / Defloat
Selections / Modify / Feather by 2
Paste a colourful paper of choice into selection
Deselect
Selections / Float, then Selections / Defloat
Selections / Modify / Feather by 2
Paste a colourful paper of choice into selection
Deselect
Add a drop shadow:
H & V - 1
Opacity - 30
Blur - 1.00
Colour - #000000
H & V - 1
Opacity - 30
Blur - 1.00
Colour - #000000
Select the inside of the frame
Selections / Modify / Expand by 10
Add a new raster layer
Flood fill with one of the pattern colours or colour of choice
Deselect
Selections / Modify / Expand by 10
Add a new raster layer
Flood fill with one of the pattern colours or colour of choice
Deselect

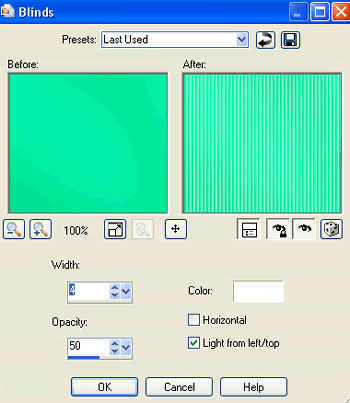
Effects / Texture Effects / Blinds with the following settings:
Select your Preset Shape Tool to Flower2
Use the Patterns provided, or your own colours if you wish, and draw out flowers of various sizes
Place them around your frame
Rename these flowers as Flower1, Flower2, Flower3....and so forth
Place them around your frame
Rename these flowers as Flower1, Flower2, Flower3....and so forth
Select Flower in your Preset Shapes Tool
Draw out various flowers within the Frame
Convert them each to raster layer
Hide your background
Edit / Copy Merged
Then Paste as new Image
Edit / Copy Merged
Then Paste as new Image
Minimise for later
Paste your tube
Resize if necessary and position to your liking
Resize if necessary and position to your liking
~ Step 2 ~
Select your Preset Shapes Tool to Ellipse
Foreground - #000000
Background - null
Draw out a circle around your tag
Foreground - #000000
Background - null
Draw out a circle around your tag
Image / Flip
Position Ellipse with an even space at the bottom
Position Ellipse with an even space at the bottom
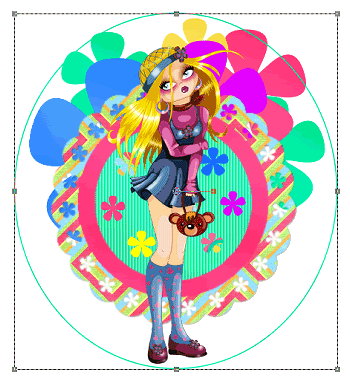
Select your Text Tool and font
Choose two bright colours (your own or use the patterns supplied) for your foreground and background
On the curve type out the words "Groovalicious"
Because we flipped the Ellipse our text will be inverted
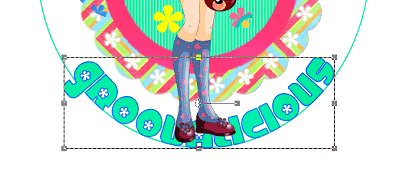
In your Layer Palette open the Vector Layer and turn off the visibility of the Ellipse
Convert to raster layer
Add some slight noise if you wish
Convert to raster layer
Add some slight noise if you wish
~ Step 3 ~
Now let's go back to the image we copied and minimised earlier
Activate your Background layer, then
Paste it as a new layer
Position it with your Mover Tool so that it sits directly behind and in-line with the Frame and flowers etc.
Paste it as a new layer
Position it with your Mover Tool so that it sits directly behind and in-line with the Frame and flowers etc.
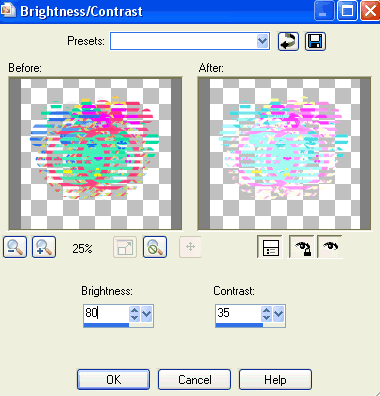
Effects / Plugins / DBX / Linear Transmission with the following settings:
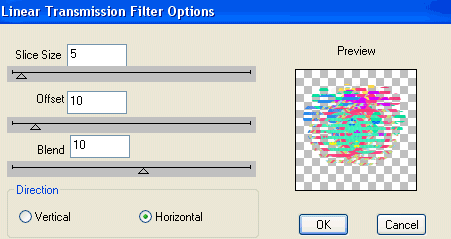
Repeat but change the Direction to Vertical
Then Adjust / Brightness & Contrast / Brightness/Contrast with the following settings:
Effects / Distortion Effects / Cirlicues with the following settings:
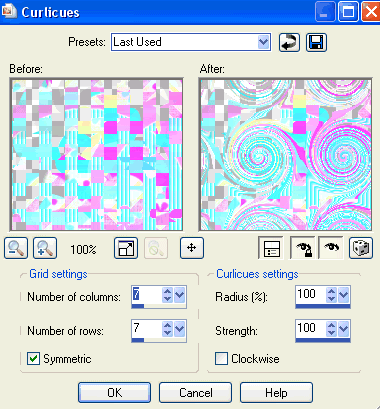
Resize by 80%
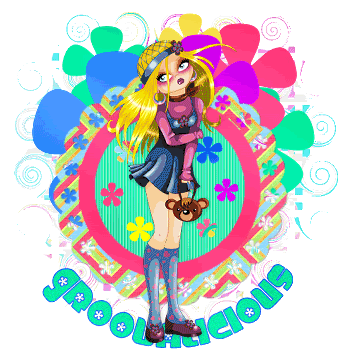
You should now have something like this:
Select your Text Tool, font and colour - something funky *g*
Type out your name
Add some noise - I added Noise of 15
Apply a Gradient Glow in white and a slight drop shadow
Add your © copyright, licence and watermark
~ Step 4 ~
Now comes the animation
This gets a little fiddly so be patient *g*
This gets a little fiddly so be patient *g*
Duplicate each of your Flower layers (1, 2, 3 etc) so you should have Copy of Flower1 etc of each one
Activate the Copy of Flower1
Adjust / Brightness & Contrast with the following settings:
Adjust / Brightness & Contrast with the following settings:
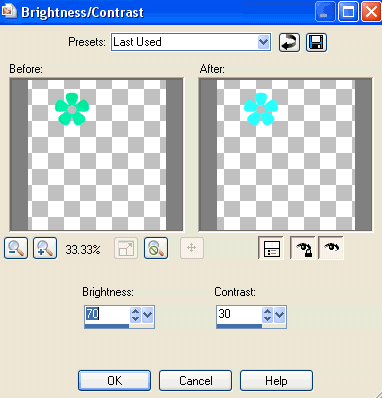
Repeat with all of the Copy of Flower layers
Now comes the tricky fiddly bit *g*
Hide ALL Copy of Flower layers except for one
Edit / Copy Merged
Edit / Copy Merged
Go to Animation Shop
Edit / Paste as New Animation
Edit / Paste as New Animation
Back to PSP
Hide the first Copy of layer and unhide another
Edit / Copy Merged
Hide the first Copy of layer and unhide another
Edit / Copy Merged
In Animation Shop
Edit / Paste after current Frame
Edit / Paste after current Frame
Back to PSP
Hide the copy of layer and unhide the next
Edit / Copy Merged
Hide the copy of layer and unhide the next
Edit / Copy Merged
In Animation Shop
Edit / Paste after current frame
Edit / Paste after current frame
Repeat the copy of each "copy of" layer, alternating them, and pasting them AFTER the current frame in Animation Shop
When you have finished copying you should have a total of the same amount of Frames as you do flowers in Animation Shop
That is, I have 6 flowers so I have 6 Frames
That is, I have 6 flowers so I have 6 Frames
In Animation Shop Select All frames
Animation / Frame Properties
Change the Properties to 20
Animation / Frame Properties
Change the Properties to 20
Finally, Save as a GIF and you're done!
Thank you for trying my tutorial
::st!na::
Another version of the tutorial:
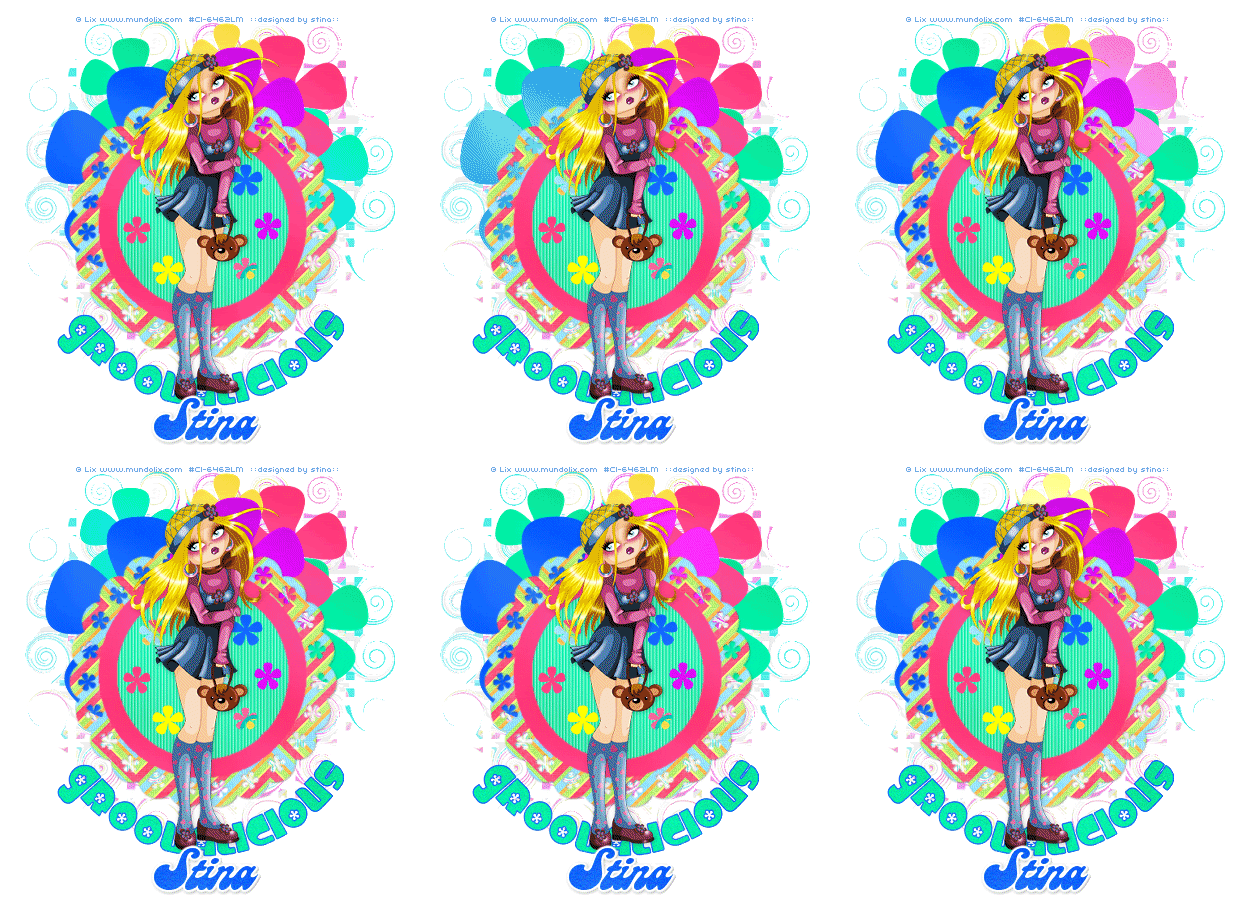
© Tutorial written by Stina on 13th March 2009
All rights reserved
All rights reserved

No comments:
Post a Comment